How to Clean a Harmonica
You have a harmonica and You want to know How to Clean a Harmonica ? Harmonica maintenance can be a delicate matter because of how fragile the inside of the instrument is. Follow these tips to successfully clean your harmonica.
Regular cleaning is essential with regards to many musical instruments. This also true for wind instruments, because the saliva left out can be detrimental.
Harmonica’s are no exception to the rule. The difficulty is many people don’t understand how to properly clean a harmonica. And without regular thoroughly cleaning, the reeds and combs may become caked with all sorts of nastiness. THIS CAN affect the ability for the reeds to sound the correct note, if any at all.
I’ve been playing harmonica as a hobby now for a couple decades. Regular, quick cleanings have helped keep my harp working like new.
Harmonicas that haven’t been routinely maintained might need a more thorough clethening. That’s what we’ll be concentrating on here. In the case below I have two diatonic Hohner’s which have been played by toddlers for nearly 2 yrs and need some serious TLC!
How to Clean a Harmonica
[toc]
How to clean a harmonica without taking it apart?
Before getting into deep cleaning, there’s one preventative step to take to really keep your instrument in great shape: avoid eating before playing! And if you do eat first, rinse the mouth area out thoroughly, or better still, brush your teeth.
This simple step will keep your harmonica from ever being too much of a hassle to clean. Your harp will stay much cleaner simply by keeping your mouth clean before playing.
Limiting the amount of moisture left in your harmonica after playing is another important and easy solution to keep it clean. Every time you finish playing the harmonica give it a good tap with the holes against your hand to knock out just as much saliva out as possible.
If you have a plastic, metal or sealed harmonica, you can even run it under lukewarm water after each use. But be sure to tap the water out to dry it whenever you can when following this method. Moisture is our enemy in this example.
Supplies you’ll need for cleaning a harmonica
Below is a list of some supplies that will help you give your harmonica a deep clean:

- A clean towel
- Proper screwdriver
- A bowl or pan to soak the reed plates
- Lemon juice or vinegar for soaking
- Baking soda (optional)
- A soft toothbrush or makeup brush
- Dental tools (nothing to sharp)
- Isopropyl (rubbing) alcohol/alcohol spray
There are also harmonica cleaning kits available with nice spatula-like blades to greatly help clean under the reeds. But you’ll generally be fine with just a toothbrush and a soaking. If you’re missing a number of the supplies above, you can still give your harmonica a good deep thoroughly clean with a light acidic cleaner and a soft brush.
I like to use a dull dental tool to help remove any tough chunks (on the rare occasions I find them). But to be clear, this can ruin a reed and damage the wood comb. Even flat spatula blades can perform damage to your harmonica with an excessive amount of force.
Give your harmonica a deep cleaning in 7 steps
Depending on how often you play, your harp might need a deep cleaning every three to six months. I’d also suggest a heavy cleaning before playing any used harmonica you may buy.
The deep cleaning method below works for diatonic, octave and tremolo harmonicas. We won’t address chromatic harmonicas for now, as those are less common and involve more steps.
Expect cleaning a harmonica to take at least one hour from disassembling, soaking, cleaning, drying and reassembling.
1. Disassemble the harmonica
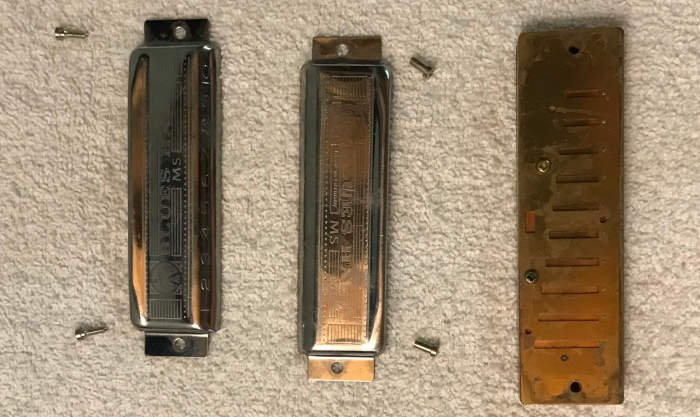
I have two diatonic Hohner Blues Harp harmonicas (C and G) my children have manhandled and need cleaning. Although it may take less time to clean them together, I’ll be cleaning them separately to avoid potentially switching parts by mistake. We don’t need a C harmonica with G reeds!
Pick one harp and start to take it apart. Often the screws on the top and bottom interlock with one another. So as you unscrew the top, the bottom will come out at the same time. Be sure to keep track of which screws belong where.
Now remove the reed plate screws and set them aside so you know the exact order to replace them in. As I take the harmonica apart, I keep the parts in a strict order, and I take pictures. This process can help you avoid confusion later when it’s time to reassemble your harmonica.
2. Soak the reed plates
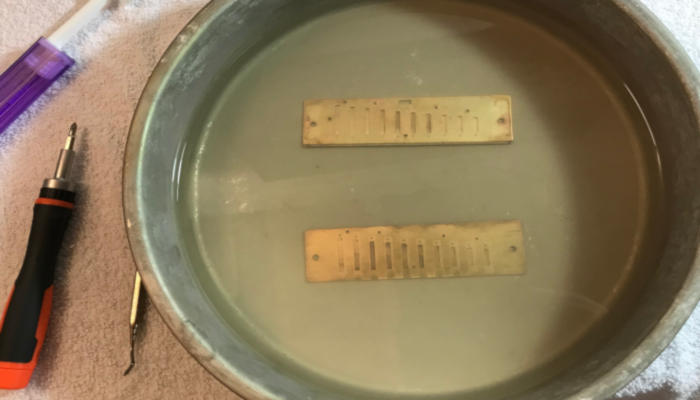
Soaking the reed plates in a lightly acidic solution for 15-30 mwithinutes helps loosen and split up any grime left on them from prolonged use. You need a light acidic solution that will do most of the cleaning, sufficient to interact with any kind of stray particles.
Here I’ll work with a slightly stronger solution of lemon juice and tepid to warm water because of the harsher treatment these harmonicas have seen. But vinegar will continue to work just as well.
Soaking in a stronger mixture is generthelly unnecessary. Cleaning your harmonica is all about using common sense and being careful. Allow vinegar or lemon juice do the majority of the cleaning for the fragile reeds.
3. Clean the cover plates
While the reed plates are soaking, clean the cover plates with rubbing alcohol or really any common instrument thoroughly cleaner. The famous Formula 65 for guitars also cleans a harmonica cover plate beautifully.
Wipe the cover plates, inside and out, with a nice clean cloth. Take care never to bend the plates, which is a possibility with cheaper harmonicas. You may also desire to clean the protect plate screws with alcohol. Just be sure to keep track of where each screw belongs.
4. Clean the comb
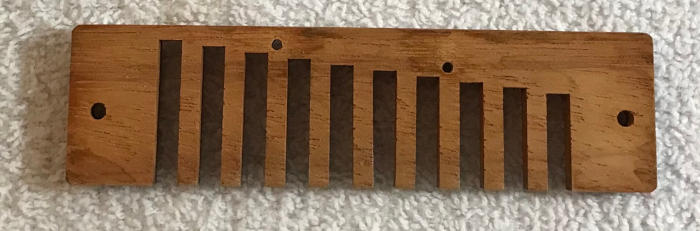
If you have a metal or plastic comb, you can simply wash it under lukewarm water with a little soap and work with a soft brush to clean it. While a gentle scrub with a dry, soft toothbrush is often enough for cleaning wooden combs.
Any appearance of mold or serious discoloration on a wooden comb is normally caused by excess moisture remaining after playing. Playing a moldy harmonica could make you sick, and replacing the comb is frequently wise in such cases.
Some harmonicists advocate applying a little bit of sesame oil on wooden combs after cleaning. Sesame essential oil is known to have antifungal and antibacterial properties, and also providing a moisture barrier. These factors help keep the comb clean and mold-free.
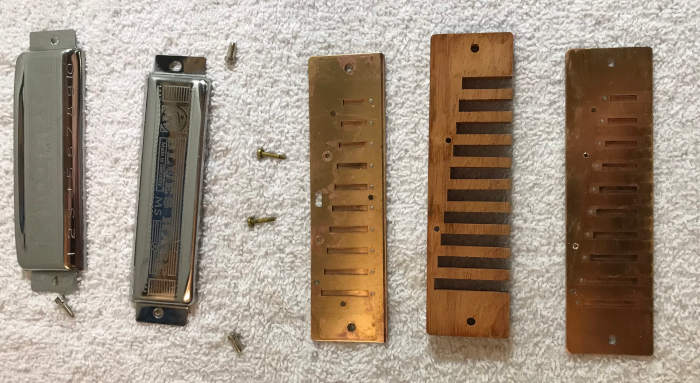
5. Clean the reed plates
After soaking the reed plates, it’s time to clean them with the brush. Several vital points to keep in mind listed below are:
- Be gentle. Use the slightest pressure to brush the reed plates.
- Brush down the reeds. Never brush across.
- Avoid bending the reed plates. Even damaging one reed can make your harp pretty much unplayable. And you have to learn how to repair along with cleaning!
To help remove any persistent grime on reed plates, you can also scrub with a bit of baking soda. Limit your baking soda scrub to 30 secuponds roughly, to avoid damaging the final on the reed plates. Then immediately rinse under lukewarm water while lightly brushing downward on the reeds.
Let the chemistry do most of the cleaning. Any difficulty here can be a sign that you haven’t taken enough care to regularly clean your harmonica after play. Even my 10-year-old harmonica that is used by children isn’t too dirty because easy steps were always taken up to keep it dry and free from particles.
6. Leave the harmonica parts to dry
Remember that moisture isn’t our friend here. And the very last thing we want to do is put the harmonica back together while damp.
Spread the parts of your harmonica from a clean towel to air dry. The components will typically need 20 minutes to one hour to completely dry, based on surrounding humidity.
You may be tempted to dry the parts with a towel by hand. But doing so can leave behind tiny towel fibers, which can result in your mouth later during play. If you’re the impatient type, easier to use canned air-usually CO2- to dried out the parts faster.
7. Reassemble the harmonica
Reassembling your harmonica ought to be a breeze if you’ve kept tabs on all the parts.
Take one last look at your reeds to make sure they’re dry and have nothing stuck inside them. Then place them back into the comb. Insert the screws in reverse order and avoid overtightening. Ensure everything looks good and put the cover plines on.
You can use a tuner or perhaps a tuning app on your smartphone and check each hole to be sure everything is working fine. Find the right notes for your harmonica key and make certain each blow and draw match with the corresponding notes.
Conclusion
When you take a harmonica apart you’ll realize just what a simple instrument it really is. There’s no reason to not get good care of it. If you neglect to maintain it, your harmonica can end up being unplayable. And any repairs necessary will most likely cost more than the instrument will probably be worth!
Each time you play your harp make sure to have a clean mouth. When finished tap out any moisture and every now and again give your harmonica a deep clean. In the event that you follow those basic steps, your harmonica can last you for several years!