The easiest way to play harmonica for everyone

You’re learning how to play the harmonica, right? But you don’t know where to start. It leaves you with a lot of surprises, even though you know that a harmonica can be easily carried around, easily sets the mood, and it makes you happier.

Ok, it’s not as hard as you think! Today we will synthesize the most basic knowledge to help you play the harmonica in the easiest way.

If you’ve finished reading this everyone’s harmonica guide, and you still can’t play, I’m pretty sure you don’t want to play.

The easiest way to play harmonica

[toc]

Things to prepare to play harmonica

Choose Harmonica - The easiest way to play harmonica for everyone

Choose a harmonica.

There are many different types of harmonica available for purchase, which vary in use and price. For now, purchase either a diatonic or a chromatic harmonica. Either type can be used to play most popular music, such as blues or folk.

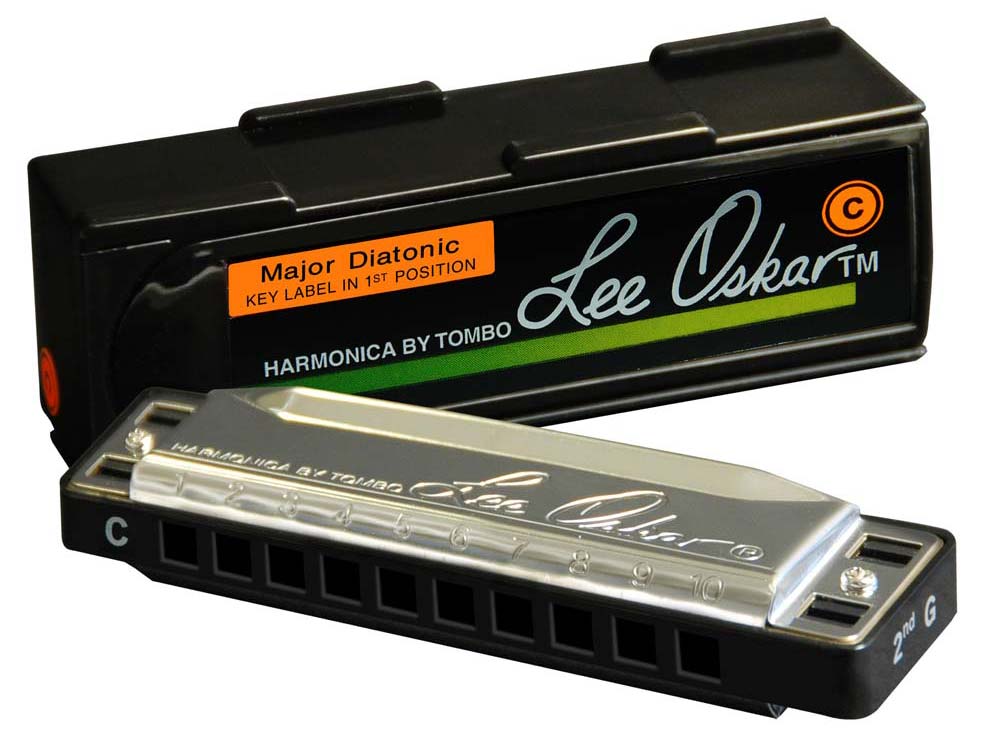
  • The diatonic harmonica is arguably the most common type available, and certainly the cheapest. It’s tuned to a specific key, which can’t be changed. Most diatonic harmonicas are tuned to the key of C. Types of diatonic harmonica include the “blues harmonica,” the “tremolo harmonica,” and the “octave harmonica.”

    • In the western world, the blues harmonica is common; in east Asia, the tremolo harmonica is seen more often.

  • The chromatic harmonica is a type of harmonica that uses a mechanical apparatus to control which holes make noise. Basic chromatic harmonicas with 10 notes can only play one full key (the same as a diatonic harmonica), but chromatics with 12-16 holes can be tuned to any key. Chromatics are considerably more expensive than most diatonic harmonicas; a quality chromatic from a reputable brand can cost several hundred dollars.

    • Because of their flexibility, 12-plus-note chromatic harmonicas are generally preferred for jazz music.

  • A common shorthand term for the harmonica is the “harp.” This comes from its other traditional names, including “French harp” and “blues harp.” It’s also known as a “mouth organ”.
The easiest way to play harmonica for everyone

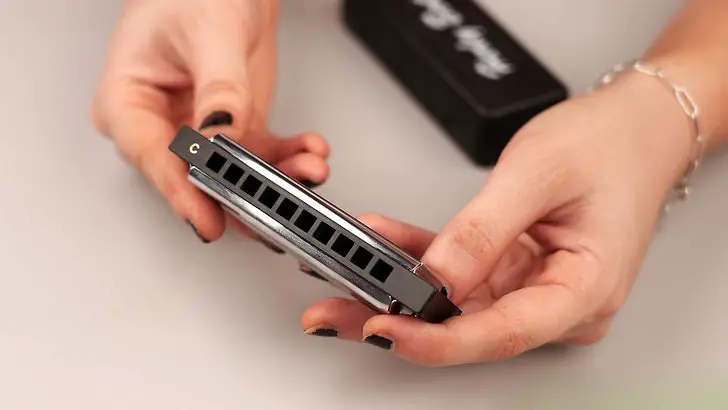
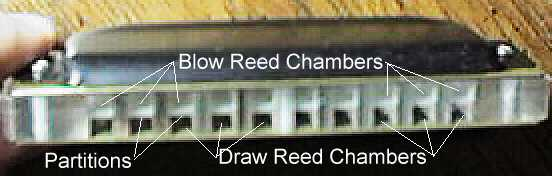
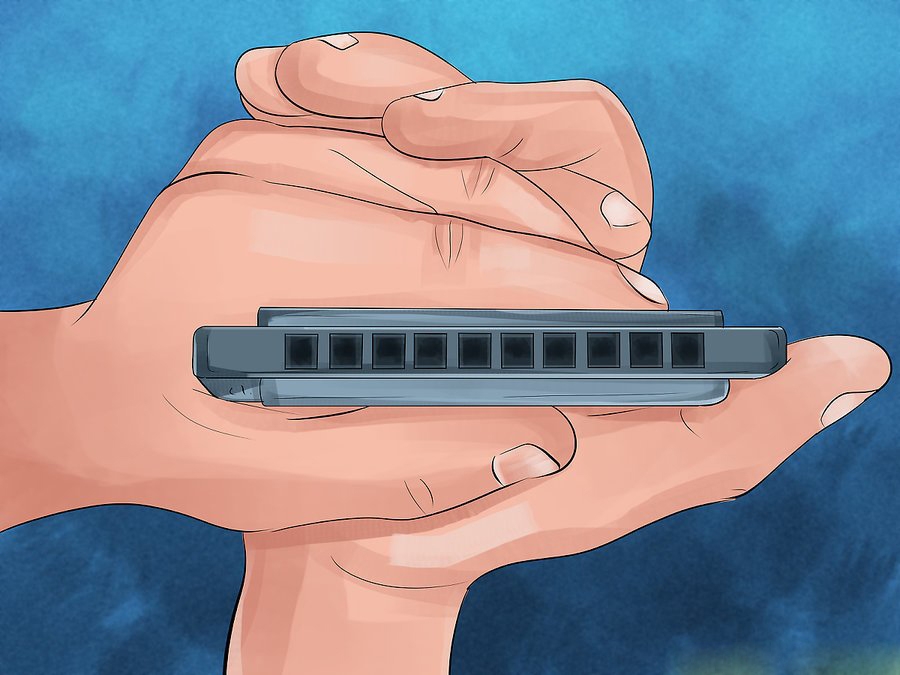
Learn about your harmonica.

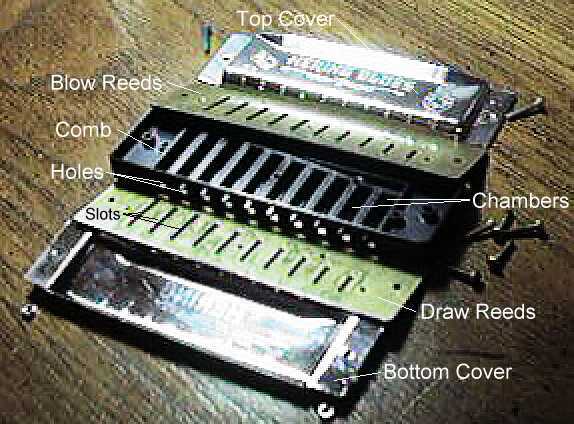
The harmonica is a reed instrument that uses brass reeds. The reeds are what split the air you push or pull through the holes to create tones. Reeds are mounted on a plate, sensibly called the reed plate, which is also usually made of brass. The part of the harmonica that the reed plate is mounted to is called the comb, and is typically made of plastic or metal. The mouthpiece of the harp may be integrated into the comb, or in chromatic harmonicas, screwed on separately. The cover plates cover the rest of the apparatus, and can be made of wood, metal, or plastic.

  • A chromatic harp’s sliding bar is also usually made of metal.
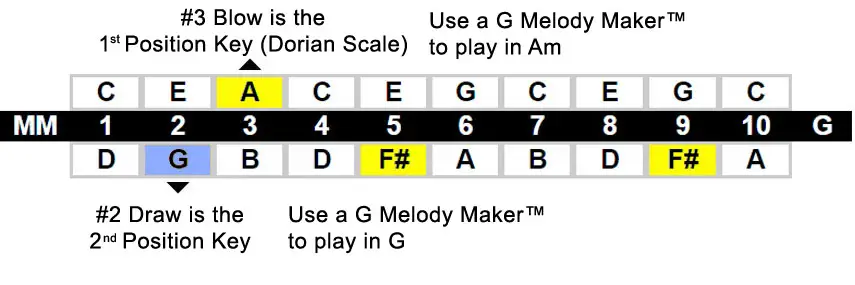
  • Depending on whether you inhale or exhale through your harp, different notes are produced by the reeds. A typical diatonic harp tuned to C on the exhale is tuned to G on the inhale. These scales complement each other nicely, each filling in the other without having to add extra holes.
  • The reeds inside your harmonica are delicate and will wear out over time. Gentle playing and regular care are required to maintain a good tone as long as possible.

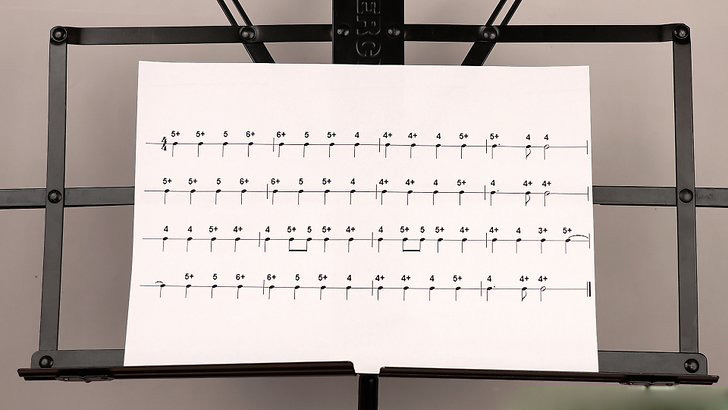
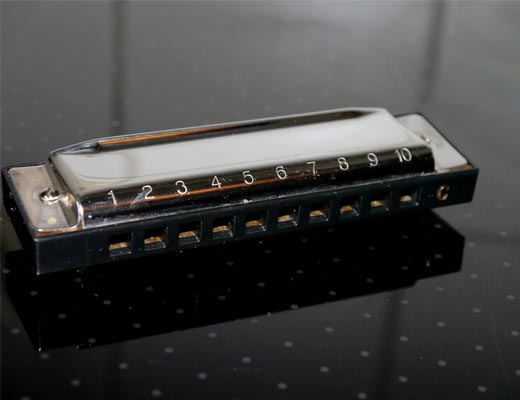
Learn to read harmonica tablature.

Like guitars, harmonicas can be played by following tablature, which reduces the notes on a sheet of music down to an easy-to-follow system of holes and breath patterns. Tablature is useful for larger chromatic harmonicas as well, but it differs somewhat from diatonic tablature, and is less common.

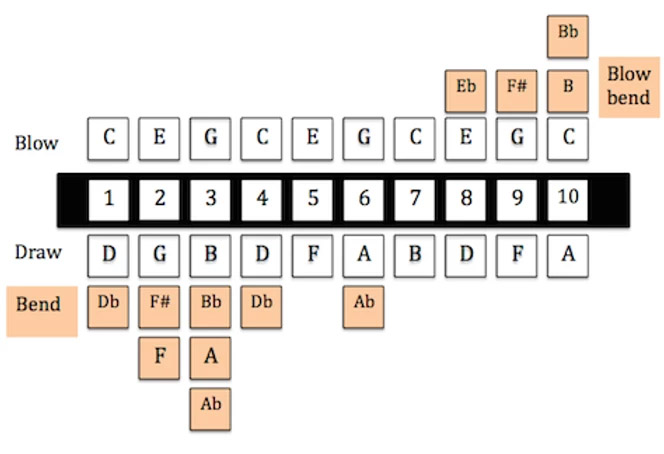
  • Breathing is marked by arrows. An up arrow indicates a breath out; a down arrow indicates a breath in.

    • Most holes on a diatonic harmonica produce two “neighbor” notes on a given scale; thus playing C and then D on the same scale is accomplished by blowing into the appropriate hole, and then drawing in from the same hole.

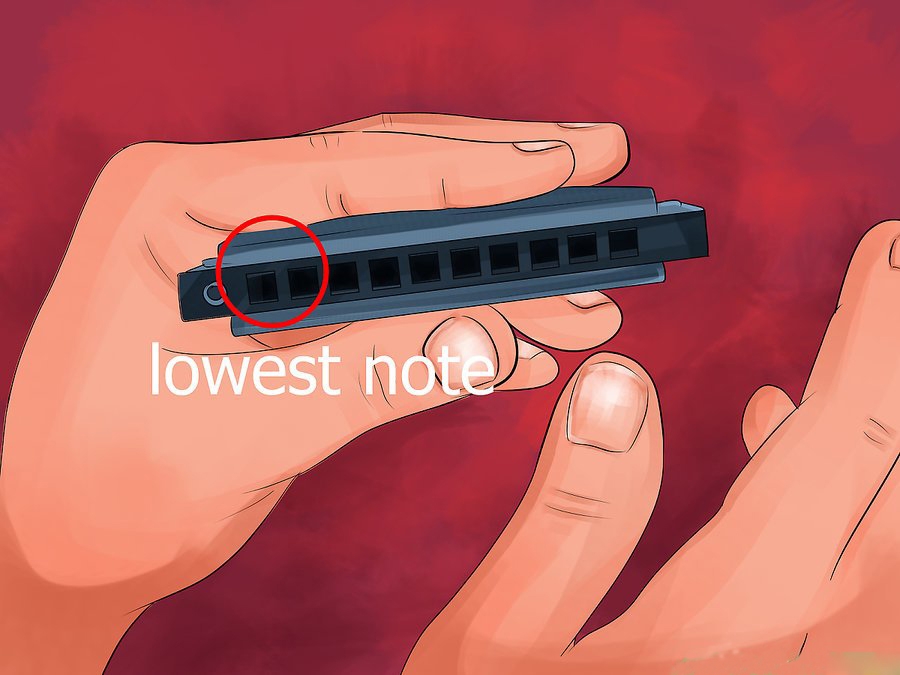
  • Holes are marked with a number, starting from the lowest (left-hand) tone and moving upward. Thus, the lowest two notes are (up) 1 and (down) 1. On a 10-hole harp, the highest note would be (down) 10.

    • Some notes on a regular 10-hole harmonica overlap, notably (down) 2 and (up) 3. This is necessary to allow proper range for playing scales.

  • More advanced techniques are marked with slashes or another small mark. Diagonal slashes through the arrows indicate that note bending (covered later) is required to get the proper tone. Chevrons or slashes on chromatic tablature can also indicate whether or not to hold the button in.

    • There isn’t a standardized system of tablature that’s used by all harmonica players. However, once you practice and get comfortable reading one type, most other types will make sense to you quickly.

  • You can read How to read harmonica tabs to understand more.

Basic Harmonica Technique

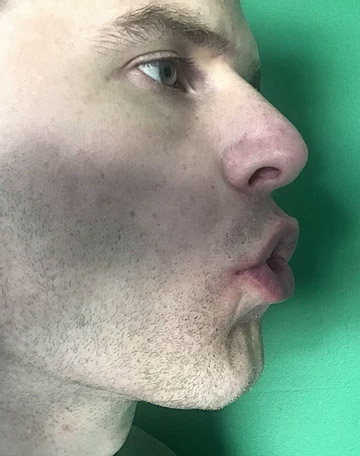
Breathe in with your belly.

Breath control is very important when playing the harmonica, and it’s important to practice your technique beforehand. To try breathing in with your belly, lie flat on the ground and put your hand on your stomach. Take a deep breath in and feel your stomach rise up, but don’t let your chest move. Then, slowly push your breath back out.

  • Belly breathing gives you more control over your breath, and it also lets you take more air in.

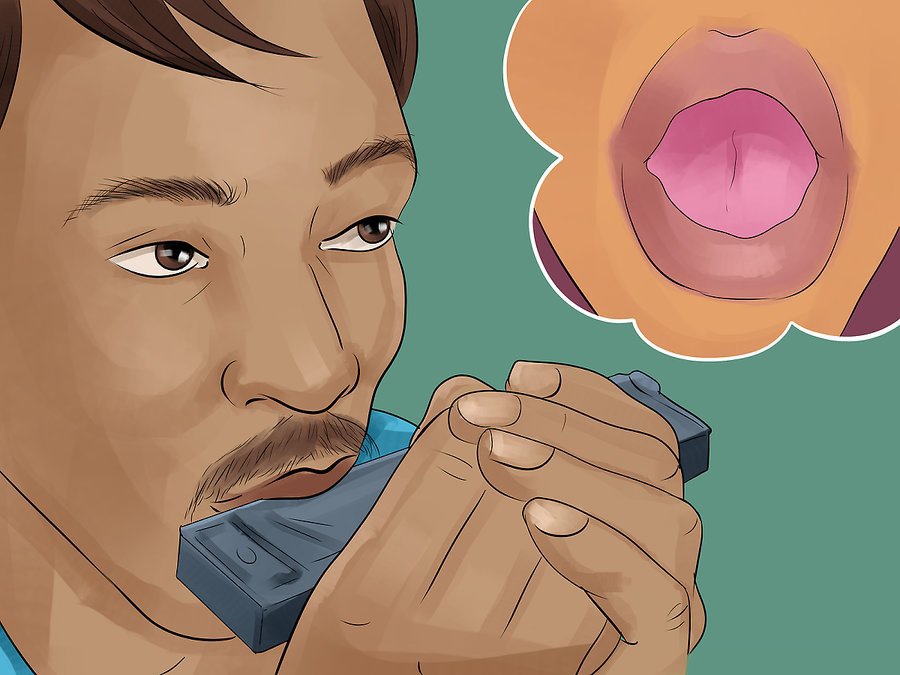
Make a note by blowing.

The very first thing to practice with your new instrument is making a note. Pick a hole or a set of holes on the mouthpiece and blow gently into them. Neighboring holes are typically designed to harmonize with each other automatically, so try blowing into three holes at once to make a pleasing sound. Practice switching between only playing one hole, and playing chords on multiple holes.

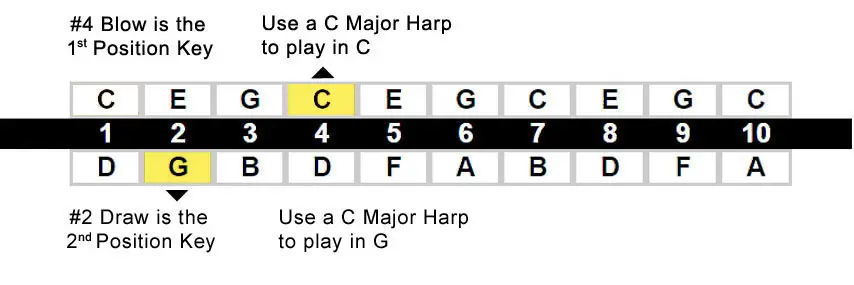
  • This type of playing is called “straight-harp” or “first position.”
  • As you might suspect, the number of holes you blow through is partly controlled by your lips. To allow greater control over the notes you play, you’ll eventually learn to use the blade of your tongue to block holes as well. This is covered later.
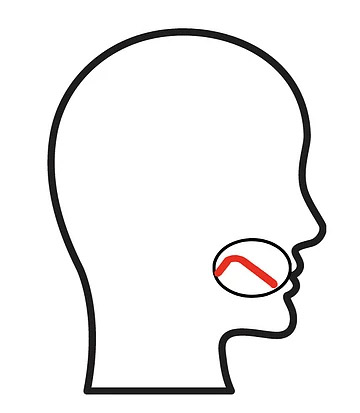
  • Try not to allow any air to escape through your nose. Push it all out through your mouth to get a full note.

Draw in a breath to change notes.

Remembering to pull air across the reeds gently, breathe in to bring each note up a step. By breathing in and out through the mouthpiece, you can gain access to all the notes your harp is tuned for.

  • This type of playing is called “cross-harp” or “second position.” Cross-harp notes are often well-suited to blues riffs.
  • If you have a chromatic harmonica, practice pushing and holding the slide button to further control the notes you produce.
  • To make breathing out easier, try saying “hah!” Push the air out forcefully with your diaphragm to get a full note.

Try playing a scale.

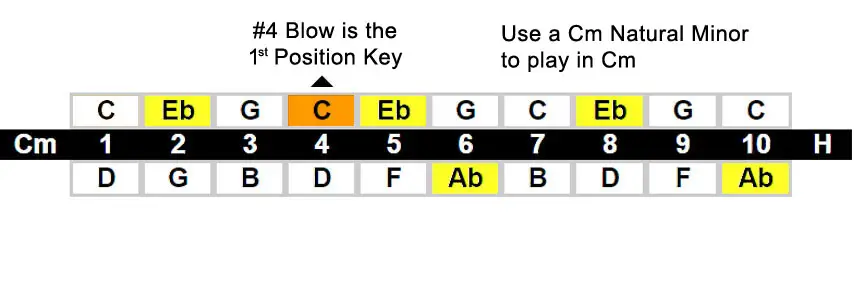
On a C-tuned diatonic harmonica, the C scale starts with (up) 4 and climbs to (up) 7. The standard out, in pattern is repeated except for on the 7th hole, where it is switched (draw in first, then out). This scale is the only complete scale on a C-tuned harp, but you can sometimes play songs on other scales, provided they don’t require the missing note(s) of the scale.

Practice.

Keep practicing playing scales and individual notes until you’re comfortable with playing just one note at a time. Once you can exert that level of control over your instrument, pick out some simple songs and practice them as well. Tablature for songs like “Mary Had a Little Lamb” and “Oh, Susanna” is easy to find online, if you get stuck.

  • Try adding texture by playing multiple notes at once. The next step in your practice is to slightly relax your control and add two-note and three-note chords to the songs you practice by playing two or three adjacent holes at once. This will help you develop more control over your mouth and your breathing, and make the songs more interesting to listen to.

    • Don’t play everything in chords! Try adding a chord at the end of a verse or phrase. The important thing is to get comfortable switching between single notes and multiple notes.

Advanced Techniques

Pay for lessons.

From this point on, though you can certainly continue to teach yourself, you’ll see faster and more technically sound results if you practice under the tutelage of an experienced player. Harmonica lessons vary in price and frequency; feel free to try a few lessons from a teacher and then move on until you find one who fits your needs.

  • Even as you take lessons, continue to rely on guides and books to help augment your playing. There’s no reason to drop all your other material just because you’re supplementing it with professional lessons.

Skip holes. 

It’s easy to fall into a pattern of constantly forcing air in and out through your harp, but as you begin to play more advanced songs, you’ll need to practice skipping over some holes to reach others. Play songs with notes that require you to jump a hole or two, such as the American traditional tune, “Shenandoah,” which has a jump from the 4th to the 6th hole near the end of the second phrase (on a standard C diatonic).

  • Practice skipping by pulling the harmonica slightly away and then returning it to the appropriate position (to further your familiarity with the position of each hole) and by stopping your airflow without removing the harmonica (to give you more practice with breath control).

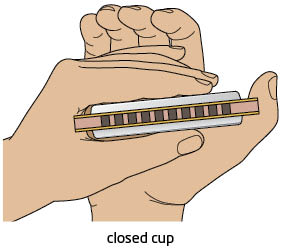
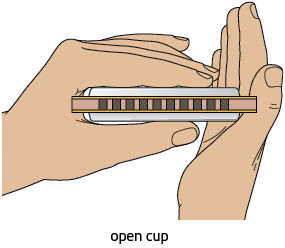
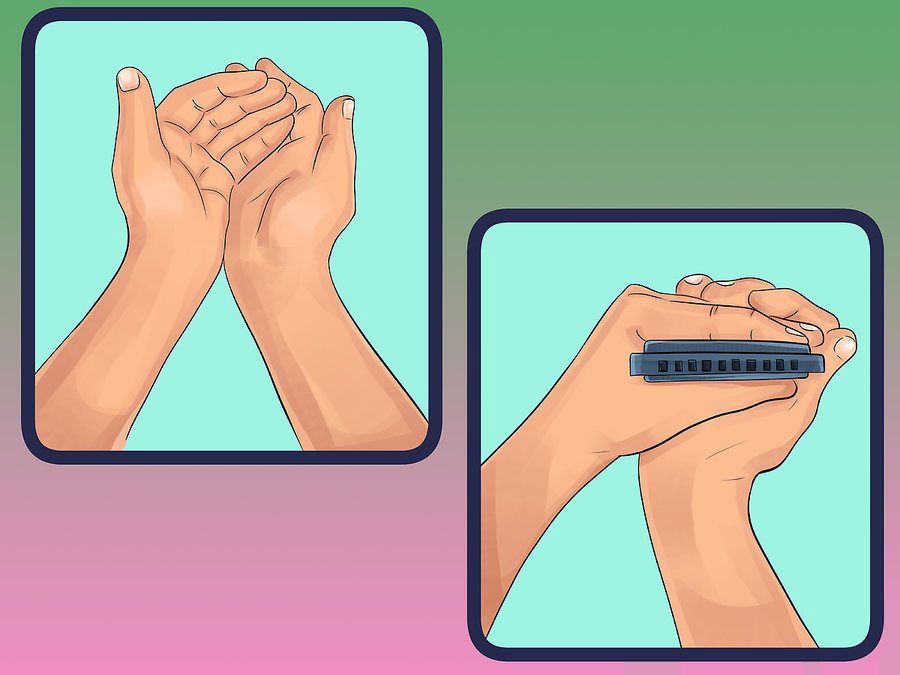
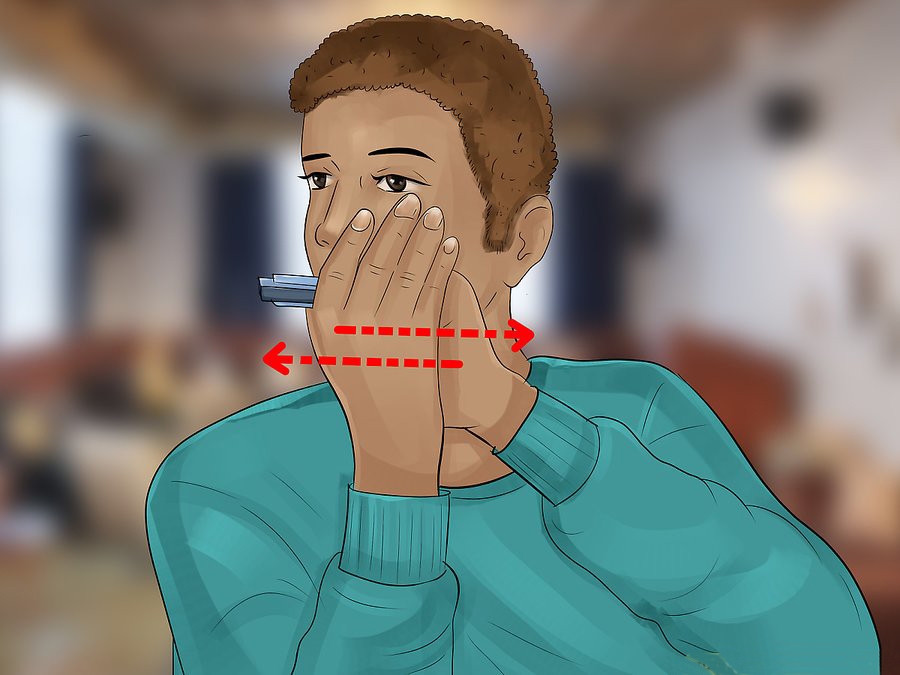
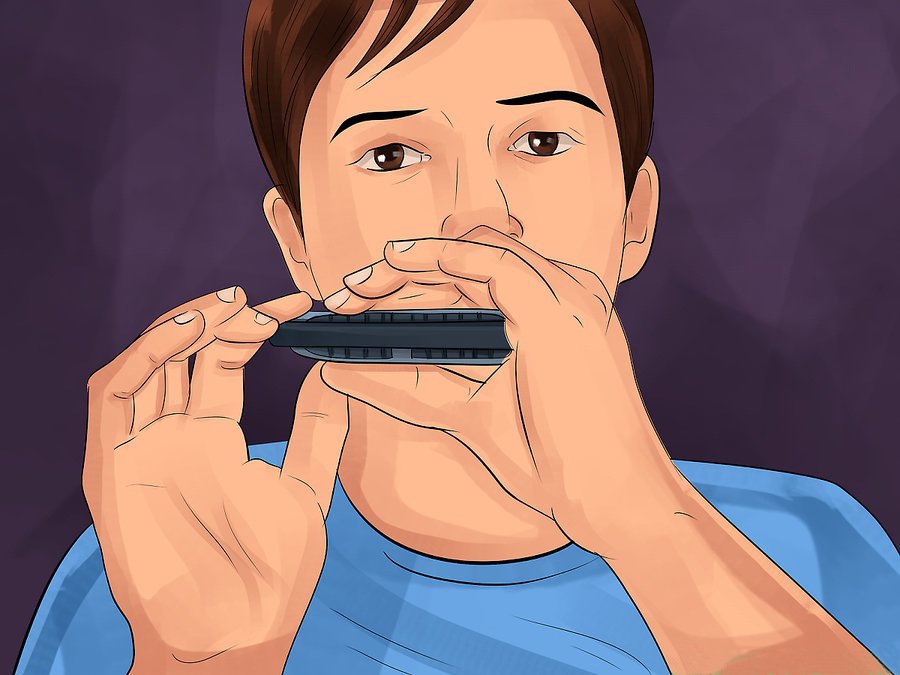
Play with two hands cupped.

To start with, you’ve probably been holding the harmonica with the pointer finger and thumb of your left (or non-dominant) hand and sliding it as you play. Up your game by adding your right (or dominant) hand. Rest the heel of your right palm under your left thumb, and then lay the blade of your right palm along your left to that your fingers can curl up around your left pinky finger. This creates a “sounding hole” that can be used to affect the sound coming from your harmonica.

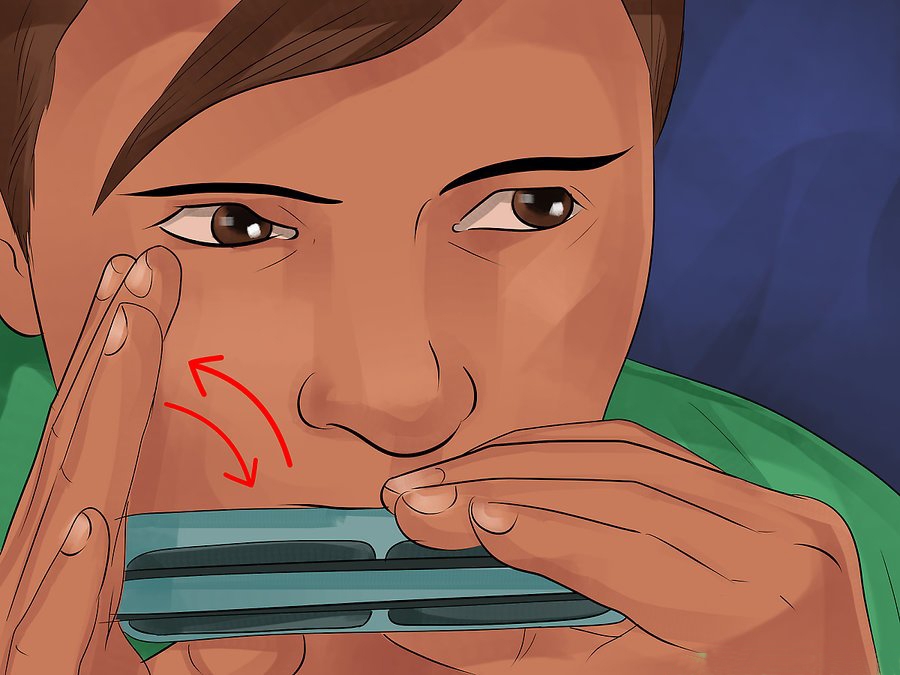
  • Add a soft warble or wail by flapping your sounding hole open and shut. Use it at the end of a verse to add emotion, or just practice it anywhere you like.
  • Create a train whistle effect by starting with the sounding hole open, then tapping it shut and open again once.
  • Play a muted, soft sound by leaving the sounding hole mostly closed.
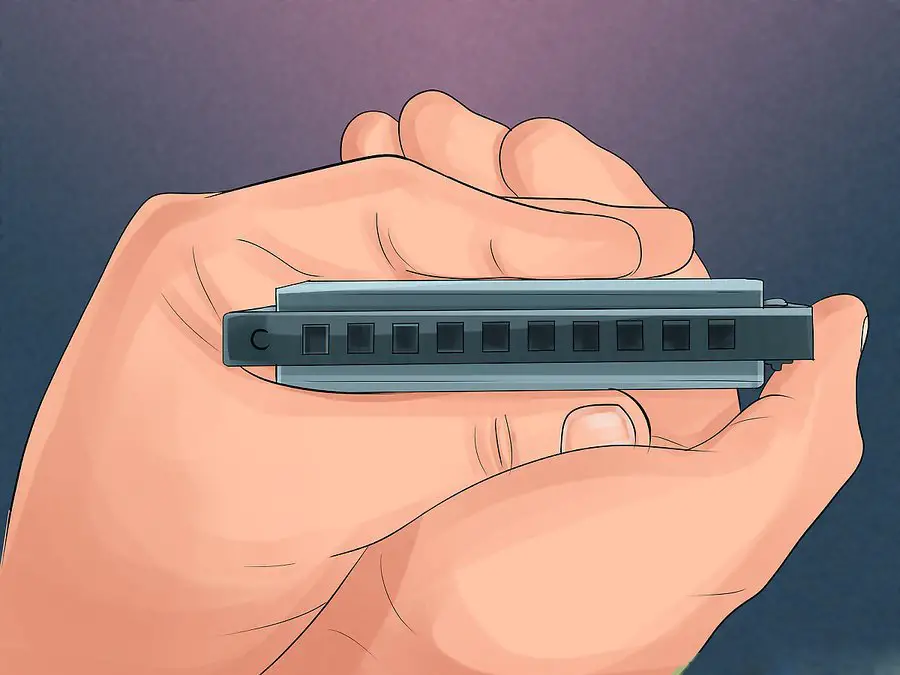
  • You’ll likely find that this position forces you to hold your harp at an angle, with the left end pointed slightly down and inward. This position actually lends itself to other techniques as well, so embrace it.
  • How to Hold your Harmonica?

Learn to tongue block.

Tongue blocking is a great way to roll single notes into beautiful chords without breaking the original note. Using the side (blade) of your tongue, you’ll block some notes of a chord, and then lift off partway through the note to add them. This technique takes practice, but your sounding hole position should help present the side of your tongue to the mouthpiece naturally.

  • Start by opening your mouth to cover the first four holes of your harp. Using your tongue, block holes 1 through 3 and play a straight-position note on hole 4. If you did it right, you should only hear (up) 4 being played. Once you can do this with ease, play a sustained note and then lift your tongue off halfway through to introduce the full harmony.
  • Tongue blocks can be used to add a waltz- or polka-like airiness to songs by alternating them with individual notes, or in any of a number of other different ways. They’re very flexible. Practice using them until you’re comfortable improvising them from song to song.
  • Harmonica Tone
  • Tongue Effects

Begin to learn note bending. 

Probably the most advanced technique in terms of the sheer amount of practice it takes to master is note bending. Note bending is the art of actually changing the notes your harmonica produces by making airflow tighter and sharper. Master harpists can turn a diatonic harmonica into a de facto chromatic harmonica just by note bending. For now, practice using it to produce flat notes to increase your repertoire.

  • The basic technique for bending a note is to make the opening in your lips very very small, and sharply suck air through them into the hole you want to bend. Draw a cross-harp note and gradually pinch your lips together until you begin to hear the tone change. By pinching your lips more or less, you can further control the tone of the note.
  • Be very careful when you practice note bending. Because the air crosses the reeds so sharply, it can easily loosen or bend them, ruining your instrument. Patience and care are required to find a happy medium between not bending a note and bending it too harshly.
  • How to bend a note on Harmonica?
  • Diatonic Bending

Conclusion on how to play harmonica

After reading our harmonica guide for everyone, are you ready to play harmonica cyar?

If you are still not confident to play harmonica, read the article again. Take a deep breath, exhale softly, then get ready to play harmonica!

Wish you play harmonica very well, very attractive!

Reference:


Top 10 easy harmonica songs for beginners (with tabs)

Are you a new harmonica beginner? Are you finding easy harmonica songs for beginners? Ok, that is cause i open this topic with “Top 10 easy harmonica songs for beginners” which i collected from internet. I hope it can help you.

All notes are mainly in the middle register of the harmonica: holes 4 to 7, the easiest information to play.

These are simple songs, but to play them well you should have good control of all the notes in the middle register, both individually even though moving between holes.

It is also advisable to apply articulations using syllables like “TA” and “DA” when doing repetitions of blow and draw notes, respectively. These articulations separate the notes and give them a far more defined starting sound or accent.

For example, when we play a hole 4 blow and then repeat it, instead of blowing twice (with two separate airflows), we shall only blow once, and by using the syllable “TA” as an articulation, the continuous airflow will be interrupted when your tongue fastly hits the hard palate, separating the notes. As a result, the sound of the repeated note will undoubtedly be clearer.

In 9 of these songs you will see that on the tabs there are as much articulations as repeated notes.

The songs are arranged by difficulty, and each song has a slow practice version and an original tempo version. It will be useful to learn each song bit by bit, and play it all together.

Playing a song with the clean sound is more important than playing it fast.

This Old Man” and “Jingle Bells” have several articulations and many passages with hole leaps, which make them even more demanding for a beginner.

When you jump holes, you must not move your mouth too far from the harmonica; just try to keep the gap to a minimum to land right at the biggest market of the hole you want to play next. When you jump from holes 6 to 4, you could accidentally play hole 5 by falling short, or hole 3 by leaping too much. At first, problems with playing hole leaps are very common because you may not really have a good reference on the harmonica yet, but you will improve this with repetition!

The tablature I use is the arrow system – up arrows for blow notes and down arrows for draw notes. Learn more about different tablature systems in this article: “How to read harmonica tabs

Top 10 easy harmonica songs for beginners

Top 10 easy harmonica songs for beginners

[toc]

1. Happy Birthday

Happy birhday harmonica tab

6 6 -6 6 7 -7
Hap-py birth-day to you,
6 6 -6 6 -8 7
Hap-py birth-day to you,
6 6 9 8 7 -7 -6
Hap-py birth-day to _ _
-9 -9 8 7 -8 7
Hap-py birth-day to you.

You can see other version here.

Slow Tempo (80 bpm)

Original Tempo (110 bpm)

2. Home Sweet Home

4 -4 5 -5 -6 6 -5 5
6 -5 5 -5 -4 5
4 -4 5 -5 -6 6 -5 5
6 -5 5 -5 -4 4
6 7 -7 -6 6 6 5
6 -5 5 -5 -4 5
6 7 -7 -6 6 6 5
6 -5 5 -5 -4 4
-5 5 -5 -4 4

You can see other versions here.

Slow Tempo (65 bpm)

Original Tempo (80 bpm)

3. Jingle Bells (First part)

5 5 5
5 5 5
5 6 4 -4 5
-5 -5 -5 -5 -5 5 5 5 5 -4 -4 5 -4 6
5 5 5
5 5 5
5 6 4 -4 5
-5 -5 -5 -5 -5 5 5 5 5 6 6 -5 -4 4
3 5 -4 4 3
3 3 3 5 -4 4 -3
3 -5 5 -4 6 6 6 6 -6 6 -5 -4 4 6

You can see more versions here

Slow Tempo (80 bpm)

Original Tempo (110 bpm)

4. This Old Man

6 5 6 6 5 6
This old man, he played one,
-6 6 -5 5 -4 5 -5
He played nick-nack on my drum.
Chorus: (Repeat after each verse)
5 -5 6 4 4 4 4
With a nick-nack paddy whack
4 -4 5 -5 6
Give a dog a bone,
6 -4 -4 -5 5 -4 4
This old man came rolling home.

You can see more versions here.

Slow Tempo (120 bpm)

Original Tempo (160 bpm)

5. When the Saints Go Marching In

4 5 -5 6
4 5 -5 6
4 5 -5 6 5 4 5 -4
5 5 -4 4 4 5 6 6 6 -5
4 5 -5 6 5 4 -4 4

You can see more versions here.

Slow Tempo (120 bpm)

Original Tempo (160 bpm)

6. Oh Susanna

4-4 5 6 6-6 6 5
I came from Al-a-bam-a

4 -4 5 5 -4 4 -4
with my ban-jo on my knee;

4-4 5 6 6 -6 6 5
I’m goin’ to Lou-‘si-an-a

4-4 5 5 -4 -4 4
M-y true love for to see.

4-4 5 6 6 -6 6 5 4
I-t rained all night the day I left

-4 5 5 -4 4 -4
The weath-er it was dry;

4 -4 5 6 6 -6 6 5 4
Th-e sun so hot I froze to death,

-4 5 5 -4 -4 4
Su-san-na, don’t you cry.

-5 -5 -6 -6 -6 6 6 5 4 -4
Oh, Su-san-na, oh, don’t you cry for me;

4 -4 5 6 6-6 6 5
I-ve come from Al-a-bam-a

4 -4 5 5 -4 -4 4
with my ban-jo on my knee.

You can more other versions here.

Slow Tempo (90 bpm)

Original Tempo (140 bpm)

7. Camptown Races

6 6 6 5 6 -6 6 5
De Camptown ladies sing this song,
5 -4 5 -4
Doo-da, Doo-da
6 6 6 5 6 -6 6 5
De Camptown racetrack’s two miles long
-4 -4 5 -4 4
Oh, de doo-da day.

Refrain
4 4 5 6 7
G’wine to run all night
-6 -6 7 -6 6
G’wine to run all day
6 6 6 5 6 6 6 -6 6 6
I bet my money on a bob-tailed nag
-4 -4 -4 5 -4 -4 4
Somebody bet on the gray

You can see more other versions here.

Slow Tempo (80 bpm)

Original Tempo (100 bpm)

8. Mary Had a Little Lamb

5 -4 4 -4 5 5 5
Ma-ry had a lit-tle lamb
-4 -4 -4 5 6 6
Lit-tle lamb, lit-tle lamb
5 -4 4 -4 5 5 5
Ma-ry had a lit-tle lamb
5 -4 -4 5 -4 4
Whose fleece was white as snow

You can more other versions here.

Slow Tempo (120 bpm)

Original Tempo (160 bpm)

9. Ode to Joy

5 5 -5 6 6 -5 5 -4 4 4 -4 5 5 -4 -4
4 4 -4 5 5 -4 4 -3 3 3 -3 4 4 -3 -3
3 3 -3 4 4 -3 3 -2 2 2 -2 3 3 -2 -2

5 5 -5 6 6 -5 5 -4 4 4 -4 5 -4 4 4
4 4 -4 5 5 -4 4 -3 3 3 -3 4 -3 3 3
3 3 -3 4 4 -3 3 -2 2 2 -2 3 -2 2 2

You can see more other versions here.

Slow Tempo (90 BPM)

Original Tempo (140 BPM)

10. Alouette

4 4 -4 5 5

-4 4 -4 5 4 3

4 4 -4 5 5

-4 4 -4 5 4

4 4 4 4 4 5 6

6 -6 6 -5 5 -4 4

6 6 6 6

4 4 4 4

6 6 6

4 4 4

6 -5 5 -4 4

You can see more other versions here.

Slow Tempo (80 bpm)

Original Tempo (100 bpm)


Discrete Comb

The Discrete Comb is the invention of Winslow Yerxa.  It is essentially a thick comb (about 50% thicker than a normal comb) with a partition in each chamber to isolate the blow and draw reeds into discrete cells.  Discrete combs are available for the Hohner MS (Modular Series) harps and for Lee Oskars.  Prices are $25 for MS compatible combs and $35 for Lee Oskar compatible combs, plus $5 shipping and handling.  To order one, write cheques (must be drawn on a U.S. Bank) to Harmonica Information Press and mail to:

Discrete Comb
203 14th Avenue
San Francisco CA 94118-1007

By the way, standard disclaimers apply here.. I have no financial or other interest in HIP or the Discrete Comb.  It’s a great invention, full of possibilities, and I just want to help inform everyone of its existance and capabilities.

By covering both the upper and lower cells with the embouchure at the same time, a harp built on the discrete comb responds like a normal diatonic harp with the normal 2-reed bends.  But, by tilting the harp a little up or down you can select a discrete chamber containing either a blow or a draw reed.  By isolating reeds in this fashion, any reed can be played as a closing reed or an opening reed.

What this means is that

  • The discrete comb can be played normally (by playing both blow and draw reed cells at the same time)
  • “valve-style” single reed closing bends can be played either blow or draw in any hole, in other words blow bends are available on blow reeds 1-6 in addition to the normal holes 7-10, and draw bends are available on draw reeds 7-10 in addition to the normal holes 1-6.
  • overblows can be played on any draw reed, including 7-10, where on a normal harp only holes 1-6 overblow
  • overdraws can be played on any blow reed, including 1-6, where on a normal harp only holes 7-10 overdraw

The overblows and overdraws are much easier to produce than on a normal comb, and are more stable.  Overbends can be bent in pitch and vibrato applied when played on the discrete comb.  These effects can be achieved on a very well set up normal harp, but they are more difficult to get.  No gap adjustment is needed to get overbends on the discrete comb, though adjustments can help optimize the response based on your own style.

Normally, valves are used to isolate the blow reeds to allow single reed closing bends–and valves prevent overblows. The discrete comb allows both overblows and single reed closing bends.

The downside of the discrete comb is its thickness.  The thicker comb is less comfortable to play, for me anyway, than a normal harp.  The added thickness means you have to be more accurate with your embouchure to get clean single notes, since a more wide open lip/mouth position tends to let in more of the adjacent holes. 

However, these drawbacks are most likely due to limited playing experience with the discrete comb.  The more you play on a discrete comb the more comfortable you are likely to get with its size and playing characteristics.  You’ll have to determine for yourself if the numerous benefits are worth the drawbacks.


What key harmonica is best for beginners

What key harmonica is best for beginners

What key harmonica is best for beginners

What key harmonica is best for beginners? – Many novice players ask us for advice about which keys of harmonicas they should start out with. To determine which keys will be best for you to buy, ask yourself these two questions:

1) Will you be playing solo, or with others?

Seeking intend to play solo, or simply for your own personal satisfaction, then any key can be used. Some other words, any song can be played in any key, regardless of what key the original composer, or artist, may have purchased.

However, if you for you to play with someone else, such as a duo or group, or perform along with a favorite recording, your key selection would be governed by those situations.

2) What kind of music do you want to play?

That you just can to know which keys of harmonicas to buy, it is necessary to first determine which style of playing you will be using, 1st Position or 2nd position.

If you want to play simple melodies and folk music, you will most likely be playing in 1st Get ranking. This means you would begin at the blow, accenting the blow notes and blow chords. You would use a C harp to play in C.

If you want more expression for playing Blues, Rock, Country and Pop music, you will most likely be playing in 2nd Position. This means you would originate from the draw, accenting draw notes and draw chords, and bending. You would use a C harp to play in W.

90% of today’s players use 2nd Position for Blues, Rock, Country and Pop music. Click on 1st Postion / 2nd Position or Basic Chords and Bending to uncover more about these topics.

It’s important to understand that although the note layout for each key of Major Diatonic will be different, the PATTERN of notes, chords and bends will be the related. This means that once you learn to play Jingle Bells on a C Major harp, you can play Jingle Bells on any key of Major harp (G, A, Bb, Low F, etc.) using create same blow/draw patterns.

C Harmonica – Why a Harmonica in the Key of C?

Most beginning players are advised to get a harmonica in the key of C. Those new to music may ask why a C harmonica is needed, rather than kind. Others may ask what is supposed any key of C harmonica. These questions are reasonable, this page answer individuals.

You need a C harmonica would harmonica instruction books will a*sume in order to have one, so that you can to with the playalong Cd blank disc. The 81 harmonica lessons at my teaching site Harmonica Academy can (almost) all be created by using an only a click C harmonica.

Your music shop get buying harmonica. These types of have the letter C on the box, as shown suitable here. The music shop may only have harmonicas in B and E (these are the keys usually do not get bought). Don’t if you buy one of these, can not follow your lessons.

The C harmonica scale and music keys

To understand what is meant by a key of C harmonica, a (very) small amount of music theory will help. Listen to this:

It is the C major scale, played on a C harmonica. It should sound familiar, and is the “do re me fa so la ti do” which many learnt at school. Music notes are indicated by the alphabet letters A through to G. So the C major scale has C as the first note, and is therefore in the key of C.

Now listen to this scale:

It sounds the same as the previous one, except a little higher. Listen to both scales, one after the other. Can you hear the difference?

The second scale is a D major scale, played on a D harmonica. This scale has D as the first note, and so is in the key of D. Music is often played in different keys. For example, a female will usually sing a partiuclar song in a different key than a male, as their voices need different starting notes (usually higher for the female).

So that’s what a key of C harmonica means…

Seeing that music keys have (hopefully) been explained, we revisit the harmonica. The common 10 hole harmonica is really a diatonic instrument, meaning that it is designed to play in one key (C for a C harmonica). This also means that some notes are incomplete. For example, if you compare a C harmonica with a piano, the C harmonica can play the white key notes only.

Actually there is a technique called bending, which recovers these missing notes. However bending is for a later date.

So, what things harmonica players do any song is played in the different significant? Simple. They just lift another harmonica, tuned to your key of this new record. Harmonica players therefore have a set of instruments several keys, like those shown above.

As a newbie you typically manage your lessons along with a single harmonica in informed of E. However when you start playing to musicians (hopefully you will), then harmonicas in different keys are needed. I remember the pride and anticipation while i bought very first set of harmonica, having newly learnt about music keys.

As a developing player you will receive opportunities to play with other musicians. Ensure that possess to a harmonica in accurate key before join in, otherwise chaos will soon follow. People plays as key of C.

Which harmonica keys should I get?

When you are just stating, the C harmonica will be fine. As you progress, then buy others. In the event you join in with guitarists (most people do begin with), then the following 5 harmonica keys touches on most situations: C, D, F, G, A.

As your music progresses you will get harmonicas in other keys as well.

A final twist… second position

Many beginning harmonica players want to play blues. As always, you need a harmonica which matches the key of each blues song you choose.

However, most blues harmonica is played in second position, where the harmonica key is dissimilar to the key of the song.

Details about second position blues harmonica are in the teachings at my Harmonica Academy site. However for now, the table below will show which key harmonica to use when playing second position blues.

Music key —- Harmonica key

A —————– D
Bb —————– Eb
B —————– E
C —————– F
C# —————– F#
D —————– G
Eb —————– Ab
E —————– A
F —————– Bb
F# —————– B
G —————– C
Ab —————– Db

You will soon learn which harmonica to use. In the meantime, write this table on to a business card, and keep it with your harmonicas.

When I first started I knew nothing of music keys, and was hence unable to push and pull on others (my harmonica was always in the wrong key). This frustrated me no end, and Experienced about to quit. Then, at a festival in New Zealand, someone explained music keys, second position, and the need to have harmonicas in different secrets.

Incredibly, they loaned me their instruments to try out brand new strain idea. I was immediately jamming with some musicians and singers. The festival had a stage through open mike, we tucked there. I was hooked.

I remain forever grateful to the person who explained music keys if you. Hopefully this page will provide similar a*sistance to other new players.


How to bend a note on Harmonica? Bending Tips

How to bend a note on Harmonica? Bending is a basic diatonic harmonica playing technique used to produce notes not otherwise available in the basic tuning of the harp, and they are also used to provide various sliding-note effects.  Bends are, in large part, what give the diatonic harp its unique character, and are intimately related to the blues tradition.

Bending, whether draw bends or blow bends, produce notes lower in pitch than the natural, unbent note.  The amount you can bend a note depends on the pitches of the two reeds in the hole.  The higher pitch note in the hole can be bent down to just below a half step above the lower pitch note in the hole. 

For example, the notes on a C harp in hole 2 are: blow-E, draw-G.  The higher G note can be bent down to Gb and F–and just a little lower.  It is best to only bend down to the desired note, and not further, in order to minimize stress on the reeds.  You can use a piano, guitar, pitch pipe, or electronic tuner to check that you’re hitting the correct pitch.

Bending is not something that is easy to describe how to do–and it is difficult to show because all the movements are hidden inside the mouth and throat.  It takes practice to be able to do bends at all, and lots more practice to do them well.  There are draw bends available on holes 1 through 6, and blow bends available on holes 7 through 10, each of which require different playing techniques.

  To make matters more challenging, different key harps require different bending techniques, depending on the pitch range of the harp.  Lower key harps (e.g. A, Ab, G, and low F) require more mouth/throat/tongue movement than the same holes on higher key harps (e.g. C, D, E, and F).

Bends are intially quite challenging–but they are quite fun, and eventually become second nature.  Learning your bends not only gives you more notes and effects, it gives you more control over your notes, air stream, resonance, and tone.

So, celebrate when you finally get your first bends!  But remember–that’s only the beginning!

How to bend a note on Harmonica

How to bend a note on Harmonica?

[toc]

What is a bend?

Bending allows us to play notes that wouldn’t be available otherwise. Diatonic harmonicas have several missing notes (tones in the musicial scale that don’t appear naturally on the instrument) so bending helps us to fill in these gaps.

Bends are a distinctive part of the blues sound. Bending works by making both the blow and draw reeds vibrate simultaneously to produce a note which sits between the pitch of each indivudal reed.

How do you get a bend?

Bending requires a change to the oral cavity (space in your mouth) to allow a lower note to resonate. This can take some getting used to. It feels silly at first, but practising moving the shape of your mouth from an ‘AH’ or ‘EE’ to an ‘OO’ shape is a good place to start:

How do you bend notes on harmonica

Now try sliding the tip of your tongue directly back in your mouth to create a humped shape. This helps angle the airflow so that both the blow and draw reed vibrate.

How do you bend notes on harmonica

Finding the ‘sweet spot’

The two steps above are all that’s needed to achieve a bend, but it can take a frustratingly long time to make this work. You need to experiment with slow changes of shape and position to find the sweet spot where it comes together and the note moves.

When this happens, stay where you are! A couple of other ways to conceptualise the technique are (a) to say ‘KUH’ as you play a note, and (b) to think of playing an inward whistle which gets lower and lower.

Which notes will bend?

Holes 1-6 will bend on the draw notes. Holes 7-10 will bend on the blow notes. We tend to learn the draw bends first as they often come more easily (you’ll probably find hole 4 will work first). As you progress, you’ll learn to control these bends and use them as melodic notes. Here’s a diagram of the bends available on a C harmonica:

How to bend a note on Harmonica?

Note that each hole (and each key of harmonica) will feel different so you will need to adapt your technique to each situation. Good luck!

Draw Bends

Draw bends are available on holes 1 through 6–but hole 5 will not bend as much as a full half step.  Don’t try to bend lower than the note will go or you risk damaging the reeds.

Here are some tips for getting your first draw bends.

  • First, be sure you can get a good, clean, pure, loud, single note before going any further!

Don’t even worry about bends if you can’t get a consistent pure single note.

  • One good approach is to use the “lip block” embouchure. It helps you relax and get your mouth open, which helps improve your resonance and makes bending easier.
  • While breathing in from your diaphragm, make “eeeeee” and “oooooh” sounds. Notice how your jaw drops on the “ooh” sound, and pay attention to the feeling in your throat. The bend happens when you go from “eeeeee” to “oooooh”.
    Try holes 2, 3, and 4 for your first bends.  The “Oh” should be deep with an open throat; try saying “orange”.  Your throat should be like the first “or” part.   Whisper it.  Orange.  Whisper it louder. 
    Whisper it breathing in.  Try bending with the mouth/throat position of the “Or” part.
  • Make sure NO AIR leaks in through your nose.  This is very important.  If air leaks in through your nose it will be very very difficult to make the note bend.
  • Make sure you have an air tight seal of your mouth on the harp.  Air leaks get in the way of bends, whatever their cause.
  • Don’t try to force it.  Bending is essentially effortless.  If your mouth/throat/tongue shape are right the bend will naturally happen.  Think about holding an egg in your mouth during a bend.  Keep playing with the shape of your mouth and your tongue position.  Very minor changes in mouth/throat/tongue position make all the difference.
  • Drop your draw and open up your vocal tract while continuting to draw air in smoothly–remember, don’t try to force it.
  • Try whistling while breathing in.  Bend the pitch of your whistled note down.  That’s what it feels like to do draw bends.
  • The tongue is the key (for beginners). Start with it flat and forward in your mouth. While drawing in with the “eeeee”, *slowly* pull it back, keeping the front low in the mouth, and humping it in the back. At some point the sound should begin to choke a little. That’s the crucial spot. Treat it like the “friction point” on a clutch car… if you move too fast you’ll stall the car–or miss the bend.  At that crucial spot, adjust your mouth position from “eeee” to “ooooh”.  At first, it may help to increase the air pressure a little. But, you don’t have to play loud or hard to get bends. You can bend notes playing quite softly.
  • Breathe in while making a hard “K” sound. Notice where you make that sound in your throat. That’s one place in your vocal tract from which you can get a draw bend.
  • Breathe from deep within your body–from your diaphragm. Feel your stomach push out a little bit. This will help your resonance and make bending easier.  Lie on your back and slowly breathe in.  Put your hand on your stomach and notice how it moves up and down–that’s the location of your diaphragm.  Draw in your air from there.
  • Try different key harps.  The mouth position is different for different keys, and if you’re having trouble with one key another might work better.  For example, if you can’t get it on a C harp, try an A harp or a D harp.
  • As they say, “Practice, practice, practice…”

It ain’t as easy as it looks! Don’t give up! It takes a while to get it!  And remember, don’t try it unless you can get consistent pure clean single notes–you have to master that first.

Blow Bends

Blow bends are normally learned after draw bends, because the low end of the harp (holes 1 through 6) are used more, especially by beginners, than the top end of the harp, holes 1 through 7, where the blow bends are available.  Note that hole 7 will not bend as much as a full half step, so don’t try to force it or you could damage the reed.

Blow bends are done by constricting the air stream by tiny movements toward the front of the tongue.

Start the natural blow note with your tongue flat in the bottom of your mouth.  Slowly, keeping the tongue flat, lift the tongue toward the roof of the mouth.  Keep the air stream constant, and where you feel the note start to choke–that’s the crucial spot. 

Very tiny changes to your tongue position cause the note to transition from the natural note to the bent note.  You have to experiment and remember your exact mouth position.  The vocal tract is more constricted in the mouth and throat for blow bends than for draw bends.

Try whistling a note and bending the pitch upwards.  A similar tongue movement happens when doing blow bends on the harp.

5 tips for bending notes

  1. Move your mouth from an ‘AH’ to an ‘OO’ shape
  2. Drag your tongue back into a humped shape
  3. Say ‘KUH’ as you play a note
  4. Slurp the air instead of allowing it to travel freely
  5. Imagine an inward whistle that’s getting lower


YouTube player


Harmonica position chart

Harmonica position chart – If you want to play Harmonica, you need to learn the basics of Harmonica. One of those pieces of information is the note and position of the notes on the Harmonica. Our today’s article will clarify this matter for you to understand.

Harmonica position chart

[toc]

About Keys and Positions

Although it is possible to play in many keys of music on any one harmonica by using various positions and techniques, most players use only site directories . two positions; 1st Position (also known as Straight Harp) and 2nd Position (also known as Cross Harp).

NOTE: It crucial to know that 1st Position (starting from BLOW / EXHALE) plays in a different key from 2nd Position (starting from DRAW / INHALE).
It is were required to determine which style of playing will be used to know which key of harp pick. To determine the correct key of harp to use, refer to our Notation chart samples below and review the Resources section of such a website.

For each harmonica tuning (the Standard tuning and our three Altered tunings), essential points are explained below can be used regardless of the key chosen within each tuning.

Harmonica Positions

Harmonica Key, Position, and Music Key

Position/

Harmonica Key

1st

Major

2nd

Mixolydian

3rd

Dorian

4th

Aeolian

5th

Phrygian

6th

Locrian

7th

8th

9th

10th

11th

12th

Lydian

C

C

G

D

A

E

B

F#/Gb

Db

Ab

Eb

Bb

F

G

G

D

A

E

B

F#/Gb

Db

Ab

Eb

Bb

F

C

D

D

A

E

B

F#/Gb

Db

Ab

Eb

Bb

F

C

G

A

A

E

B

F#/Gb

Db

Ab

Eb

Bb

F

C

G

D

E

E

B

F#/Gb

Db

Ab

Eb

Bb

F

C

G

D

A

B

B

F#/Gb

Db

Ab

Eb

Bb

F

C

G

D

A

E

F#/Gb

F#/Gb

Db

Ab

Eb

Bb

F

C

G

D

A

E

B

Db

Db

Ab

Eb

Bb

F

C

G

D

A

E

B

F#/Gb

Ab

Ab

Eb

Bb

F

C

G

D

A

E

B

F#/Gb

Db

Eb

Eb

Bb

F

C

G

D

A

E

B

F#/Gb

Db

Ab

Bb

Bb

F

C

G

D

A

E

B

F#/Gb

Db

Ab

Eb

F

F

C

G

D

A

E

B

F#/Gb

Db

Ab

Eb

Bb

Harmonica players frequently talk about what position they are playing in.  The position specifies the “where/how” of the root note in the scale being played.  By “where” I mean “which hole”, and by “how” I mean how the hole is played, i.e. blow, draw, bend, or overbend.  Position is a useful term because diatonic harps come in all keys, but the relative note layout for each key is the same. 

This means that once you know a song on a harmonica in a certain key you can use the same pattern of “where/hows” on any other key and still be playing the same song, or phrase or lick or riff, just in a different key.  The consistency of patterns a*sociated with scale types (e.g. the blues scale) makes the term position useful for communicating with other harp players, though musicians who play other instruments will have no use for the term–it won’t tell them anything!

Positions are numbered according to the circle of fifths.  First position is where you start in the circle, and each step clockwise is one position higher.  That is, as you add sharps to the key of the harmonica you increase the position number by the number of added sharps.  For example, on a key of C harmonica playing 1st position puts you in the key of C. 

To figure out which key is 2nd position, go one step clockwise from C in the circle of fifths (i.e. add one sharp to the key) and you get G.  3rd position is another step clockwise (i.e. 2 sharps added to the 1st position key) which is D, and so on.  Rather than memorizing a table of positions for each harmonica key it is much preferable to learn the circle of fifths, which is far more useful.

Since there are 12 distinct notes in a chromatic scale and in the circle of fifths, there are 12 different positions on the harp.  When numbering the positions based on going clockwise around the circle of fifths we are essentially talking about “sharp” positions, since each clockwise step gives us a scale with one more sharmonica than the previous scale.  It is pretty unnatural to think about a key having 12 sharps however! 

For this reason, some players talk about “flat” positions as well as regular positions.  The flat positions are named and numbered according to a progression counterclockwise around the circle of fifths.  So first flat on a key of C harmonica is the key of F.  In terms of the “where/how” of playing, 1st flat is identical to 12th position.  Similarly, 2nd flat is identical to 11th position, etc.

There is a natural mode a*sociated with each position.  By this I mean that by using just the natural non-bent unaltered blow and draw notes on the harmonica, when you start at a different where/how note you are playing a different mode.  Here are the natural modes a*sociated with some common positions.

  1. First position is a major scale. The mode name for the major scale is called Ionian.
  2. Second position is a major scale variant with a flatted 7th.  The mode is called Mixolydian.
  3. Third position is a minor scale.  There is more than one minor scale, and the mode for this one is called Dorian.
  4. Fourth position is the natural minor scale whose mode is called Aeolian.
  5. Fifth position is another type of minor scale.  The mode for this one is called Phrygian.
  6. Sixth position has a sort of major scale feel and is called Locrian.
  7. Twelfth position, also called First Flat, has a major scale type feel and is called Lydian.

Here is a table of the positionassociated with the root note of each scale mode showing the starting place and how the hole is played (i.e. the “where/how” talked about above). For example, first position starts on the hole 1 blow; second position starts on the hole 2 draw, and 12th position starts on the hole 2 draw whole step bend.  (Each tic mark ‘ represents a half step bend.)


Position Designation of Tonic Note


Blow 1 5 2 1 5 2 1 5 2 1 Blow
”’     9         10 7 6
  12 4             11
8 7 11 8   9          
Draw 3 2 6 3 12 4 6 3 12 4 Draw


The “sets” (with matching colors) show different 4-harmonica sets that will cover all 12 keys if you play in all 3 positions. In other words, with an A, C, Eb, and F# harmonica you can play all 12 keys by playing positions 1, 2, and 3.

1st position, also called “straight” harp, is the natural key of the harmonica. In other words, if you have a key of C major tuned harmonica, first position utilizes the scale tones of the C major scale, which starts on the C note.

2nd position, commonly called “cross” harp, starts on the 2 draw and uses a scale a 5th higher than the natural key of the harmonica.  2nd position is the most commonly used harmonica position for Blues, Country, and Rock music because it makes use of draw notes much more than 1st position. 

This is important because the draw notes for holes 1-4, and 6 can be bent, allowing all the notes for the blues scale to be played, as well as being able to be played with more variety and nuance. For a key of C harmonica, the 5th scale tone is G (C=1, D=2, E=3, F=4, G=5), so playing 2nd position on a C harmonica is playing in the key of G (technically the G “mixolidian” mode).

3rd position, sometimes called “slant harp” or “double-crossed”, is the scale starting another 5th up from 2nd position, e.g. for a C harmonica, D. (2nd position G=1, A=2, B=3, C=4, D=5.)

To be able to easily determine the music key a*sociated with any key harmonica in any position, the harmonica key needed to play in any position for a particular music key, or the defacto position you are using to play a particular key music on a particular key harp, see the section on the Circle of Fifths.

Understanding 1st / 2nd Position

Major Diatonic Harmonica


Labeled in 1st Position

MAJOR DIATONIC - Harmonica position chart

The Major Diatonic Harmonica was originally intended for playing simple Folk music of the nineteenth century and its notation layout was adequate for that purpose. The original style of playing, known as 1st Position (Straight Harp), is suitable for playing simple melodies, Folk music and various other types of music that call for melody lines, along with some chords.

1st Position (Straight Harp), is still used by many players today, but due to its simplicity of sound, it is not as popular as 2nd Position (Cross Harp).

The evolution of music introduced Blues, Rock and Country and along with these new forms of music came the need for greater expression. Harmonica players began to experiment and found that when they primarily used the inhale (draw) notes, a different kind of sound was provided. This resulted in a new and more fluid style of playing, known as 2nd Position (Cross Harp). 90% of today’s players use 2nd Position for Blues, Rock, Country & Pop music.

2nd Position (Cross Harp), is a Blues scale that offers a more expressive and soulful sound. Many of the draw reeds can be bent (a technique used to change the pitch of a note.)

MAJOR DIATONIC (1st Position plays the Major Scale)

  • Begins on #4 Blow
  • Accents the Blow Notes
  • As examples, use a C Major Diatonic to play in key of C; or use an A Major Diatonic to play in key of A, etc.

OR…

MAJOR DIATONIC (2nd Position plays the Mixolydian Scale / Blues)

  • Begins on #2 Draw
  • Accents the draw notes and bending impotenciastop.pt
  • As examples, use a C Major Diatonic to play in key of G; or use an A Major Diatonic to play in key of E, etc.

Please refer to the Major Diatonic Key Guide Chart to learn more.

Major Diatonic
Example: Key of C

Harmonica position chart - MAJOR DIATONIC (2nd Position plays the Mixolydian Scale / Blues)

Melody Maker™ Harmonica

Labeled in 2nd Position

Harmonica position chart - Melody Maker™ Harmonica

The Melody Maker™, with its three altered notes, is intended for playing Major scale melodies in 2nd Position (Cross Harp). In 1st Position (Straight Harp), you can play: Irish, Clave/Afro music. In 2nd Position (Cross Harp), you can play: R&B, Country, Reggae, Pop, Jazz, Latin.

(The Melody Maker™ is NOT recommended for Blues).

MELODY MAKER™ (2nd Position plays the Major Scale)

  • Begins on #2 Draw
  • Accents the draw notes and bending
  • As examples, use a G Melody Maker™ to play in key of G; or use E Melody Maker™ to play in key of E, etc.

OR…

MELODY MAKER™ (1st Position plays the Dorian Scale)

  • Begins on #3 Blow
  • Accents the blow notes
  • As examples, use a G Melody Maker™ to play in key of Am (Dorian); or use an E Melody Maker™ to play in key of F#m (Dorian), etc.

Please refer to the Melody Maker Key Guide Chart to learn more.

Melody Maker™
Example: Key of G

Labeled in the 2nd Position Key (shown in blue as #2 Draw)

Harmonica position chart - MELODY MAKER™

Natural Minor Harmonica

Labeled in 2nd Position

The Natural Minor, with its five Altered notes, is a natural choice for playing minor music in 2nd Position (Cross Harp), such as: minor Blues, Reggae, Ska, Latin, Funk, R & B and Hip Hop.

Harmonica position chart - Natural Minor Harmonica

NATURAL MINOR (2nd Position plays the Natural Minor Scale)

  • Begins on #2 Draw
  • Accents the draw notes and bending
  • As examples, use an A Natural Minor to play in key of Am; or use a G Natural Minor to play in key of Gm, etc.

OR…

NATURAL MINOR (1st Position plays the Dorian Scale)

  • Begins on #4 Blow
  • Accents the blow notes
  • As examples, use an A Natural Minor to play in the key of Dm (Dorian); or use a G Natural Minor to play in key of Cm (Dorian), etc.

Please refer to the Natural Minor Key Guide Chart to learn more.

Natural Minor
Example: Key of Gm

Labeled in the 2nd Position Key (shown in green as #2 Draw)

Harmonica position chart - Natural Minor

Harmonic Minor
HarmonicaLabeled in 1st Position

The Harmonic Minor, with its five altered notes, is ideal for playing World Music, typically played in 1st Position (Straight Harp). It offers a soulful, Eastern European sound, perfectly suited for playing traditional ethnic music spanning many different cultures, including: Eastern European, Gypsy, Yiddish, Asian, Tango and Reggae music.

Harmonica position chart - Harmonic Minor Harmonica

HARMONIC MINOR (1st Position plays the Minor Scale)

  • Begins on #4 Blow
  • Accents the blow notes
  • As examples, use an Am Harmonic Minor to play in Am; or use a Gm Harmonic Minor to play in key of Gm, etc.

NOTE: The Harmonic Minor is a unique “modal music” tuning with different Minor/Major scales. Please refer to the Harmonic Minor Key Guide Chart to learn more.

Harmonic Minor
Example: Key of Cm

Labeled in the 1st Position Key (shown in orange as #4 Blow)

Harmonica position chart - Harmonic Minor

Refer: https://leeoskar.com/ufaqs/understanding-1st-2nd-position/


Circle of Fifths

About the Circle of Fifths

The term fifth refers to an interval between notes.  Consider all the notes in the key of C, namely C D E F G A B C.  Now number the notes going up the scale and you get C=1, D=2, E=3, F=4, G=5, A=6, B=7 C=8.  The term up a fifth just means the note numbered 5, or G.  Up a forth just means the note numbered 4, or F, etc.

If we think about the key of G major scale instead of C major, the notes are 1=G, 2=A, 3=B, 4=C, 5=D, 6=E, 7=F#, 8=G.  Up a fifth from G is the note numbered 5 in the G scale, which is D; up a forth is the note numbered 4, or C.

This is really simple–there’s nothing mysterious about it.  These terms like a fifth, forth, third, seventh, etc. just talking about where the note falls in the scale if you number starting at the root note in the scale.

Now if we number the notes going down the C scale we have C=1, B=2, A=3, G=4, F=5, E=6, D=7, C=8.  If we pick the note down a forth from C we get the note numbered 4, in this case G.  Notice that up a fifth yields a G, and down a forth also yields a G. This is a general principle: up a fifth is the same as down a forth.  Well, what about vice versa?  Up a forth in C major is an F, and down a fifth is also an F.  Yep, it’s another general principle: up a forth is the same as down a fifth.

We’ve seen that up a fifth in C is G, and in G is D.  What if we keep going?  The major scale for the key of D is D=1, E=2, F#=3, G=4, A=5, B=6, C#=7, D=8, so up a fifth is the note numbered 5, which is A.  For the key of A we get E, for E we get B, for B we get F#, which is the same note at Gb.  Traditionally we go to flat names at this point, up a fifth from Gb is Db, then Ab, Eb, Bb, F, and C.  We’re back at C, and we’ve covered all 12 notes in the scale.  This is great!  We don’t get back too early–before all the notes have been used–and each note appears one time in the circle of fifths–there are no duplicates.

This is where the idea of the circle of fifths comes from.. the mathematical relationship that allows us to go up in fifths and get each note exactly once before we get back to the beginning.  Of course, we can also go up in fourths and have the same relationship, since up a forth is the same as down a fifth–the notes just come out in reversed order. This circle of key names is symmetrical, and really only a circle of fifths if you go clockwise.  It’s a circle of 4ths if you go counterclockwise.  But by convention and tradition, the circle of key names is called the circle of fifths.

An interesting thing about the circle of fifths is that as you step clockwise, the number of sharps in the key signature increases by one. Since the circle is symmetrical, as you step counterclockwise the number of flats in the key signature increases by one.

And, for diatonic harmonica players the circle of fifths is great for figuring out positions, harp keys, and the key of the music.

  • When playing first position, you are playing in the key of the harp.
  • If you want to play a particular key in 2nd position, pick the harp key 1 step counterclockwise from the music key.
  • If you are playing in 2nd position, just look one step clockwise from the key of the harp to determine the key of the music.

This technique works regardless of what position or key you are playing in.  To play in a key using third position, pick the harp key that is 2 steps counterclockwise.  If you want to know what key you are playing in when you’re playing 3rd position, just look 2 steps clockwise from the key of the harp.

Given the key of the harp, each step clockwise on the circle of fifths is the key of the music for the next higher position.

Given the key of the music, each step counterclockwise on the circle of fifths is the key of the harp to use for the next higher position.

To figure the music key and position for any diatonic harmonica key, just number the harp key as 1, and consecutively number the other keys stepping clockwise around the circle. You don’t need a big table. Just the Circle of 5ths.

We often play I, IV, V chord progressions in blues, country, rock, pop, and classical music. If you pick a key/root chord from the circle, the chord one step clockwise is the 5th, the chord one step counterclockwise is the 4th.  So, it’s easy to figure out I IV V by looking at the circle.

Most western music uses chord progressions from the Circle of 5ths, and mostly the chords are in the range from tonic plus 1 step (i.e. clockwise: the 5th) to the tonic minus 4 steps (i.e. counterclockwise). And, most often songs resolve by stepping directly clockwise back to the tonic.  Examples help.  Let’s pick the key of C as the root, or tonic.  Looking at the circle, the chords from C – 4 to C + 1 are Eb, Bb, F, C, and G.  You want to find a good sounding chord progression?  Well, try some of these, which just follow the above 2 rules: stay in that range, and step clockwise back to the tonic.

Examples: C, F, C, G, F, C

Well, that’s cheating.  It’s “just” a blues progression.  The blues form is the most basic progression that follows the rule!

Okay, lets extend it: C, F, C, G, Bb F C or how about C Eb Bb F C G C etc.

For improvisation, thorough familiarity with the Circle of Fifths is almost indispensable.

By the way, I never have to dig through a box to find the harp key I want. I keep my harps arranged according to the circle of fifths. I think this is a really good idea–extremely useful when jamming to music and trying to find the right key and position.  Changing position is just a matter of picking the harp to the right or left.. you don’t have to think about it.  If the harp you try isn’t right in any position you’re comfortable with, it’s easy to skip 2 or 3 to the right or left and get a harp where none of the keys in your comfortable positions overlap.  This way, I usually find the right key within 3 or 4 tries at most.  And, with your harps arranged this way the circle of fifths becomes well ingrained, second nature, and it’s much easier to pick a particular key harp than when I had them arranged in “sequential” order (C, D, E..).

Chord Substitution

A common technique found in a lot of different kinds of music is to substitute the relative minor chord for the major chord found in the circle of fifths.  The relative minor chords are a (minor) 3rd lower than their relative majors, and the relative minor circle of fifths is rotated 4 steps counterclockwise from the major keys.  Consider the IV V I chord progression.  It’s a very common, ordinary “pop” sounding progression.  Now, substitute the relative minor of the major IV chord in place of the IV chord.  The 4 (IV) chord’s relative minor is a (minor) 3rd less than major chord, or 4-3=1 note higher than the root I chord, which is the minor ii chord.  The resulting chord progression is ii V I.  (Minor chords are written as lower case roman numerals instead of upper case as for major chords.)  The ii V I progression is the most common chord progression found in jazz!

Think about the triads built on the notes of the major scale, for example the key of C.  The first 3 triads are C E G, D F A, and E G B, which are the C major, D minor, and E minor chords.  Look at the circle of fifths for minor keys and find the relative major keys for Dm and Em, the ii and iii chords in the key of C.  The relative major for the ii chord is the IV chord, and for the iii chord is the V chord.  The I IV V progression is just the first three chords of the scale with the relative major chords substituted for the minor chords!

Familiarity with the circle of fifths and chord substitutions will greatly enhance your understanding of music and your ability to improvise and write music.  The more you dig into it, the more sense it will make!  The great thing is, if you understand just a few basic concepts, everything falls into place and much of the confusion about music theory is demystified.


Chromatic Harmonica Notes Layout

Chromatic Harmonica notes layout – Many beginning players are confused about harmonica notes, particularly since some of them are missing. This articles shows the notes on a harmonica, and the reasoning behind their layout.

Chromatic Harmonica Notes Layout

[toc]

Note Positions

The purpose of this article is to cover one and only one topic: what the NOTE POSITIONS are on a 16-HOLE CHROMATIC HARMONICA.

While there are 16 holes on a 16-hole chromatic harmonica, they don’t number the holes from 1-16 on the cover of the harmonica. Instead, they number the first FOUR holes with numbers 1-4, then start over again with #1 at hole 5 and go up to #12 on the 16th hole.

Why do they do this? For many years, Chromatic Harmonicas had 12 holes, and many of the books were written explaining technique on a 12-holer.

Let’s give the 16 hole chromatic harmonica a QUICK GLANCE, before we get into detail on the notes available on each hole. Each hole has 4 reeds, so there are 64 tones total, and some are duplicates. You access those 4 notes per hole by the DRAW and the BLOW, with and without the slide in.

Pushing the slide in always raises the given note by one half tone.

The Notes Repeat The Same Pattern….4 Times

The single line chart below provides you the BLOW ONLY notes on a 16 hole chromatic. You’ll notice right away that the identical pattern of C E G C repeats itself 4 times. Because the pattern repeats every 4 holes, it makes it simpler for you to find notes.

Chromatic Harmonica Notes Layout

4 Note progression, Blow Only

C E G C C E G C C E G C C E G C

What Are Those Notes…what Is The Range Of This Instrument?

The 16 hole chromatic harmonic has a larger range than a flute, a trumpet or a guitar, but less than a piano. Some of you have musical training, and you may be curious what the note range is on a 16-hole chromatic harmonica, in terms of a piano keyboard.

A 16 hole chromatic harmonica has a range from C3 which is the C below middle C on a piano, up to a D7. So it’s 4 octaves plus a C# and a D. That’s 4 octaves.

Harmonica’s makes sound both BLOWING and DRAWING IN AIR, these are called BLOWS and DRAWS. Here’s a complete note layout chart, I’ll explain it in detail.

Blow

C

E

G

C

C

E

G

C

C

E

G

C

C

E

G

C

Slide Out

Hole

1

2

3

4

1

2

3

4

5

6

7

8

9

10

11

12

Draw

D

F

A

B

D

F

A

B

D

F

A

B

D

F

A

B

16 Hole Chromatic, Key of C

Blow

C#

E#

G#

C#

C#

E#

G#

C#

C#

E#

G#

C#

C#

E#

G#

C#

Slide In

Hole

1

2

3

4

1

2

3

4

5

6

7

8

9

10

11

12

Draw

D#

F#

A#

C

D#

F#

A#

C

D#

F#

A#

C

D#

F#

A#

D

To read the top part of the chart above, start by reading the words, “Slide Out” which are in white letters on a black background on the second line. Next to the words “Slide Out”, you’ll see the word “HOLE” then numbers in the following sequence: 1,2,3,4,1,2,3,4,5,6,7,8,9,10,11,12. That center line of numbers tell you what hole to play on.

All the NOTE LETTER NAMES after the word BLOW are the notes you get when you blow in that numbered hole, again with the slide OUT, and down below, you get the NOTE LETTER NAMES you get on those same hole numbers when you DRAW breath in.

The chart just under this is similar, but it gives you the NOTE LETTER NAMES when the slide is pushed in. When you release the slide it moves back to its original position because it’s on a spring.

So: if you BLOW on hole #1 with the slide out, you get a C.

If you DRAW on hole #1 with the slide out, you get a D

If you BLOW on hole #1 with the SLIDE IN, you get a C# (also called a Db)

If you DRAW on hole #1 with the SLIDE IN, you get a D# (also called an Eb)

Then, if you blow on the 2nd hole with the slide out you get an E, and so on.

The chart below has the same information in another layout, with all combined into one chart.

Hole 1 2 3 4 5 6 7 8 9 10 11 12 13 14 15 16
HOLE °1 °2 °3 °4 1 2 3 4 5 6 7 8 9 10 11 12
Blow, Slide In C# F G# C# C# F G# C# C# F G# C# C# F G# C#
Blow, Slide Out C E G C C E G C C E G C C E G C
Draw, Slide Out D F A B D F A B D F A B D F A B
Draw, Slide In D# F# A# C D# F# A# C D# F# A# C D# F# A# D

Let’s go over the harmonica’s notes ONE HOLE AT A TIME.

HOLE #1…all the way at the left of your harmonica

On hole #1, which is all the way to the left side of the harmonica (if you hold it so the slide, thing you can push it and it comes back) is on the right, and the numbers visible on the top of the harmonica’s cover, you get 4 notes:

When you BLOW you get a C.

When you DRAW you get a C# (also goes by the name Db, same tone, different name)

When you BLOW WITH THE SLIDE IN YOU GET A C#

When you DRAW WITH THE SLIDE IN YOU GET A D

BIG HINT….. WHEN YOU PUSH THE SLIDE “IN” YOU GET THE NEXT TONE ½ STEP ABOVE WHERE YOU WERE…BLOW OR DRAW, all the way up and down the harmonica!

HOLE #2…the second hole

On hole #2 you get 3 different notes, 4 total:

When you BLOW you get an E.

When you DRAW you get an F.

When you BLOW WITH THE SLIDE IN YOU GET AN F, (yep, same as the draw just above in this list)

When you DRAW WITH THE SLIDE IN YOU GET AN F#/ also called a Gb

Why did they do that? Well, it means you can play an F on a blow or draw, and that comes in handy.

HOLE #3…third hole

On hole #3 you get 4 different notes:

When you BLOW you get a G.

When you DRAW you get an A.

When you BLOW WITH THE SLIDE IN YOU GET AN G#/ also called an Ab.

When you DRAW WITH THE SLIDE IN YOU GET AN A#/ also called a Bb.

HOLE #4…fourth hole

On hole #4 you get 3 different notes, 4 total:

When you BLOW you get a C.

When you DRAW you get a B.

When you BLOW WITH THE SLIDE IN YOU GET A C#/ also called Db

When you DRAW WITH THE SLIDE IN YOU GET a C

Why did they do that? Well, it means you can play a C as a blow or a draw, and that comes in handy.

THIS IDENTICAL PATTERN is found on actual holes 5-8, 9-12, and 13-16, with the exception that the draw with slide in on hole #16 is a D…they didn’t want to repeat the C as in the other octave groupings…you might need the D for something.

So, that’s the note layout chart for a 16 hole CHROMATIC HARMONICA.

HOW TO PLAY THE NOTES

You can play each note and say the note name, all the way up and down the harmonica. Or hunt for all the C’s, then all the D’s, etc.

One way to play all the tones is to play what’s called a CHROMATIC scale with all 12 tones.

C, C#, D, D#, E, F, F#, G, G#, A, A#, B, C

Again, getting a half tone higher of any given note is easy on a chromatic harmonica…just push in the slide.

We will discuss this in another article and video, but some notes have more than one name, and are called ENHARMONIC.

C#/Db are the same tone, D#/Eb are the same tone, E#/F are the same tone, F#/Gb are the same tone, A#/Bb are the same tone, and B#/C are the same tone.

If you look at a piano keyboard and have someone give you the note names this will make sense, because those shared notes share the same physicial piano key.

That’s the 16 HOLE CHROMATIC HARMONICA note layout.

Also you can read more:


The Harp Reference: Note Layout

Harmonica notes layout – Many beginning players are confused about harmonica notes, particularly since some of them are missing. This articles shows the notes on a harmonica, and the reasoning behind their layout.

Harmonica notes layout

[toc]

Chromatic Harmonica Note Layout

NOTE POSITIONS

The purpose of this article is to cover one and only one topic: what the NOTE POSITIONS are on a 16-HOLE CHROMATIC HARMONICA.

While there are 16 holes on a 16-hole chromatic harmonica, they don’t number the holes from 1-16 on the cover of the harmonica. Instead, they number the first FOUR holes with numbers 1-4, then start over again with #1 at hole 5 and go up to #12 on the 16th hole.

Why do they do this? For many years, Chromatic Harmonicas had 12 holes, and many of the books were written explaining technique on a 12-holer.

Let’s give the 16 hole chromatic harmonica a QUICK GLANCE, before we get into detail on the notes available on each hole. Each hole has 4 reeds, so there are 64 tones total, and some are duplicates. You access those 4 notes per hole by the DRAW and the BLOW, with and without the slide in.

Pushing the slide in always raises the given note by one half tone.

THE NOTES REPEAT THE SAME PATTERN….4 TIMES

The single line chart below provides you the BLOW ONLY notes on a 16 hole chromatic. You’ll notice right away that the identical pattern of C E G C repeats itself 4 times. Because the pattern repeats every 4 holes, it makes it simpler for you to find notes.

4 NOTE PROGRESSION, BLOW ONLY

C E G C C E G C C E G C C E G C

WHAT ARE THOSE NOTES…WHAT IS THE RANGE OF THIS INSTRUMENT?

The 16 hole chromatic harmonic has a larger range than a flute, a trumpet or a guitar, but less than a piano. Some of you have musical training, and you may be curious what the note range is on a 16-hole chromatic harmonica, in terms of a piano keyboard.

A 16 hole chromatic harmonica has a range from C3 which is the C below middle C on a piano, up to a D7. So it’s 4 octaves plus a C# and a D. That’s 4 octaves.

Harmonica’s makes sound both BLOWING and DRAWING IN AIR, these are called BLOWS and DRAWS. Here’s a complete note layout chart, I’ll explain it in detail.

Blow

C

E

G

C

C

E

G

C

C

E

G

C

C

E

G

C

Slide Out

Hole

1

2

3

4

1

2

3

4

5

6

7

8

9

10

11

12

Draw

D

F

A

B

D

F

A

B

D

F

A

B

D

F

A

B

16 Hole Chromatic, Key of C

Blow

C#

E#

G#

C#

C#

E#

G#

C#

C#

E#

G#

C#

C#

E#

G#

C#

Slide In

Hole

1

2

3

4

1

2

3

4

5

6

7

8

9

10

11

12

Draw

D#

F#

A#

C

D#

F#

A#

C

D#

F#

A#

C

D#

F#

A#

D

To read the top part of the chart above, start by reading the words, “Slide Out” which are in white letters on a black background on the second line. Next to the words “Slide Out”, you’ll see the word “HOLE” then numbers in the following sequence: 1,2,3,4,1,2,3,4,5,6,7,8,9,10,11,12. That center line of numbers tell you what hole to play on.

All the NOTE LETTER NAMES after the word BLOW are the notes you get when you blow in that numbered hole, again with the slide OUT, and down below, you get the NOTE LETTER NAMES you get on those same hole numbers when you DRAW breath in.

The chart just under this is similar, but it gives you the NOTE LETTER NAMES when the slide is pushed in. When you release the slide it moves back to its original position because it’s on a spring.

So: if you BLOW on hole #1 with the slide out, you get a C.

If you DRAW on hole #1 with the slide out, you get a D

If you BLOW on hole #1 with the SLIDE IN, you get a C# (also called a Db)

If you DRAW on hole #1 with the SLIDE IN, you get a D# (also called an Eb)

Then, if you blow on the 2nd hole with the slide out you get an E, and so on.

The chart below has the same information in another layout, with all combined into one chart.

Hole 1 2 3 4 5 6 7 8 9 10 11 12 13 14 15 16
HOLE °1 °2 °3 °4 1 2 3 4 5 6 7 8 9 10 11 12
Blow, Slide In C# F G# C# C# F G# C# C# F G# C# C# F G# C#
Blow, Slide Out C E G C C E G C C E G C C E G C
Draw, Slide Out D F A B D F A B D F A B D F A B
Draw, Slide In D# F# A# C D# F# A# C D# F# A# C D# F# A# D

Let’s go over the harmonica’s notes ONE HOLE AT A TIME.

HOLE #1…all the way at the left of your harmonica

On hole #1, which is all the way to the left side of the harmonica (if you hold it so the slide, thing you can push it and it comes back) is on the right, and the numbers visible on the top of the harmonica’s cover, you get 4 notes:

When you BLOW you get a C.

When you DRAW you get a C# (also goes by the name Db, same tone, different name)

When you BLOW WITH THE SLIDE IN YOU GET A C#

When you DRAW WITH THE SLIDE IN YOU GET A D

BIG HINT….. WHEN YOU PUSH THE SLIDE “IN” YOU GET THE NEXT TONE ½ STEP ABOVE WHERE YOU WERE…BLOW OR DRAW, all the way up and down the harmonica!

HOLE #2…the second hole

On hole #2 you get 3 different notes, 4 total:

When you BLOW you get an E.

When you DRAW you get an F.

When you BLOW WITH THE SLIDE IN YOU GET AN F, (yep, same as the draw just above in this list)

When you DRAW WITH THE SLIDE IN YOU GET AN F#/ also called a Gb

Why did they do that? Well, it means you can play an F on a blow or draw, and that comes in handy.

HOLE #3…third hole

On hole #3 you get 4 different notes:

When you BLOW you get a G.

When you DRAW you get an A.

When you BLOW WITH THE SLIDE IN YOU GET AN G#/ also called an Ab.

When you DRAW WITH THE SLIDE IN YOU GET AN A#/ also called a Bb.

HOLE #4…fourth hole

On hole #4 you get 3 different notes, 4 total:

When you BLOW you get a C.

When you DRAW you get a B.

When you BLOW WITH THE SLIDE IN YOU GET A C#/ also called Db

When you DRAW WITH THE SLIDE IN YOU GET a C

Why did they do that? Well, it means you can play a C as a blow or a draw, and that comes in handy.

THIS IDENTICAL PATTERN is found on actual holes 5-8, 9-12, and 13-16, with the exception that the draw with slide in on hole #16 is a D…they didn’t want to repeat the C as in the other octave groupings…you might need the D for something.

So, that’s the note layout chart for a 16 hole CHROMATIC HARMONICA.

HOW TO PLAY THE NOTES

You can play each note and say the note name, all the way up and down the harmonica. Or hunt for all the C’s, then all the D’s, etc.

One way to play all the tones is to play what’s called a CHROMATIC scale with all 12 tones.

C, C#, D, D#, E, F, F#, G, G#, A, A#, B, C

Again, getting a half tone higher of any given note is easy on a chromatic harmonica…just push in the slide.

We will discuss this in another article and video, but some notes have more than one name, and are called ENHARMONIC.

C#/Db are the same tone, D#/Eb are the same tone, E#/F are the same tone, F#/Gb are the same tone, A#/Bb are the same tone, and B#/C are the same tone.

If you look at a piano keyboard and have someone give you the note names this will make sense, because those shared notes share the same physicial piano key.

That’s the 16 HOLE CHROMATIC HARMONICA note layout.

Diatonic Harmonica Note Layout


Icon

Diatonic Harmonica Note Layout 128.80 KB 394 downloads

...
.well.c2a3 .btn { padding: 11px 30px; font-size: 11pt; } .well.c2a3 .media-body { font-size: 11pt; } .well.c2a3 .wpdm_icon { height: 42px; width: auto; }

Here are pictures of a harp comb that shows where the notes are in a C and an F diatonic harmonica.

The holes are numbered 1-10, and the position of the hole number indicates the low note in each hole.  The blow notes are shown in the hole chambers toward the front edge of the comb, and the draw notes are shown at the rear of the chambers.  The notes in between the blow and draw notes in the chambers are the normal bent notes available in each hole.  The notes shown outside the chambers are the overbends, consisting of overblows in holes 1-6 and overdraws in holes 7-10.  Note that overbends are available in all holes, but only those that add unique notes have been shown.

The discontinuous line of hole numbers is shown to emphasize the point that the note relationships invert at hole 7.  That is, on holes 1-6 the blow notes are lower than the draw notes–but on holes 7-10 the draw notes are lower than the blow notes.

Harmonica notes layout
C Diatonic Note Layout

Most players who advance beyond the beginner level play in 2nd position 80%-95% of the time. (Playing in 2nd position means the tonic note is the 2 draw, which is a 5th higher than the key of the harmonica.) So, to think in the generic key of C when playing in 2nd position, you use the key of F harmonica.  Here is the note layout of a key of F harmonica.

Diatonic Harmonica Note Layout

F Diatonic Note Layout

Another nice thing to see explicitly, instead of digging it out of other
charts, is how to play the same note at different places on the harp. The
range of a 10 hole diatonic is 3 octaves, so I’ve divided the table into
Low, Mid, and Hi to correspond to these octaves.


C Harp Note Location F Harp Note Location

Note Low Med Hi
C 1> 4> 7>/10>
Db 1′ 4′ 7#/10#
D 1 4 8
Eb 1># 4># 8>’
E 2> 5> 8>
F 2″ 5 9
F# 2′ 5># 9>’
G 2|3> 6> 9>
Ab 3″‘ 6′ 9#
A 3″ 6 10
Bb 3′ 6># 10>”
B 3 7 10>’

Note Low Med Hi
F 1> 4> 7>/10>
F# 1′ 4′ 7#/10#
G 1 4 8
Ab 1># 4># 8>’
A 2> 5> 8>
Bb 2″ 5 9
B 2′ 5># 9>’
C 2|3> 6> 9>
Db 3″‘ 6′ 9#
D 3″ 6 10
Eb 3′ 6># 10>”
E 3 7 10>’

These next tables show the holes, blow and draw, and the a*sociated
notes on C and F harps.


C Harp Notes by Hole F Harp Notes by Hole

Hole Blow

Note
Draw

Note
1 C D
2 E G
3 G B
4 C D
5 E F
6 G A
7 C B
8 E D
9 G F
10 C A

Hole Blow

Note
Draw

Note
1 F G
2 A C
3 C E
4 F G
5 A Bb
6 C D
7 F E
8 A G
9 C Bb
10 F D


The Harp Reference: Embouchure

The embouchure (ahm’ ba sure) is the method of applying the lips and tongue to the mouthpiece of a wind instrument, like the harmonica! If you are just learning to play I recommend you start with the Lip Block.

1) Lip Block – A variant of the pucker (see below), it’s also called lipping. Tilt the harp up at the back about 30 to 45 degrees, and open your mouth pretty wide, enough to cover about 3 holes, with your upper lip about 1/2 to 2/3 of the way over the top cover.  Let the harp nestle into your lower lip. What happens is that quite naturally, without really trying and without forcing it, the lower lip blocks the 2 side holes and lets the center hole sound cleanly. The open mouth position helps improve your resonance, which in turn helps in getting bends correctly, and improves your overall tone. The harp needs to be well in your mouth… Don’t be shy! You can’t just peck it with puckered lips and make it work right.  You should be relaxed, without tightening your lips or pinching in your cheeks.

2) Pucker – The lips are pursed and pushed out, and the harp is positioned deep back into the mouth (but not are far back as for tongue blocking or U-blocking. See below).  The air stream is “directed through the pucker to one hole”.  (Note: This is as described in many beginning harp books, ala John Gindick’s.  In my opinion, the pucker does not direct the air stream through the hole so much as the deep position of the harp in the mouth brings the lips into contact with the side holes not to be played.)

Note: I believe that for experienced players the pucker and lip block evolve so as to become nearly indistinguishable.  In my opinion, it is easier to reach this “pucker/block” embouchure starting with the lip block than with the “pucker” mental image.

3) Tongue Block – The mouth is opened to cover 3 or more holes, and the tongue blocks the holes that are not intended to sound.  The tongue block pretty much must be used for octave and split interval play . Tongue blocking also facilitates various harp playing techniques and effects, such as “slaps” and “flutters”.  The tongue normally blocks the holes on the left and leaves a single note on the right unblocked to sound, but the tongue can also block holes on the right leaving a single note on the left to play.  It’s best to learn to block and play on both sides to facilitate quick jumps and easy access to holes on both ends of the harp.

4) U-block – A variant of the Tongue Block where the tongue is (normally) rolled into a “U” shape, though the tightness of the curve varies a lot from player to player. The tip of the tongue is placed just beneath the hole to be played or even down onto the lower cover. The mouth is open to cover about 3 holes, and the tongue curves up, or is pushed up to block the left and right holes.

All bends and overblows/draws are available using any of these embouchures.  There is no clear evidence of which I am aware that any embouchure allows faster or cleaner play than any other.  The consensus best approach is to learn them all and use the ones you like.

Note: The tongue block is the only embouchure that offers split intervals and certain “slap” effects.  (U-block techniques easily extend to become essentially tongue block techniques for blocking multiple holes.)  In my opinion, for most people if only one embouchure were to be used, the tongue block would offer the most versatility.  However, as mentioned above, there is no need to stick to only one embouchure, and it’s best to learn as many as possible.

Also note: It is possible to “pucker/block” out of either corner of the mouth, and it is possible to lip block on either side of a single hole to be played.  These modifications to the “standard” embouchures can add speed and accuracy since less harp/head movement is required to jump to a non-contiguous note. For the pucker/block, the harp is “twisted” from side to side to bring either corner of the mouth into play.  For the tongue block, the tongue is moved left or right to cover/expose the proper notes.  For U-blocking, the tongue can be moved from side to side to select individual notes with little or no movement of the harp relative to the mouth.


Which Harp Should I Get?

There are a zillion different diatonic harp models to choose from, some of which are shown above.  So how do you decide which to get?  There are two basic classes of diatonic harmonica: ones that basically work okay, and ones that don’t.  Here’s the main thing–look for harp models that come in all keys, and not just one or two (typically C, or C and G).

Cost is not the determining factor, but expect to pay somewhere around $15 to $35 at a store, or from $10-$25 mail order, plus shipping and handling.  This is just a rule-of-thumb range.. the point is, you usually won’t get a good harp for $5.00, and you don’t need to pay $50.  Pro’s play everything from Huang’s that can be had for $6.00 mail order to custom Filisko models that cost about $200 and require a year wait.  Click here for price comparisons.  The most popular models used by pro’s are:

  • Hohner Marine Band
  • Hohner Special 20
  • Lee Oskar Major Diatonic
  • Hohner Golden Melody
  • Hohner Big River (an inexpensive relatively new model that is gaining in popularity)

Other good harps include:

  • Hohner Meisterklasse (expensive and very nice)
  • Suzuki ProMaster (moderate price and very nice.  Option for partial valving.)
  • Hering Blues (looks like a Lee Oskar)
  • Hering Master Blues (looks like a Marine Band)
  • Hohner Blues Harp
  • Hohner Cross Harp
  • Huang Silvertone Deluxe (inconsistent quality)
  • Huang Star Performer (inconsistent quality)

One distinction in harmonic types is the material out of which the comb is made.  Comb materials come in:

  • Plastic
    • Special 20, Lee Oskar, Golden Melody, Big River, Herings, Cross Harp, Huangs
  • Wood
    • Marine Band, Blues Harp, Huang Bac Pak
  • Metal
    • Meisterklasse, ProMaster

Some people believe certain tonal characteristics are a*sociated with different comb materials, but there is little or no objective evidence to support that belief.  I have heard Big River harps made out of everything from light foam to lead to concrete to balsa wood to titanium, and any difference in tone due to the comb material is minimal at best.  My advice is not to select a harmonica based on comb material with the idea that the material will have a “warm” or “mellow” or “bright” sound.

The purpose of the comb is to hold the reed plates and direct the air over the reeds,  The most important characteristics are stability and geometric integrity–in other words, they need to be able to be manufactured accurately so that there are minimal air leaks between the comb and the reed plates.  Plastic works fine for this.  So does metal.  Wood is more iffy in that there is much moisture involved in breathing through the harp, and wood can swell, crack or split.  That aside, the wood comb Marine Band is the most popular harmonica out there, and often chosen for that classic Chicago Blues sound.  The Marine Band has slots in its covers, which contributes to its characteristic sound.  Probably many people attribute the sound to the wood rather than the design of the covers.  Plastic body harps with Marine Band reed plates and covers also exhibit the same characteristic sound–but are only available by harmonica customizers.  The Hohner Big River harp has slots in the covers similar to but smaller than those in the Marine Band.

One of the main factors that determine whether a harmonica’s tone is characterized as warm or bright is the tuning used.  Equal temperament tunings, such as used on Lee Oskar harps, are typically described as brighter sounding than more justified tunings such as used on most Hohner harps.  For more information about tunings and temperaments than you knew could exist, see Pat Missin’s “Altered States” at http://www.users.globalnet.co.uk/~patm.

I recommend starting with a plastic body harp.  Wood combs can swell and be rough on the lips, and tend to be less air tight and more difficult to play than plastic or metal comb harps.  Here are my top 5 recommendations, in no particular order:

  • Hohner Special 20
  • Lee Oskar Major Diatonic
  • Hohner Golden Melody
  • Hering Blues
  • Hohner Big River

Eventually you’ll probably want to try many of the different models to decide which you prefer.  One approach is to buy different models for different keys, but remember that different keys have their own individual characteristics, so not all differences you notice may be attributable to the harp.

Also remember, all harps can be (are!) less-than-perfect out of the box, and all will sometimes break reeds (where they go flat), especially for beginners learning bends, or more advanced players learning overblows.  Many people find that Lee Oskars last longer than just about any other model, and I’ve personally never had one go bad.  Many people prefer the sound of Hohner harmonicas, however, so you’ll have to figure it out for yourself!  In my opinion, the better the player the less difference there is in the sound of the model of the harp.  I don’t know anyone who can listen to a CD and accurately tell you what model harp is being played based on its sound.

Which Key Should I Get?

The correct answer is, of course, it depends on what music you want to play and what position you want to play in.  For blues, rock, and country you’ll usually be playing with guitar players, who prefer sharp keys.  Most of the time 2nd position (cross harp) will the be position of choice.  Guitar players often play in the keys of G, E, A, and D, so for playing along in 2nd position 
the harp keys to get first are:

  • C,
  • A,
  • D, 
  • G.

After that, keys Bb and F are used pretty often. The last keys to get are Ab, Eb, Db, E, B, and F#/Gb.  You should get all 12 keys so you can have the flexibility to play with any song, regardless of key, using whatever position works best.  If you want to play horn parts, or play mostly with keyboard players, you’ll be playing in flat keys more often, so you might want to get F, Bb, and Eb before A and D.


The Diatonic Harp Reference: How a Harmonica Works

A harmonica consists of two reed plates, the top one for blow reeds and the bottom one for draw reeds, which are attached to a comb and shielded with top and bottom covers.  Each reed plate has different length slots over which reeds of corresponding length are fixed at one end.  An air stream passes over the reeds into or out of chambers in the comb and causes the reeds to vibrate.  This configuration of reeds puts the harmonica in the class of so-called free reed instruments.

The reeds vibrate, but interestingly it is not the reed vibration that causes the harmonica sound.  You can verify this for yourself by removing the covers and plucking a reed.  It makes a tiny ping sound, nothing like what you hear when you play the harmonica. The sound of the harmonica is created by the action of the reed vibrating through its slot and chopping the air stream.  This is similar to the way a siren works.  There is very little clearance between the edges of the reeds and the sides of the slots in the reed plates, so when the reed is actually within the slot during its vibrations the air stream is essentially shut off.  When the reed emerges from its slot on either side of the reed plate the area through which the air stream can pass opens up, so the air stream starts up again.  It is this vibration of the air stream that makes the harmonica sound.  The reeds are not like guitar strings, which vibrate to make the sound which is amplified by the acoustics of the guitar body.  They are just springs that cause vibrations in the air stream.

The tiny harmonica does not have any resonant body like a guitar or violin, or a sound board like a piano.  Nothing in the harp appreciably amplifies its sound or resonates.  The resonance comes from the player, which is largely why the harmonica is such a personal instrument.  Many people will tell you that the material out of which the body of the harmonica is made determines how it will sound.  While there may be very small differences in tone due to materials, any such difference is essentially negligible to all but the most advanced players.

The top picture above shows the harmonica parts in their proper orientation.  Notice how from this angle you can only see the slots in the reed plates on the other side of the plate from where the reeds are attached.  Both plates have their reeds facing down.  You can see that when the harp is a*sembled, the upper reeds are inside the comb and the lower reeds are outside the comb.

Normal blow notes are caused by the upper reeds crossing their slots when the air stream enters through the holes in the comb, flows over the inner reeds, and exits through the slots.  The reeds move into their slots, stopping the air stream, and then out the other side of the reed plate, which lets the air flow again.  As the reed deflects it gains energy like stretching a spring or a rubber band.  When the air pressure is released after the reed passes through its slot the energy in the reed causes it to spring back toward its starting position, once again crossing its slot and cutting off the air stream.  This process repeats while the air stream is maintained.  Normal draw notes work similarly but are caused by the lower reeds crossing their slots when the air stream flows over the outer reeds, enters through the slots, and exits through the holes in the comb. This action of the reeds where they first move into their slots is traditionally called a closing note.  Bends to change the pitch of closing notes are called closing bends.

During normal draw or blow bends, both the draw reed and the blow reed can participate in making the note.  As you start with a draw note and bend it down to its limit, initially the draw reed makes the note as above, then both reeds vibrate through their slots to make the note, and finally, at the deepest part of the bend, only the blow reed is making the note.  You can verify this by removing the covers and using your fingers to stop the vibration of the upper and lower reeds at various times during a bend.  The reverse happens during blow bends: the blow reed starts, both reeds participate, and finally only the draw reed makes the sound.

The range of bending available for a pair of reeds is determined by the pitches of the natural notes of the reeds (i.e. the unbent notes).  The pitch can be bend down from the high note to just lower than 1 semitone (one half step, e.g. B to C) above the low note.

The opposing reed, i.e. the blow reed during a draw bend, starts by moving away from its slot.  This deflection adds energy to the spring that is the reed.  When resonance factors are just right the opposing reed can gain enough energy that when it springs back it goes all the way through its slot.  The action of the reeds where they first move away from their slots is traditionally called an opening note.  The physics of exactly how all this interplay between the reeds, air stream, and slots works is largely unexplored, unintuitive, and not well understood.

The point to understand is that during a normal bend, one reed is operating in a closing note fashion while the opposing reed is operating in an opening note fashion.  The closing reed’s pitch gets lower while the opening reed’s pitch gets higher than their corresponding natural notes.

During overbends, i.e. overblows and overdraws, the resonances and air flow characteristics are such that the closing reeds don’t participate in making the sound, and only the opening note is played.  (It is possible to play in such a way that the closing and opening reeds both play and produce different pitches.  This is usually caused by poor overblow technique, but can be used to achieve two-note double stops that can’t be achieved any other way.)  The action of stopping the closing reed from sounding is often called choking the reed, which forces the closing reed into its slot with very little energy so that it neither crosses its slot nor has enough energy to spring all the way back to its normal position. With the slot blocked the air stream cannot flow that way, and with the little energy in the spring the reed remains in position to block the slot, so the closing reed vibration never takes place.  Overbends are opening notes, so their pitch is higher than the natural note of the reed–just the opposite of normal bends.

How does the harmonica work?  You inhale through it or exhale through it and it makes notes.  You change the shape of your mouth, move your tongue around, open and close your throat, breathe with different pressures and attacks, and the notes it makes changes.  You do it enough and you figure out what makes what happen. 


The Diatonic Harp Reference: Getting Good Tone

Tone is a frequent topic among harp players, but it is not a simple concept that is well defined.  Tone is the Holy Grail of harmonica.  It is related to the musical timbre of the instrument, but most often encompasses other playing elements as well.

Tone is about 
Notes 
That sound: good. 
Notes 
That sound: Clean and full and Big and fat and 
Round and warm and Sweet and clear.  or 
Notes that sound: 
Bitter and shrill or Light and airy or Bright and piercing or 
Powerful and edgy… 
Notes: 
That aren’t weak and wimpy or tentative, but that 
Speak out and Sing, 
Confidently, with 
Your voice
Or softly whisper 
Your secrets
Notes: 
That rip through you and 
Grab your insides and 
Tear the emotions out of you. 
That’s good tone.

Tone production relates to the whole of playing a note: how it is attacked, how it is sustained, what (loudness variation) dynamics are applied, how it ends: abruptly or smoothly or tailing off, and what effects are used on it when, such as vibratos and/or tremolos, or slurs or other combinations with other notes.  A player with good tone uses many different techniques, timbres, effects, and varieties of note shaping to produce his/her notes.  Notes shouldn’t just happen.  Notes should be willfully created.  All of them.

Phrasing relates to how notes are played in succession, whether smoothly with legato or abruptly with degrees of pizzicato or staccato, how dynamics and musical space are used to frame notes and passages and set them apart from other phrases in the music.  In grammar, a phrase is a related set of words formed to express an idea.  In music, a phrase is a related set of notes used to express a musical idea.  Phrasing, while distinct from tone, is not unrelated to it.  In much improvised play, it is the musical idea that is maintained from instance to instance of a song, not the precise notes and timing.  Just like when you have an opinion or idea to express in words, you don’t always say it the same way, using the same words in the same order with the same emphasis–so it goes with musical ideas too.  Musical ideas can be replicated in phrases using different notes and timings, so long as the feel remains consistent.  What has this got to do with tone?  Well, if you take away specific note sequences and timings for the basis of a musical idea, you have reduced the number of musical elements left to worry about.  Tone (strictly timbre) is one of those remaining musical elements.  Rhythm is another that is partially left.. the groove–the underlying beat pattern and beat emphasis is normally kept consistent to maintain the feel of a phrase, even if the rhythmic patterns of the note durations is not kept the same.  The vibrato element of tone is one element that can be used in setting the feel to a phrase.  The tone of the notes should be appropriate for the phrase being played–the tone should augment the musical expression.  The tone can work together with the other phrasing elements–including dynamics, note durations, and rests–to enhance the musical statement that is a phrase.

Tone comes from the entire musical system that produces the note, from the instrument to the player to the setting to the amplification.  Of this sound production system, the player is by far the largest most dominant factor when it comes to tone.  Through out these pages I talk about techniques that enhance your ability to make different sounds with the harp, and provide a basis for overall good tone.  Here are some elements to pay particular attention to, to pick up on when you see them a*sociated with other topics and techniques:

Common Elements of Good Tone

  • Good harmonica tone sounds good with the rest of the music, and changes according to the demands of the musical expression.
  • Clean single notes.  Sloppy play is an enemy of good tone.
  • Playing in tune.  This includes draw bends, blow bends, intermediate bends, and overbends–all the note types.
    • Also, the tuning system used, such as equal temperament or just intonation or some compromise between the two, affects the tonal characteristics of passages and chords.
  • Breathing from the diaphragm helps produce a big fat full tone.
  • Resonance works with breathing to produce a loud or complex full bodied tone.
  • Effective use of vibrato works with the rhythm of the music to add variety and life to the sound of a note.  Consistency of vibrato through the different note types can be a key to maintaining a cohesive tone through a passage, and mask the playing techniques used to create the note.
  • Consistency among note types in a passage contributes to the sense of a controlled and motivated tone.
  • Draws
  • Blows
  • Draw Bends
  • Blow Bends
  • Full bends
  • Intermediate bends
  • Overblows
  • Overdraws
  • Single-reed “valve” style closing reed bends.
  • Open airways, including the mouth and throat help get the thick round tone.  Pinching of the air stream makes a note weaker and thinner and less confident.
  • Effective hand cupping techniques add resonance and variety and shape to the note.  For amplified play, a tight hand cup fattens up the sound, makes the note louder, adds compression, and contributes to a powerful, edgy distortion.  A leaky seal makes the note thinner, softer, more shrill, less biting.  A poor cup around the harp and mic can be like playing an electric guitar with the amp turned off.  A good tight cup is like turning the amp on.
  • Proper equipment for amplification enhances the sound production system–but the player is still the key.  If you have poor acoustic tone, expect to have poor amplified tone as well.  If you have good acoustic tone you have a chance to get good amplified tone, but you have to master those additional amplified tonal elements as well.
  • Proper amplification and electronic effects to work with the player’s tone to enhance the intended feel of the music.  For example, if you’re going for a big fat full tone, don’t use amplification that emphasizes high notes and brittle or piercing sound.  If you want to sound like a distorted electric guitar, don’t play through a clean rig like an SM57 through the PA.  If you want a clean acoustic sound, don’t hold a bullet mic cupped tight and play through an overdriven guitar amp using effects pedals.
  • Even, consistent, and controlled volume (loudness) for all note types, blown, drawn, bent, or overbent.  If your notes are not consistent or controlled as to how loud they are relative to each other, the result will sound chunky, choppy, and strained, and the sense of good tone will be greatly diminished.
  • Good use of dynamics consistently for all note types contributes to an overall sense of good tone.  Dynamics is about controlling loudness, softness, and pulsing of volume, and about changes to the loudness–gradually, or suddenly, playing louder or softer, while keeping any pulsing heartbeat intact.
  • Good phrase-related tone adds a sense of cohesiveness and consistency to each phrase and to the music as a whole.
  • Effective use of variety, especially among musical phrases, to add interest, add spice, add color, and convey different feelings works together with the effective use of consistencywithin musical passages to become the work of musical art painted by the tonal palette and different tonal colors.  If you can’t maintain tonal consistency within a passage, you cannot paint a smooth red stroke; if you can’t add variety to your tone, you can only paint in blue.
  • Effective use of the strengths of the differences among the note types–their individual voices and character adds variety and provides expressive capabilities.  Elements you may wish to downplay for the sake of consistency sometimes, you may want to emphasize for the sake of expression or variety at other times.
  • Attention to the details of note attack, formation, sustain, and shaping is the key to controlling your tone.
  • Tongue slaps for note articulation can help thicken up the sound with brief chords and add punch to the rhythmic heartbeat of the music.
  • Controlled use of slurs to let in small amounts of air and sound from adjacent holes can thicken up the sound and add tension.
  • Effective use and control of difference tones generated with double-stops (2 notes at a time) can add to the overall sense of musical harmony or dissonance, and thicken up the sound with these created, extra notes.  This is an advanced technique that requires very precise control over the bends of both notes when two notes are played at once to “tune” a third note that is automatically generated as a function of the frequencies of the notes being played.  Control over difference tones is especially important for amplified play, where the created difference tones are much louder than during acoustic play.
  • Good musicianship in general contributes to the overall sense of good tone.

Effect Combinations

Though the elements of tone are described individually, they are often used in combination to produce the final sound.  Just because they are discussed separately doesn’t mean they are used in isolation.  There are lots of examples of effects used in combination.. here are a few:

  • Note articulations (including slaps) start a note, but don’t impact the use of dynamics or vibrato.
  • Hand “wahs” are often used in conjunction with bends that are released, which emphasizes the “wah” effect.
  • Tremolos and vibratos can be merged, or transformed into one another.
  • The depth of tremolos and vibratos can be a*sociated with dynamic changes to the loudness of a note.  As a couple of examples, a note could start out soft and straight (no vibrato), increase in volume adding a tremolo wavering of the volume, and end with a loud, pitch-wavering vibrato; or a note could start loud and straight, then fade out with a little vibrato.
  • Dynamic pulsing of the volume of vibrato oscillations can work with phrasing, rhythm, timing, the groove, and legato passages to enhance and emphasize them.
  • Hand tremolo can be combined with throat vibrato and diaphram tremolo to produce a tone wavering volume wavering pitch wavering note.
  • Other examples are left as an exercise for the dedicated student.

Practicing Tone

Practicing tone means practicing all the elements that go into tone production, some of which are mentioned above.  It does not mean playing lots of notes.  It means playing each note for a long time, manipulating it with your mouth and hands and tongue and breath to try to make it sound as good as you can, in as many different ways as you can.  Practicing and playing with good tone is not hurrying to the next note, it is lingering on each note to show the details.

Practicing tone means listening to the sound of each note, and being aware of the details.  The more you know, the more you will notice, the more details you will hear.  You can actually practice tone by learning what different playing techniques sound like, and listening to identify what techniques of note formation and shaping are being used.  The songs Misty and Stormy Sea II are full of examples you can try to identify and analyze to see how the techniques contribute to the tone and the music.  The section on diatonic techniques includes sound samples (in Real Audio format) to help you learn to identify and understand what the player is doing.  Once you can hear and know and think about what can be done, only then can you try to do it.

What the player is doing.  Is doing.  Try to do it.  Doing.  Do.  Something active, not passive.  Good tone is active.  It is willfully produced, it is not something that just happens because of the harp you use or the amplification equipment you play through.  Tone is something the player puts in the note. Something the player does, actively, willfully, by exercising control over him/herself, his breathing, her playing, their music.

But the timbre of different instruments, amps, and mics does vary.  The degree or possibility of certain kinds of tonal manipulations can be different on different equipment and under different conditions.  But remember, good tone is not passive, not just something that happens.  Good tone is control over notes that is done by the player.

Practice playing one note for a long time, listening to its sound, its voice, its nuances.  Change it subtly, change it dramatically, play it soft, play it loud, play it gradually softer and softer, play it gradually louder and louder.  Play it straight, play it with vibrato, change the depth of the vibrato, waver the pitch, oscillate the volume, let it fade out, make it end abruptly.  Hold it for a long time.

I think it is good to practice tone–especially a big fat full round horn-like tone–on lower key (pitch range) harps (say, key of A or lower is better).  The lower notes require a larger resonance chamber, and you have to open up and get big on the inside more for low key harps than on higher key harps (say key of C and higher).  I even suggest working on extended-range low key harps, like a low D or even a “tenor” C like a Hohner 365.  Bends and vibratos on low harps require a tighter grip on the air stream, and larger mouth and muscle movements–and maybe I just like their sound.  Since different key harps have their own character, it is good to practice tone on a full range of keys, including low, medium, and high harps (say, D and higher).  Work on higher key harps requires smaller movements and more subtle control of the muscles.  You can’t really get a big fat horn-like sound out of a high key harp, and it’s harder to get a bright, brittle, piercing, or flute-like sound on a low harp.

Whenever you play, whatever you play, give each note its due.


The Harp Reference: Definitions

In order to learn about the harp, you have to know the language–harp specific terms and their meanings.  The following pictures show a disassembled diatonic harmonica with various parts indicated.  The bottom picture shows a reedplate with the reed side up.

Diatonic Harmonica Parts 

The following table presents some basic definitions used when discussing the harmonica and harmonica play.  Many other less basic terms are discussed in the section about diatonic harmonica techniques


Term Meaning
Bend A lowering of the naturally played pitch
of a reed caused by playing techniques.  Draw notes can be bent on
holes 1-6 and blow notes can be bent on holes 7-10.
Blow Notes played by exhaling.  The blow notes are created by the upper
reeds (numbers up) where the reeds open inside the harp.
Chamber The area or cell in the comb into which the
reeds vibrate.  The player breathes through the outer holes of the
chambers to play the harmonica.  See figure above.
Chromatic A tuning that uses all 12 notes used in Western
music. Chromatic harmonicas have a slide activated by a button that alter
the reed that is sounded to enable fully chromatic play. Often refers to
the type of harmonica, as opposed to a diatonic harp.
Closing Bend A pitch lowering bend where the reed initially closes into its slot.
Comb The body of a harp upon which the reed plates
are attached. The comb has the holes or chambers into which you play. 
Combs are made of wood, plastic, or metal.  See picture above.
Covers The outer covers of the harmonica that attach
to the comb.
Cup The seal formed between the hands and the
harmonica or mic.
Diatonic A tuning that uses only the 8 notes from
a major or minor scale. This is the tuning for normal 10-hole “short” harmonicas,
also called diatonic harps. Often used to refer to the harmonica itself,
as opposed to a chromatic harmonica.
Discrete Comb A diatonic harmonica comb with a separate chamber for each reed.
Draw Notes played by inhaling.  The draw notes are created by the lower
reeds (numbers up) where the reeds open outside the harp.
Gap The space between a reed and its slot in the reedplate.  See picture
above.
Embouchure The method of applying the lips and tongue
to the harmonica.  Often refers to any technique that manipulates
the air stream.
Harp Harmonica.  Seems to originate from
the early term “French Harp”.  Also called “Short Harp” and “Mouth
Harp”, as well as “Mouth Organ”, “Tin Sandwitch”, and “Mississippi Saxaphone”.
Opening Bend A pitch raising bend where the reed initially opens away from 
its slot.
Overblow An advanced type of bend that plays the opposite reed in an opening
rather than closing fashion.  Overblows raise the pitch of the natural
note, whereas normal bends lower the pitch.  Overblows are available
on holes 1-6 and overdraws are available on holes 7-10.
Position Relates to the starting place (e.g. hole
number) and manner (e.g. draw or blow) in which the root note of the scale
is played.  The natural notes of the harmonica when played in different
positions yield characteristic modes.
Reed A thin rectangular metal strip (normally
brass) attached to a mounting plate that is activated by the players breath
to spring back and forth through its slot, which chops the airstream and
produces the harmonica’s sound.  See picture above.
Reed plate The mounting plate for the harmonica reeds.
Normally brass.  See picture above.
Resonance An amplification effect due to sound waves echoing and superimposing
to reinforce certain audible frequendies.
Slot A rectangular hole in the reed plate just
slightly larger than its reed. The reed vibrates through its slot to produce
the harmonica sound.  See picture above.
Tab Short for tablature.  A shortcut notation that indicates how to
play a note on the harmonica.  This is different from standard musical
notation, which indicates what note to play including its relative duration. 
Tremolo Pulsations of air pressure that cause a wavering effect to the loudness
of the sound.  Often referred to as vibrato, and often mixed with
vibrato to produce a note oscillation effect as used by singers. 
When both vibrato and tremolo are present, usually the term vibrato is
used.
Vibrato Slight fluctuations of pitch produced by a slight wavering movement
of part of the embouchure affecting the air stream.  Sometimes referred
to as tremolo, and often used with tremolo to produce a note oscillation
effect as used by singers.  When both vibrato and tremolo are present,
usually the term vibrato is used.


Tribute to Little Walter


Blue Midnight

1 – E7 2 3 4 2 – A7 2 3 4 3 – E7 2 3 4 bar 4 2 3 4
2″  => => => => => => => ~22″ ~2 => => => 3′ 2   2~2″1 . .  . 2″
Start straight 4 bars, 
then           add
vibrato
5 – A7 bar 6 7 – E7 bar 8 4
 2  => 2  3~3′ 2  .  . 2″  2  3′ 2~2″ 1 ~2 => => => 3′ 2   2~2″1 . .  . 2″
 
9 – B7 10 – A7 11 – E7   3 –  A7    12 –  B7 3
~22″ ~22″ ~2 1 . ~4 => 4′ 3 2 . 3 2 ~2 .  ~3 6> 6>

      3> 3>
. 5 ~4 ~4 ~4  .  . 2 3 4
 
Verse 2
1 – E7 2 – A7 3 – E7 bar 4 4
6> 6>  5  5 4 23  .  23 6> 6> 5  5 ~4 32 . 23  6> 6> 5  5 4 23 . 2 3 4>45>5. 6>66>5. 5>44> 3 2 5>
 
5 – A7 bar 6 7 – E7 bar 8
  4=5  =>   =>  =>   =>  =>   => 4~4′ 3 ~4.  32 . . 2″ 2 3′ 5 43 => . . 44
 
9 – B7 10 – A7 11 – E7 3 – A7 12 – B7 4
 ~6    ~6  7 ~6  . 4566’6> 5 4~4′ 4> 3 2 6>54~4’4> 3 2  . 346>6> 5 4′.32 3′ 22″1 .  .  2345>
 
Verse 3
  1 – E7 2 – A7 3 – E7 bar 4 4
5 5 5> 4 5 . 32 . 45> 5 5 6>54~4′  3′ . 45> 5   5 5> 4 5 . 45> 5 6>  5~5’5> 4~4’4> 3 3″ 2
 
5 – A7 bar 6 7 – E7 bar 8 4
2″ 2 3′ 4′. 32 => => 2″23’4> ~44>32 ~4~44>32 4 4’~4 4=5 => => .6>54~4 4′ 32 3’22″1 . . 2~34>
 
9 – B7 10 – A7 11 – E7 3 – A7 12 – E7 4 – E7
~4~44’~32 ~33″22″1 => . 1  2″ 2 34>4′.  3 2  34>4′. 32. 2 ~346> 5.~4 4′.4>  3.432 1 2 2″ ===>2


The Harp Reference: Throat Vibrato

Vibrato

Vibrato and Tremolo

Vibrato and tremolo and two terms that are often used, misused, and interchanged, and different people have different ideas about the distinctions and similarities between the two terms, techniques, and effects.  I have decided to take the essence of my definitions from the “Schaum Dictionary of Musical Terms”.  These are my definitions:

Tremolo is pulsations of air pressure that cause a wavering effect to the loudness of the sound.

Vibrato is slight fluctuations of pitch produced by a slight wavering movement of part of the embouchure affecting the air stream.

The effective difference between the two terms is that tremolo refers to loudness and vibrato refers to pitch.  Tremolo is oscillations in volume and tone, vibrato is oscillations of pitch.

In practice, however, both vibrato and tremolo can be applied to the same note at the same time.  Then what do you call it?  I call it vibrato.  In my experience, the term vibrato is used more than the term tremolo for the harmonica to describe both of these techniques (whether used at the same time or not).   I’ll use “vibrato” whenever a pitch change is present, and tremolo when only volume oscillations are present, the pitch staying constant.

In addition, on the harmonica it is possible to produce oscillations of tone or timbre as well as volume and pitch by manipulating, principally the hands and tongue.  This effect can affect volume in addition to timbre, and so becomes more difficult to properly classify.  For example, hand effect “wah wah”s are commonly heard on the diatonic.  Each “wah” is an opening of the hands, which results in a louder note with a different timbre, but essentially the same pitch.  Since there is no pitch change present, I classify this effect as a tremolo.

Effective utilization of vibrato and tremolo is one of the most crucial elements of good tone.

Diaphragm Tremolo

Diaphragm tremolo, as the name says, is a wavering of a note caused by playing pressure fluctuations created by gently pulsing the diaphragm to produce volume oscillations.

If you gently say “ha ha ha” you can feel a pulsing of your diaphragm.  It is this motion that drives the diaphragm tremolo.

If you say “ha ha ha” while breathing in you may feel a tugging or pulsing at the back of your throat.  To keep the tremolo without pitch variations, open up your throat to keep the air stream from being pinched.  If you pinch your throat to fluctuate the air stream, you are probably adding some pitch wavering, which means you are using a throat vibrato.

Throat Vibrato

Throat vibrato is one of the most important diatonic harmonica techniques to master.  It adds color and variety to your notes in the same way that it does for a singer, and it is intimately a*sociated with good tone.   Throat vibrato may be the most emotional of the vibratos and tremolos because it can engage the diaphragm to make use of both pitch changes as well as volume changes.

Throat vibrato is primarily a*sociated with draw notes on holes 1-7.  The diaphragm is used to provide the playing pressure, the throat is used to smoothly pulse the air stream, and the throat works with the tongue to control the note pitch and the depth of the pitch oscillations.

The key to throat vibrato is a smooth oscillation of pitch and volume.  Done poorly throat vibrato can sound chunky, and not smooth.  Done well it sounds smooth and natural and wonderful.  Strive for a sine-wave type continuous smoothness, with consistent pitch and volume changes.  Rhythm is an important part of the vibrato. You can do vibrato at different speeds, so you should choose a speed that fits with the rhythm and feel of the music.  The pulses of the vibrato should be made to divide the notes into even intervals to add to the rhythmic content of the music.

The classic way to get throat vibrato is to imitate a rapid fire machine gun (eh eh eh eh eh), like when you were a kid. Then do it inhaling instead of exhaling.  It’s the same throat motion that gets the throat vibrato. Work on it until all the chunkiness is gone, and it sounds as natural in your play as it does in a singer’s voice.  There is a tendency for throat noise to be heard during aggressive throat vibrato, especially when a mic is used and the sound is amplified.  You should record yourself and listen to determine if the throat noise is audible or intrusive, and seek to minimize it.

A good way to get the feel of throat vibrato is to try put vibrato or even tremolo on the 3 draw 1/2 step (or even less) bend. Your throat is involved getting the bend initially, so there’s some feel there before you go for the vibrato.  Breathing from the diaphragm will help control the vibrato.  There’s always an interaction between the throat and diaphragm when doing a vibrato, since each is involved in controlling the air stream.  For throat vibrato, obviously the emphasis is on the throat–but you’ll probably notice some involvement of the diaphragm as well.  As you pulse the diaphragm for tremolo on this note, the change in playing pressure coupled with the throat pulling the bend will tend to add a pitch fluctuation vibrato to the diaphragm tremolo.

Try playing the 3 draw 1/2 step bend amplified, but play softly.  Practice very soft draw bends.  At some point you’ll notice what feels like a direct connection between your throat and the note.  Every little nuance of throat motion will be reflected in the sound.  Work on playing softly, with good note formation and support from your diaphragm.  Then put some vibrato on the note by pulsing the air stream with your throat.  The pitch will change up and down because you’ve got a hold of the bend with your throat.  Keep at it, it’s worth it!

How much should you use throat vibrato?  Different players like different things, so it all depends.  Often it is good to emulate what singers do, and start a note straight, then add vibrato toward the end of the note.  Some players think there’s no such thing as too much vibrato, they love it that much.  Other players like to use it more sparingly, to add variety and contrast.  I think you should use it a lot, but not all the time.  Throat vibrato is one of the best things you can do to improve your tone, your control over the notes you play, and your focus on the connection between your playing and the response of the reeds.

Vibrato on Draw Bends

Vibrato can be placed on draw bend notes, either full bends or intermediate bends.  Smooth control of this vibrato makes use of a subtle, coordinated interaction between the throat, tongue, and diaphragm.

The diaphragm provides the playing pressure support for the note, while the tongue and the throat work together to produce the desired pitch.  In the case of bent draw notes, given a stable embouchure mouth, tongue, and throat position, the pitch of the note can be changed by changing the playing pressure.  A gentle pulsing of the vocal tract below the throat can be caused by a nearly imperceptible pulsing of the diaphragm.  Any more than VERY gentle nearly imperceptible movement of the diaphragm can cause an unacceptably large chunky vibrato that isn’t smooth.

It is also possible to hit the bend using the throat and back part of the tongue to produce the pitch.  This leaves the front part of the tongue free to manipulate the air stream and produce a kind of tongue vibrato.  Articulations like “yo yo yo” and “oy oy oy” can help you identify the necessary tongue movements.  Sometimes repeated “biting” type motions of the jaw or mouth and jaw can also be used to get some vibrato and tremolo type effects on bent notes.

Blow Note Vibrato

Most commonly, blow notes will utilize tremolo instead of vibrato, especially on holes 1-6, because altering the pitch of these blow notes is fairly difficult.  However, on holes 7-10 you can do blow bends, so you can definitely use vibrato on these notes.  The diaphragm is used to hold the playing pressure steady, or produce slight pulsations in the volume.  The throat is also used to throttle the air stream, and the tongue position is used to interrupt the air stream and control any bends and how much pitch variation you get in the vibrato.

Practice smoothly bending the blow notes down and back up over their full range.  This will give you the feel of your tongue position, and how much small changes there affect the resulting pitch.

Make sure your notes are fully supported with your diaphragm so you don’t lose your tone during bends, or when you waver the pitch by pulsing your throat or manipulating your mouth/tongue position.

Practice blow bend vibrato on holes 2 and 3 by going from the hole 2 and hole 3 full draw bend (2″ and 3″‘) to blow vibrato for that hole.  Your control over the air stream for the full draw bends can be maintained for the blow note vibrato by merely changing the breathing direction.

Alternate practicing on holes 7-10 and holes 1-6.  Try to bring your tongue techniques from the upper hole blow bends down to your lower hole blow vibrato.  With some practice, you should be able to slightly bend the low notes down in pitch, if you have enough diaphragm support.  As you achieve some pitch variations on the low holes, bring that diaphragm support up to your high holes to add control to your smooth blow bends.

The high hole draw note vibrato poses a similar and symmetric difficulty to the low hole blow vibrato.  First, concentrate on getting a good smooth tremolo on the volume for those notes.  Gradually bring your throat and tongue into the tremolo and try to catch the critical pressure necessary to grab the reeds.  Tiny movements and subtle control of the high hole draw notes can add a small amount of bend to those notes, and enable a vibrato effect.

Draw and Blow Vibrato Consistency

Since the draw and blow notes in different cells on an unvalved harmonica like a diatonic bend different amounts for each note, you have to consciously adjust your technique to try to maintain a consistent vibrato for the various note types.

One way to practice this is to use hole 7.  Hole 7 seems to have some unique qualities.  First, you can blow bend it, but only about a quarter tone–less than a full 1/2 step.  This makes it a good candidate for blow vibrato, since some pitch variation room is there.  The draw note doesn’t really want to bend, but can be coaxed into moving a little bit easier than holes 8, 9, and 10.  Since the depth of the blow bend is limited with respect to holes 8-10, the two vibratos–blow and draw–can be made to sound very symmetric.  Practice getting a consistent, symmetric vibrato for the 7 blow and 7 draw, then move it up to the higher holes.

On the low holes (1-6)  the odds are you’ve practiced and used draw note vibrato much more than blow note vibrato.  Try to apply what you do with the draw note to your vibrato on the blow note.  Practice going back and forth between a strong and controlled and rhythmic draw note vibrato and a similar blow note vibrato.  Altering between the hole 2 draw and the hole 3 blow is effective for getting consistent vibrato because the pitch is the same.. go for the same tone as well.  Hold the notes for a long time.  Listen to how you shape the draw note–how the volume swells, when the vibrato begins, how the note pulses dynamically with the beat, how the sound trails off and whether the depth of the vibrato changes over the duration.  Try to make the blow note do the same thing.  The muscles, mouth position, and approach to the blow note will be quite different–pushing the pitch down instead of pulling it down–but try to make the adjustments so that the notes are symmetrical and consistent with each other, even if the playing isn’t.  I find that when I’m supporting the tiny blow bend on the low holes hard with my diaphragm, the tension makes it easy to produce a fast vibrato.  So the speed doesn’t naturally follow or flow from the draw note to the blow note–it has to be controlled to a slower rate to maintain the pulse and pace set by the draw note.

As you go back and forth between the draw vibrato and the blow vibrato you may find that what you can do with the blow vibrato feeds back into what you do do with the draw vibrato.  You may make the pitch change depth more shallow, or you may change the vibrato rate to facilitate a consistent vibrato between the blow and draw.  You may decide to use different kinds of draw note vibrato at different times, for different reasons–one type perhaps for consistency of phrasing in certain passages, another type perhaps for trying to rip a very emotional note out of a phrase.

Vibrato on Overblows

If you have a good stable overblow note you can add vibrato to it.  Vibrato on overblows is a similar technique to vibrato on the high hole blow notes.  First practice and gain control of vibrato on the normal blow notes in holes 7-10.  Then work on hitting your overblows on pitch and sustaining them with good tone and diaphragm support.  Then, finally, combine the two techniques and work on a smooth stable overblow vibrato.  Note that overblows bend UP in pitch instead of down, so you have the opportunity to add some variety to your tonal palette.

Vibrato on overdraws are similar in technique to draw note throat vibrato.  First you have to have a good stable overdraw.  Then you have to have good subtle control over your throat vibrato.  Practice draw note vibrato on the high holes to gain the fine control over those muscles you’ll need for putting vibrato on the overdraw notes.

Vibrato with Valved Cells

Valved cells have one or more “windsaver” valves that prevent air used to play one reed from escaping through the slot of the opposite reed in the chamber.  Diatonics are sometimes partially valved to allow the normal draw and blow bends, but provide blow bends on the lower holes (1-6) and draw bends on the upper holes (7-10) in exchange for the capability to do overblows.  Chromatics normally have valves for all reeds, blow and draw.

Since both blow and draw bends are available in every cell, the use of valves provides a good mechanism for increasing the depth of pitch changes on notes that normally don’t bend much, and can aid in getting consistent symmetrical vibrato for blow and draw notes.

Single reed closing bends–those that are provided by valves–have a tendency to get weaker as the pitch is bent down.  Effective use of the diaphragm and resonance is needed to support the note and keep the volume and tone consistent during the bend, and during pitch oscillations used for vibrato.

What I Learnt at Buckeye, 1999

  “Brassy, you come up now and tell us what you learned at the Buckeye Harmonica Festival.” She pointed at him, and he stood reluctantly.

  “But Ms. Tery, there was too much!  Don’t the others haveta have time to give their reports too?”

  “Now Brassy, just think of something that stands out as important to you.” And hopefully might be of some interest to the class, she thought.  She motioned for him to come forward, and after a moment’s pause, he finally obeyed.

  “I learned that I haven’t been paying enough attention to my blow vibrato,” he said in the general direction of no one in particular, his eyes on his shoes.  “I used to work on it more, but I forgot about it while worrying about overblows and some other stuff.”

  “Which of the teachers told you that?” she asked.

  “I learned it from Joe Filisko.  But he didn’t tell me, he showed me.”

  “Oh, you mean you talked to him during one of the daily 3 hour teaching extravaganzas,” she figured.

  “No, it wasn’t like that.  I didn’t know enough to ask him about that when I had a chance.  He showed me up on stage, by playing his music.”

  “Well Brassy, don’t make me keep asking.  What did he show you?”  She was getting a bit exasperated by now.  Must be something in the air.

  “He showed me how good blow vibratos can sound when you have enough control of them to push the pitch down a little in addition to oscillating the volume.  That’s a basic technique of draw note vibrato, but not so common on blow notes.  It’s a vibrato that can be done very fast too, it seems, probably faster than a draw vibrato.”

  “What do you think his secret is?” Ms. Tery asked.

  “Well, the first thing you have to do is think about it and not ignore it,” because otherwise you wouldn’t even try to put it in, he thought.  “And I think you have to have powerful blow notes.  A lot of players work and spend so much time on the draws, the draw notes get very powerful, and the blows don’t keep up.  That’s where I think overblows come in.  The practicing of overblows–especially on harps not made by Joe!–helps develop very strong blows and control over the blow reed, which you have to “choke out” to let the draw reed sound the overblow note. I think it’s because of getting in touch with the critical pressure…” she cut him off.

  “Okay okay, never mind that.”  She sometimes grew weary of his long windedness.  “Why would anyone care?”

  “One of the side benefits of this overblow work is control over normal blow bends, of course, but another benefit is probably good power and control over blow note vibrato as well.”

  “Blow note vibrato isn’t that difficult,” she pointed out.

  “Blow note diaphragm-based tremolo–as if you were saying ‘ha ha ha’–the kind that oscillates volume only, and not pitch, is pretty easy.   But getting any pitch shifting on the blow vibrato to compliment the throat vibrato on draw notes–that’s more difficult.”

  “You can sit down now.” she told him.  He shuffled off back to his desk, and a part of him wished he was practicing instead of sitting in class.

  But he loved the other kids.


The Harp Reference: Overblows

Overbends: Overblows and Overdraws

A so-called overbend is a type of bend where the pitch that results is higher in pitch than the natural note of either reed in the hole, rather than lowering the pitch as with ordinary bends.  This is because the overbend technique actually causes the normally-sounding reed to choke while you’re playing so it doesn’t sound, and causes the other reed in the chamber to sound as an opening note instead.

During a normal draw bend both reeds can participate in making the lower pitched bent note.  The draw reed lowers its pitch and sounds as a closing reed note, while the blow reed raises its pitch and sounds as an opening reed note,  actually dominating the sound. A full bend sounds almost exclusively from the opposite reed. In other words, a full draw bend sounds from the blow reed, and vice-versa for blow bends  The point is, a reed sounding as an opening note with a higher pitch is not unusual on the harp–it is normally just hidden within ordinary bends!  Overbends aren’t any more stressful on the reed than normal bends, if they are played properly.

The term “overblow” was coined by Howard Levy when he asked a brass player what they called “created” notes that aren’t natural to the instrument’s tuning, and the term has stuck.  Don’t be mislead from the name into thinking you have to blow or draw hard to get the overbend note.  It’s a matter of finesse and focus, not power and force.

How do you play an overblow or overdraw?  Good question.  Hard answer.

First, you have to have your reed gaps set close to the reed plates.  It also helps to have harps with good compression, that is good “air tightness”.  If your harp is set up improperly, you simply won’t be able to get an overbend, and if its not set up just right it will be much more difficult to get the overbend.  You can’t count on being able to overblow any harp right out of the box, but just about any harp that comes in all 12 keys can be adjusted to achieve overbends.

Overbends are advanced techniques that require a lot of control of your mouth, throat, and tongue, as well as your playing pressure.  An overblow is NOT a result of extra hard blowing or anything of the sort.  It is a technique of finesse, where your tongue and throat have to be set in exactly the right position and your activation pressure has to be just right.  Don’t even think about trying for overbends unless you can easily do and control all the normal draw and blow bends.

The holes in which overbends add new notes not available through normal play or normal bends are:

  • overblows on holes 1, 4, 5, and 6, and
  • overdraws on holes 7, 9, and 10.

Overblow technique varies considerably between holes 1 and 6, as do overdraw techniques between 7 and 10, so you pretty much need to work on each one separately.  Most people find that the overblow on hole 6 is the easiest one to get first.

Overblows

In an overblow, your tongue is set in essentially the same position as for a blow bend on hole 8.  The tongue and the throat constrict at the place where you make the hard “K” sound.  The air pressure comes from deep within, from your diaphragm.  Very tight control over the air stream and embouchure is required to start an overblow and to keep the overblow sounding after you get it.  A slight waver in your control and the overblow will be lost.

You can’t really sneak up on an overblow–you’ve got to snap it into place right from the beginning.  Try imitating the sound of a jet engine.  Form an O shape with your mouth and hump your tongue up at the back to constrict the back of the mouth at the soft palette, and push the air through the constriction with your diaphragm. Don’t blow too hard!  It’s not necessary to force it.  You have to finesse it!  Try doing a draw bend in the hole first, then go right to the overblow.  You don’t have to change your mouth position much from the draw bend to the overblow.

Not getting it?  Try this: hiss like an angry cat, with your mouth open and the hiss coming from your throat.  Now use that to start a focused blow bend on hole 6.  If you get the pressure just right, the overblow should pop out there for you.  Don’t forget or discount the advice to adjust the reed gaps close to the plate!  Getting the gaps right is part of the overblow experience.

Once you get an overblow, practice holding it as long as possible.  Relax everything you can without losing the overblow note.  You’ll find that you can get an overblow with much less effort than you think if you have your tongue and mouth in exactly the right position and shape.

Despite the tight tolerances required to get overblows, with enough practice you can actually bend the pitch of an overbend, and use vibrato on overbends.  This requires a very well set up harmonica, and very good control that only comes from a lot of practice.

Overdraws

An overdraw feels like a strong draw bend with the jaw not dropped and the tongue set more in a blow bend position.  Here again, the pressure used to get and sustain an overdraw is very critical with very little variation tolerated.  Start it with a well articulated attack with the tongue, as if making a T sound, and play with a tight pull draw bend.  Hole 7 is the most useful overdraw, though you may find it easier to get an overdraw from hole 8–but remember that hole 8 doesn’t add a new note.  Experiment with different pressures, because you have to get it just right to pop the overdraw note out there.  Remember, you’re pulling the note up in pitch, not down. You need to adjust your resonance to match the higher note.

More Tips

Still having problems?  Not surprising.  It is helpful to get the sound in your ear, and get the feel of what hitting an overbend is like.  One way to do that is to remove the covers and practice overblows while blocking the corresponding blow reed.  (Remember, it’s the draw reed that sounds during an overblow, as an opening bend.)  You can use a finger to block the reed, or you can even use a small piece of tape to do the job.  It is much easier to get an overblow with the blow reed blocked, and you can practice this way to learn the sound you’re going for.  It’s easier to get the note when you know what it is supposed to sound like–probably due to a subconscious tuning of the vocal tract to the resonant frequency of the note.  It’s kind of like whistling–you automatically make the adjustments in your mouth to get the note you’re hearing in your mind’s ear.  Once you are used to getting overblows with the blow reed blocked you can transfer the feel of the technique and the sound of the note to normal play–with the covers on!  I have heard of people who actually cut a large hole in the top cover so they can use their fingers to block the blow reeds and get overblows.

Another way to go is to practice on a Discrete Comb, which isolates the draw reed in its own chamber and accomplishes the same thing as blocking the blow reed with your finger or some tape, making overblows much easier to get.  Even if you don’t use the Discrete Comb as your standard instrument, it is quite useful as a practice device.

Overbends take a lot of practice.. probably more than almost any other diatonic playing technique.  Then, once you can do the overbends it takes a lot more practice to use these extra notes to play the diatonic harp chromatically.  Overbends open up all the positions to all modes of play, and bring jazz to the domain of the short harp. But it’s not easy.

Again, make sure you adjust your reed gaps as close to the reed plate as you can get them without causing the reed to choke.  Adjust the gaps close for both reeds in the hole.  In other words, to set hole 6 for overblows, gap both the draw reed and the blow reed close to their reed plate.  An improperly gapped harp is extremely difficult if not impossible to overbend.

The use of overblows has spread rapidly in recent years, primarily due to Howard Levy and his students.  They provided the “missing link”, technique wise, that bring every note and full chromatic capabilities to the little diatonic harp, though proper intonation and timbre are troublesome.  Not to be overlooked is the contribution of Joe Filisko to the overblow revolution.  Joe is a superb craftsman who has developed the customization techniques to build the superior instruments that have made overblows much more stable and accessible to the ordinary player.  He, Richard Sleigh, and Jimmy Gordon build Filisko-method customized diatonic harps, based on the Hohner Marine Band and Special 20 harmonicas, that overblow with extreme ease.  Unfortunately, Joe and Richard are so busy they aren’t taking new customers. At this time, Jimmy Gordon is still taking order, but be prepared to wait a good while, currently 4-5 months. They aren’t cheap, but they are great. Once you have one you can have it repaired for about the cost of a normal harmonica.   http://www.customharmonicas.com/

Learning how to overbend is one of those techniques that can have positive impact on all your playing, including non-overbent notes. You gain control over your mouth, throat, and tongue position, become more in touch with your air stream and playing pressure, learn how improve your harp set-up, and enhance your vocal tract resonance and overall focus. It’s well worth the effort required to learn how to incorporate overbends in your playing.


The Harp Reference: Breathing

Breathing

Playing the harp 
  Begins and ends 
With breathing.

Breathing in and out.

When you want.

As fast or slow as you want.

As hard or soft as you want.

For as long as you want.

Whenever you want.

From Your Diaphragm

Through out these pages you have heard (or will hear) me harp on breathing from the diaphragm.  Hopefully it has sunk in (or will sink in) that breathing from the diaphragm is important, worth paying attention to, worth working on, worth thinking about, considering, contemplating… and even practicing.

But what does it even mean?  Well, basically, we humans can breathe through our nose and/or mouth by using our lungs and/or our diaphragm to pump air in and out.  Our lungs are up in our chests, and our diaphragm is underneath, about the level of our stomachs.  Learn to isolate and separate the feelings of breathing from your lungs, both your lungs and diaphragm, and just your diaphragm.

The common advice on how to go about isolating your diaphragm breathing is to lie on the floor (hard surface helps) on your back and relax.  Put a book on your stomach and watch it move up and down.  Feel the weight of the book against your stomach and feel where your stomach pushes back against it.  Down there.  That’s your diaphragm.  Breathe from there.  Breathe all the way out and cough.  Feel the pounding of your diaphragm?

Get your lungs out of it.  If you feel your chest expanding you’re breathing from your lungs.  Chest equals lungs.  Stomach equals diaphragm.  Some guys say “play from your toes.”  From deep.  As deep as you can get.  If your shoulders are going up and down you’re breathing from your lungs.  Lungs are higher up.  Feelings caused by breathing that are high up in your body–your chest and your shoulders–are caused by breathing from your lungs.  Relax those muscles.  Stop expanding your chest and raising your shoulders.

Why?  You don’t like the answer that experience shows that breathing from the diaphragm works and sounds best?  You’re not happy with the thought that all the great players say the same things, and that the same wisdom is known by singers?  Okay, here’s another justification for you.

Resonance

Resonance is a reinforcing of sound wave echoes so that some frequencies in essence get amplified more than others.  Resonance is what breaks the crystal goblets when singers hit just the right note in just the right way.  Echoes are sound waves bouncing around, and since sound waves in air basically travel at the same speed, the affected (amplified) frequencies (how fast the sound waves jiggle the air, which jiggles our ear drums, which rate determines the pitch we hear) are determined by the size of the echo chamber; the distances of the walls from each other.  The lower the note, the longer the wave length, the bigger the chamber must be to affect that frequency.  This amplification of certain frequencies greatly influences the resulting tone and volume of the note being produced.

It turns out that our mouths are not quite big enough to provide an optimally sized resonant echo chamber for the sounds we produce either playing or singing, especially on lower notes.  The mouth is very important in manipulating the resonant chamber size (and shape) so we can tune it to the notes we are playing, reshaping the sound, but we need a little bigger chamber, something with more volume.  We add our hands, and this helps both in creating a larger chamber and providing a way to manipulate the chamber size to maximize the impact of each individual note.  But hands and mouth together are still not big enough.  The control comes from there, but the capacity–the size and volume of the chamber in which the sounds echo and resonate, benefits from use of the entire vocal tract, everything below the throat and back down into the lungs.  The lungs themselves are full of tissues and fluids, along with a myriad air sacks, so I don’t know how much the lungs themselves add to the resonance chamber–but, the airways that lead to the lungs are very important.  We need to relax the chest muscles that operate the lungs so we can control and expand the vocal tract resonance chamber.  Then we can still use the diaphragm to control the air flowing into and out of our lungs while maintaining control over the vocal tract that feeds the lungs.  We need to make ourselves big on the inside to take advantage of the resonant capabilities of our bodies.

Relax

You always hear people–musicians, athletes, and people skilled at just about any activity–talking about being relaxed or the importance of relaxation, don’t you?  The best ice skaters look perfectly comfortable and at ease, the best athletes seem to glide, float, and coast, the best performers seem relaxed and at home on their stage.  Even when they are heavily exerting themselves.  When they say “relax” they don’t mean relax all your muscles–they mean, relax all the muscles you don’t need to be using.  Don’t fight yourself.  Muscles work in pairs often times, and if you are tense, one muscle that you don’t need to be using may be fighting a muscle that you do need to be using.  To relax the proper muscles, you first have to become aware of what muscles you are using, and which ones you need to be using.  Then you have to control the ones you don’t need to be using so they remain relaxed.  Relaxation takes control over your muscles.  Relaxation is a form of control.  Adding relaxation is adding control.  If you don’t have enough control over some element of your play, try to isolate the muscles involved–the ones you need to use and the extra ones you’re using besides, and gain control by relaxing the muscles you don’t need to be using.

Through the Nose?

Most of us play the harp with our mouth most of the time.  Unfortunately, there are exceptions, but let’s try not to think about that.

What do you do if you run out of air, either breathing in or breathing out?  Well, pretty much you have to breathe out or in to compensate, if only a little.  If your mouth is on the harp and you change your breath direction, you change the note you’re playing as well, and if you don’t want to do that you have two choices: breathe through your nose or remove your mouth from playing position.

You can quickly take a bite of air, or let some go, by momentarily taking your lip off the cover plate and breathing through your mouth but not through the harp.  This feels much like a biting motion, where you’re biting at the harp.  This lip biting technique can be used to articulate notes, and the articulation can be combined with breath equalization.

More often, excess air is expelled through the nose while playing notes while breathing out.  Some players talk about almost always letting a little air out when they play blow notes because they know they’ll need the lung capacity later, since they play mostly draw notes.  Running out of air is seldom the problem.  Having too much air is often the problem, and this letting out of air during blow notes helps keep their lungs in equilibrium.

On the other hand, air leaking in through the nose during draw notes is usually not a good idea.  Control over draw bends and vibrato is greatly reduced or lost if air is allowed to come in the nose.  And besides, as I said above, too much air is usually the problem, and excess air coming in is not what you need.  If you have trouble holding notes for a long time, see if you are letting air enter or escape through your nose.  If you are, you need to learn to control that.  Don’t get discouraged if you can’t control it right away.  Like so many things, it’s something you have to work at and learn.  But once you get it you probably won’t even think about it again, unless you read something that reminds you…

Exercises

Whenever you do breathing exercises, use caution not to overdo it and make yourself dizzy or hurt yourself in any way.  You’re not trying to force your body to do something it doesn’t want to do, you’re trying to train it and teach it and condition it to want (or be able) to do more.  I’m no physician, so if you have any health problems that concern you–as always, check with a doctor first.

Anything that helps you gain relaxation control over your breathing should be beneficial to your harp playing.

Meditation in its various forms and guises tends to emphasize controlled, often slow and deep breathing, sometimes even with chanting.  Breathing exercises a*sociated with meditation practice can be applied to breathing for the harmonica.

Running, swimming, and other aerobic exercise can help strengthen your lungs and possibly improve your lung capacity, or at least allow you to more effectively utilize the lung capacity you have.

Most people breathe from only the top third or so of their lungs.  Most of the capacity lower in the lungs is not used, not well developed, and not contributing much to the person’s breathing.  Playing diatonic harp in cross harp position (2nd position) involves mostly breathing in.  When you “run out of air” it’s usually because you are getting too much air into your lungs.  We need to develop the lower parts of the lungs, breathing fully and deeply.

Breathe out slowly as far as you can.  Completely empty your lungs.  Squeeze out the last bits of air.  Got it all out?  Try coughing–see how much more there was?  Cough some more.  Get all that old deep stale air out of there.

Then slowly and willfully allow your lungs to begin filling.  This is a process of gradually relaxing the muscles that have been called into play to force the air out, up to a point.  After a while your lungs will be comfortably full of air, but keep slowly and gently filling them deeply.  Concentrate on using your diaphragm to take your slow deep breath.  It should feel like you are pushing out with your stomach.  Make sure your chest is not expanding and your shoulders aren’t rising.  Take several such long slow breaths, completely emptying your lungs first, then relaxing with control to slowly fill them back to neutral, then drawing with your diaphragm to fill them completely full.  Think you’ve got them all the way full?  Try a few quick inward pants just when you think you’re holding as much air as you can.  Picture the videos you’ve seen of pot smokers trying to inhale just a little bit more.

Pant like a dog.  Go on.  Feel the exercise your diaphragm is getting?  Open yourself up and go to it.  Let out all your air and pant.  Fill your lungs full and pant.  Keep panting while slowly breathing all the way in and all the way out.  That’s not as easy as it sounds, is it..  Keep at it, you’ll be gaining strength and control.

Practice rhythmic breathing.

Practice train songs.

Practice holding notes for a long time, both breathing in and breathing out.

While you’re holding notes, slowly vary the volume from soft to loud to soft.  Gain control of how much pressure you are using to generate the different dynamics.

Practice with the harp in your mouth, and play big full round smooth even chords.

Practice without the harp in your mouth when you can think about breathing, but can’t play your harp.

Playing the harp 
  Begins and ends 
With breathing.

Breathing in and out.

When you want.

As fast or slow as you want.

As hard or soft as you want.

For as long as you want.

Whenever you want.

Work on all those things.


The Harp Reference: Embouchure

Embouchures

The embouchure (ahm’ ba sure) is the method of applying the lips and tongue to the mouthpiece of a wind instrument, like the harmonica! If you are just learning to play I recommend you start with the Lip Block.

1) Lip Block – A variant of the pucker (see below), it’s also called lipping. Tilt the harp up at the back about 30 to 45 degrees, and open your mouth pretty wide, enough to cover about 3 holes, with your upper lip about 1/2 to 2/3 of the way over the top cover.  Let the harp nestle into your lower lip. What happens is that quite naturally, without really trying and without forcing it, the lower lip blocks the 2 side holes and lets the center hole sound cleanly. The open mouth position helps improve your resonance, which in turn helps in getting bends correctly, and improves your overall tone. The harp needs to be well in your mouth… Don’t be shy! You can’t just peck it with puckered lips and make it work right.  You should be relaxed, without tightening your lips or pinching in your cheeks.

2) Pucker – The lips are pursed and pushed out, and the harp is positioned deep back into the mouth (but not are far back as for tongue blocking or U-blocking. See below).  The air stream is “directed through the pucker to one hole”.  (Note: This is as described in many beginning harp books, ala John Gindick’s.  In my opinion, the pucker does not direct the air stream through the hole so much as the deep position of the harp in the mouth brings the lips into contact with the side holes not to be played.)

Note: I believe that for experienced players the pucker and lip block evolve so as to become nearly indistinguishable.  In my opinion, it is easier to reach this “pucker/block” embouchure starting with the lip block than with the “pucker” mental image.

3) Tongue Block – The mouth is opened to cover 3 or more holes, and the tongue blocks the holes that are not intended to sound.  The tongue block pretty much must be used for octave and split interval play . Tongue blocking also facilitates various harp playing techniques and effects, such as “slaps” and “flutters”.  The tongue normally blocks the holes on the left and leaves a single note on the right unblocked to sound, but the tongue can also block holes on the right leaving a single note on the left to play.  It’s best to learn to block and play on both sides to facilitate quick jumps and easy access to holes on both ends of the harp.

4) U-block – A variant of the Tongue Block where the tongue is (normally) rolled into a “U” shape, though the tightness of the curve varies a lot from player to player. The tip of the tongue is placed just beneath the hole to be played or even down onto the lower cover. The mouth is open to cover about 3 holes, and the tongue curves up, or is pushed up to block the left and right holes.

All bends and overblows/draws are available using any of these embouchures.  There is no clear evidence of which I am aware that any embouchure allows faster or cleaner play than any other.  The consensus best approach is to learn them all and use the ones you like.

Note: The tongue block is the only embouchure that offers split intervals and certain “slap” effects.  (U-block techniques easily extend to become essentially tongue block techniques for blocking multiple holes.)  In my opinion, for most people if only one embouchure were to be used, the tongue block would offer the most versatility.  However, as mentioned above, there is no need to stick to only one embouchure, and it’s best to learn as many as possible.

Also note: It is possible to “pucker/block” out of either corner of the mouth, and it is possible to lip block on either side of a single hole to be played.  These modifications to the “standard” embouchures can add speed and accuracy since less harp/head movement is required to jump to a non-contiguous note. For the pucker/block, the harp is “twisted” from side to side to bring either corner of the mouth into play.  For the tongue block, the tongue is moved left or right to cover/expose the proper notes.  For U-blocking, the tongue can be moved from side to side to select individual notes with little or no movement of the harp relative to the mouth.


The Harp Reference: Bending Tips

Bending Tips

Bending is a basic diatonic harmonica playing technique used to produce notes not otherwise available in the basic tuning of the harp, and they are also used to provide various sliding-note effects.  Bends are, in large part, what give the diatonic harp its unique character, and are intimately related to the blues tradition.

Bending, whether draw bends or blow bends, produce notes lower in pitch than the natural, unbent note.  The amount you can bend a note depends on the pitches of the two reeds in the hole.  The higher pitch note in the hole can be bent down to just below a half step above the lower pitch note in the hole.  For example, the notes on a C harp in hole 2 are: blow-E, draw-G.  The higher G note can be bent down to Gb and F–and just a little lower.  It is best to only bend down to the desired note, and not further, in order to minimize stress on the reeds.  You can use a piano, guitar, pitch pipe, or electronic tuner to check that you’re hitting the correct pitch.

Bending is not something that is easy to describe how to do–and it is difficult to show because all the movements are hidden inside the mouth and throat.  It takes practice to be able to do bends at all, and lots more practice to do them well.  There are draw bends available on holes 1 through 6, and blow bends available on holes 7 through 10, each of which require different playing techniques.  To make matters more challenging, different key harps require different bending techniques, depending on the pitch range of the harp.  Lower key harps (e.g. A, Ab, G, and low F) require more mouth/throat/tongue movement than the same holes on higher key harps (e.g. C, D, E, and F).

Bends are intially quite challenging–but they are quite fun, and eventually become second nature.  Learning your bends not only gives you more notes and effects, it gives you more control over your notes, air stream, resonance, and tone.

So, celebrate when you finally get your first bends!  But remember–that’s only the beginning!

Draw Bends

Draw bends are available on holes 1 through 6–but hole 5 will not bend as much as a full half step.  Don’t try to bend lower than the note will go or you risk damaging the reeds.

Here are some tips for getting your first draw bends.

  • First, be sure you can get a good, clean, pure, loud, single note before going any further!

Don’t even worry about bends if you can’t get a consistent pure single note.

  • One good approach is to use the “lip block” embouchure. It helps you relax and get your mouth open, which helps improve your resonance and makes bending easier.
  • While breathing in from your diaphragm, make “eeeeee” and “oooooh” sounds. Notice how your jaw drops on the “ooh” sound, and pay attention to the feeling in your throat. The bend happens when you go from “eeeeee” to “oooooh”. Try holes 2, 3, and 4 for your first bends.  The “Oh” should be deep with an open throat; try saying “orange”.  Your throat should be like the first “or” part.   Whisper it.  Orange.  Whisper it louder.  Whisper it breathing in.  Try bending with the mouth/throat position of the “Or” part.
  • Make sure NO AIR leaks in through your nose.  This is very important.  If air leaks in through your nose it will be very very difficult to make the note bend.
  • Make sure you have an air tight seal of your mouth on the harp.  Air leaks get in the way of bends, whatever their cause.
  • Don’t try to force it.  Bending is essentially effortless.  If your mouth/throat/tongue shape are right the bend will naturally happen.  Think about holding an egg in your mouth during a bend.  Keep playing with the shape of your mouth and your tongue position.  Very minor changes in mouth/throat/tongue position make all the difference.
  • Drop your draw and open up your vocal tract while continuting to draw air in smoothly–remember, don’t try to force it.
  • Try whistling while breathing in.  Bend the pitch of your whistled note down.  That’s what it feels like to do draw bends.
  • The tongue is the key (for beginners). Start with it flat and forward in your mouth. While drawing in with the “eeeee”, *slowly* pull it back, keeping the front low in the mouth, and humping it in the back. At some point the sound should begin to choke a little. That’s the crucial spot. Treat it like the “friction point” on a clutch car… if you move too fast you’ll stall the car–or miss the bend.  At that crucial spot, adjust your mouth position from “eeee” to “ooooh”.  At first, it may help to increase the air pressure a little. But, you don’t have to play loud or hard to get bends. You can bend notes playing quite softly.
  • Breathe in while making a hard “K” sound. Notice where you make that sound in your throat. That’s one place in your vocal tract from which you can get a draw bend.
  • Breathe from deep within your body–from your diaphragm. Feel your stomach push out a little bit. This will help your resonance and make bending easier.  Lie on your back and slowly breathe in.  Put your hand on your stomach and notice how it moves up and down–that’s the location of your diaphragm.  Draw in your air from there.
  • Try different key harps.  The mouth position is different for different keys, and if you’re having trouble with one key another might work better.  For example, if you can’t get it on a C harp, try an A harp or a D harp.
  • As they say, “Practice, practice, practice…”

It ain’t as easy as it looks! Don’t give up! It takes a while to get it!  And remember, don’t try it unless you can get consistent pure clean single notes–you have to master that first.

Blow Bends

Blow bends are normally learned after draw bends, because the low end of the harp (holes 1 through 6) are used more, especially by beginners, than the top end of the harp, holes 1 through 7, where the blow bends are available.  Note that hole 7 will not bend as much as a full half step, so don’t try to force it or you could damage the reed.

Blow bends are done by constricting the air stream by tiny movements toward the front of the tongue.

Start the natural blow note with your tongue flat in the bottom of your mouth.  Slowly, keeping the tongue flat, lift the tongue toward the roof of the mouth.  Keep the air stream constant, and where you feel the note start to choke–that’s the crucial spot.  Very tiny changes to your tongue position cause the note to transition from the natural note to the bent note.  You have to experiment and remember your exact mouth position.  The vocal tract is more constricted in the mouth and throat for blow bends than for draw bends.

Try whistling a note and bending the pitch upwards.  A similar tongue movement happens when doing blow bends on the harp.


The Diatonic Harp Reference: Speed

SpeeD

Speedin music, means playing fast in a musical context.  Not just playing fast.  Playing in a musical context means staying coherent with the rhythmic, harmonic, and melodic content of the piece.  If you play fast but ignore the musical elements, then you are just playing fast, but not using speed.  Speed implies control.  A child can pick up the harp for the very first time, blow or suck and flail the harmonica in front of his/her lips and play fast.  But this is not musical speed, as you can tell.

Let me divide speed playing into two categories: composed and improvised.  The composed category includes everything where what to be played has been worked out ahead of time.  The improvisedcategory includes everything else, where what is played was not planned ahead of time.

Speed for Composed Play

Composed play is not limited to playing classical harmonica compositions.. it also includes everything from executing riffs and licks that have been learned to playing a song like “Juke” note for note.

To play something that has been already defined–there’s no getting around it, you have to play it that way (or some planned variant of that way).  You have to work with your skill at the elements required for the phrases you are going to play.

Sometimes there will be certain elements: note transitions or jumps or technical difficulties that are particularly difficult to play.  As you practice you will become aware of the places you have the most difficulty.  These are the areas to isolate and work on individually.  Practice those elements enough that you gain control of them.  Practice them enough that instead of dreading them, you look forward to them because you can do them so well.  Practice them enough that other elements of the music become more difficult than these, which were more difficult at first.  Gaining control of these new problem elements will probably be far easier than controlling the initial elements.  Keep playing the initial difficult but now not problematic elements as you practice the new less difficult but more problematic ones.  This should become a process of smoothing and controlling the transitions between the different elements of the phrase(s).

Investigation of the underlying breathing patterns required to play the notes in the phrase can help in determining what you need to do to be able to execute the passage properly.  Memory becomes a dominant factor when playing fast composed passages, because speed means lots of notes and rhythmic patterns, and lots of anything means lots to remember.  Understanding the underlying breathing patterns gives you something besides individual notes to remember and on which to focus, making the memory task easier, as well as enhancing the ability to execute the phrase.

Start Slow

When working on passages that are to be played fast, start out working on them very slowly, paying particular attention to rhythm and tempo and dynamics.  Concentrate on all the subtelties that go into the passages, note transitions, moving to different holes, head, hand, and arm movements.  Exaggerate your movements smoothly while playing slowly–think of a slow ice skating performance, where the arms and hands extend and sweep in time with the music and the skating.

When you eventually move to faster speeds, you cut back on these exaggerated movements which tends to keep the note transition relative-timings fairly consistent.  For example, if you are playing slowly and still require some extremely fast compact movement to play some sequence of notes, there’s no room there to speed up that part later.  You need to put some exaggerated smooth and appropriate motions in your play so you know you are practicing at a speed that you will be able to improve upon later.  Some parts may require more exaggerated movements than others to keep the tempo and rhythm correct.  Where you are least able to exaggerate the slowness is where you will be limited on how fast you can play the passage.

Practice playing very smoothly at very slow speeds initially.  Only after you get comfortable and competent playing at slow speeds should you move to faster speeds.  As you start to speed things up, intermix the faster passage with the slower one in a controlled way, as a whole–don’t play a little fast and a little slow during the passage.  Keep the passage smooth and in rhythm in its entirety, but play the different speed passages back to back.  For example, play the passage at the speed you are comfortable with, then push yourself a little faster for the whole passage and don’t worry about missing notes.  Keep going and keep the rhythmic integrity intact.  Keep your dynamics and phrasing under control, and if you hit some wrong notes.. so be it, that’s okay.  Then go back and play the passage at the slower speed at which you can hit all the notes comfortably with exaggerated control.  If you find you can’t keep the rhythmic integrity and dynamics in place, you aren’t ready to move to a higher speed.  Concentrate on those musical elements at the slower speed and get them ingrained in your aural image of the passage.

Think about relaxing, and minimizing the muscles involved in playing the passage (though the ones in action may be making extended movements).  As you play slowly, work on optimizing your approach to the passage, playing smoothly and efficiently, but with a degree of motion commensurate with the speed at which you are playing.

Start with only a couple of notes, and gradually add one before or one after the small set you are working on.  Slowly build up the number of notes you are playing and build up the context of the fast passages, the notes leading into the passage, the passage itself, and the notes following the passage.

Improvised Speed

Improvised speed is playing fast in a musical context where the notes you play aren’t worked out ahead of time.

Ornamentation

Ornamentation is the adding of musical ornaments to a note.  A musical ornament is one or more notes leading to or from the primary note.  The “primary” note is the note being ornamented.

For example, you could ornament a long held 3 draw note with a quick shake to the 4 draw and back.  You could ornament a long 4 draw with a succession of 3 draw to 4 draw shakes.  You could ornament the 3 draw of the shake with a 1/2 step bend.  You could ornament back to back 6 draws with an evenly spaced 4-5-4 shake in between.  In other words, the number of possible ornamentations is vast!

Ornamentation is taking advantage of the musical space provided by held notes and rests in the musical phrase to add notes in the rhythmic context of the underlying music.

Ornamentation should work with the flow of the music and the flow into, during, and out of a phrase.

The above principles make it clear that ornamentation is more concerned with rhythm and feel than with the exact notes to be played.  These notes are short, being played quickly, and lose some of their musical significance  They are ornaments, not the tree or its branches.  Instead of thinking notes, ornamentation is more concerned with direction–where direction means moving toward a note, staying on the note, or moving away from a note.  Or some combination of those motions.  You can start with your primary note and stay there; or play notes that move ever farther away from it; or first move away from it, then back to it; or jump away from it and move steadily back to it.  Or even combinations of those, changing directions more than once before returning to the primary note.

Where do you get the primary note?  You either have it already because you’re ornamenting a preset phrase, lick or riff, or you pick it.

Picking Improvised Primary Notes

Primary notes should first be picked to follow or enhance the musical groove.. the overall rhythmic feel, the flow of the music.  In other words, they should first be picked as to when they are played, rather than which note is played.

Primary notes are most often picked from the scale and mode of the music, e.g. C major or D minor or E blues.  The Layout Generator can show you the notes in the scale and mode of the music for different  positions.

Primary notes are most (or very) often picked from the notes in the current chordal harmony, even if that harmony contains notes not part of the basic scale.

Improvisation about a melody often will involving picking primary notes from that melody at the time the melody note would or does occur.  Improvisation about a melody will often use rhythmic patternsfrom that melody with different notes, and improvisation of primary notes will often be driven by the underlying rhythmic pattern, whether it comes from a fore-known phrase or not.

Breathing Patterns

Improvised notes can also be picked by using underlying breathing patterns as the basis for note selection.  During fast play, the rhythmic integrity is far more important than the particular note chosen, especially if the notes are at least in the key of the music, which is often the case for most notes on the diatonic harp we choose to play for a particular piece of music.  Breathing patterns can establish a rhythmic pattern and basis for which the exact notes are less significant than the consistent rhythmic pattern.  These breathing patterns and rhythms will generate notes automatically.  Consider the perididdle: blow draw blow blow, draw blow draw draw.  When you move to a hole while playing with that breathing pattern, you get what note is there.  If you don’t move to a new hole, you still get what note is there.

One benefit to the use of breathing patterns is realized by selecting rhythmic patterns with breathe-in-breathe-out symmetry so that long lines can be played without running out of breath, in either direction.

Primary Note Phrases

Primary note phrases can be preset or composed phrases, licks and riffs, or improvised phrases that take the place of predefined ones.  These phrases can be placed within the context of fast play, the fast play using ornamentation,  breathing patterns, or other note selection techniques to augment the notes in the primary phrase.

In other words, a certain number of beats or bars can be allocated for speed work.  Many different notes and different rhythmic patterns are used during the fast play.  As part of those notes and rhythms, a higher level phrase can be superimposed to emphasize the overall musical rhythm and provide a motivated musical flow through the many short notes.

In still other words, there will be a few important musically motivated notes, and a lot of relatively unimportant notes, which are musically okay as long as they are played at the right time.

These motivated note phrases generate their own breathing patterns.  Ornamentation or other quick notes can be chosen that fit with these motivated breathing patterns.  This leads to fast lines that fit well with the music, the motivated phrase leading the ear through the flurry of short notes, and are relatively easy to execute since they fall naturally within the breathing patterns generated by the motivated primary note phrases.

These motivated note phrases can be treated as composed, with the fast notes added in an improvised fashion each time.  This allows an improvised section of music to be played with consistent feel, if not consistent notes, and is much easier to remember than long lines of short notes played in a particular way.  This can lead to music that contains elements of a composed improvisation.

General Speed Tips

Breathing

Fast passages can require rapid changes from inhaling to exhaling, and vice versa.  These rapid changes are accomplished by quick movements of the diaphragm.  Practice panting, like a dog pants, to help strengthen the diaphram muscle and train it to respond quickly to changing breath direction.

While you’re practicing panting, you might as well be playing chords too.  Put a low key harp in your mouth and cover a chord and practice your panting so that you get the deepest, biggest, fullest chord you can.  Open up your mouth and throat and hide your tongue down at the bottom of your mouth, a soldier hiding from enemy fire.  Visualize an egg in there, a large egg pushing the insides of your mouth outward and your tongue down.  Pant through the harp, but listen to your chords.  Make them sound good.  Slow down a little if you have to.  Make sure all the notes sound, each one, and try to get them all sounding even.  Shift to a double stroke roll–two pulses out and two pulses in.  Control the pulses with your diaphragm.  Slow down if you have to. Keep it going.  Turn it into a train if you want.  Say “hooka” when you breathe out and “tooka” when you breathe in.  Say “Tah hooka tooka hooka”, with “hooka” said while breathing out, and “ta” and “tooka” said breathing in.  Move the “Tah” around.  Then stop articulating with your tongue–stop saying tah hooka tooka.  Open your mouth back up, drop your tongue back down and just play a double stroke roll with big full chords.  Keep it under control.

Don’t pant for too long or you might get dizzy.

Speed Dynamics

Use varying dynamics to emphasize the underlying groove and primary note phrases.  Pulse the music so that it has a heartbeat.  Remember your panting practice?  Use your diaphram, that’s what you’ve been working on it for.  Hit the note(s) on the beat a little harder than the rest.  Hit beats 2 and 4 even harder to swing the rhythm.  Emphasize notes in the primary phrase over ornamented notes or notes that come from breathing patterns.  Pulse the breathing pattern rhythmically to emphasize a part of the pattern.

Playing Pressure

Control over your playing pressure is a foundational element of playing fast smoothly with good tone, whether you’re playing preset passages or improvising.  Even reed response up and down the harp greatly helps playing fast passages smoothly and cleanly with consistent tone.  The two most important factors in even playing response of the reeds are good compression (i.e. a good air tight harp) and correct gap height of the reed above its slot in the reedplate.  Of these, the most important and most easy to address is the reed gapping.  If you play commercial harps (not custom ones like those from Joe Filisko or Richard Sleigh, etc.) you should be setting your reed gaps according to your playing style.  If you choose not to do so you will be at the whim of chance, and many harps will not respond the way you like.

Speed Is It’s Own Articulation.  Fleeting notes don’t require the same degree of control over attack, shaping, and vibrato as slower ones.  When you practice by playing fast passages slowly, take care to play with the same playing pressure, legato, staccato or other effects as you will when you finally play them fast.  Don’t try to enunciate each note in a very fast passage with articulations like Ta, Ha, Da, Ka, etc.  Unless you’re very practiced with triple-tonguing techniques and synchronizing your tongue with rapid-fire notes, you’re probably better off getting your tongue out of the way.  Establish a playing pressure, and be able to achieve that pressure for rapid changes in breath direction.. in other words, make sure your pressure is consistent enough that you achieve the same volume inhaling and exhaling–or whatever volume is needed at the time to express the musical dynamics.

High Notes

Much if not most speed work is done on the high end of the harp.  The reeds are shorter and respond faster at the high end than on the low end.  Also, musically, the high notes have more energy and cut through the overall sound better than low notes.  Often higher key harps are chosen for very fast work because the high notes on them can respond faster than the high notes on lower key harps.  Much fast work is done on a normal (high) F harp, or even a high G because you can really fly, and the notes really cut through.

Parting Thoughts

If you’re good enough on the harp to be ready to incorporate musical speed, you are definitely ready to make the small effort required to set up your harp, and most of that is in setting the reed gaps, which is easy and not very risky to the harp.  (As with anything, practice the first few times on harps that are not your favorite..)

Speed can be over used.  The harp is best at shaping notes, that is its strength.  Speed can add spice to the musical mix, but like cooking with spice, enough is good and too much is worse than none.


The Harp Reference: Motivated Note

Motivated Notes

A “motivated note” is a note that is played for a reason.  All notes are motivated to a certain extent, but the degree of motivation is a big part of how well the note will work in the music.. how good it will sound.

What motivates the selection of the next note to be played?  Why do you pick that particular pitch at that particular time, and why do you hold it as long as you do?  That depends on what motivates you.. what your reasons are.  What motivates you depends fairly heavily on what you know about, as well as your attitudes, and even what you don’t know. Learning new things can enhance your motivation, giving  you better reasons for playing a particular note a certain way.  One new idea can take your improvisations in new and interesting directions.

Many times we are unaware of our actual reasons for what we play.  We are normally at a different level of awareness and have difficulty peering deep down into the underlying and overriding motivations that meld into our judgments and determine our decisions.  This is particularly true when improvising.  Playing by ear, we say.  Just going with the flow and playing what works, what sounds good.  We get an aural image of the music, look around, and see where we want to go.  But what do we see?  How do we think about what we see, and how do we decide which way to go?

There is a vast array of different notes and note combinations that can be played at any given time, in various combinations, different ways.  The context of the music provides a probabilistic limiting to what things will work, musically.  You’re probably not going to play a classical motif while performing Chicago Blues.  Certain notes in certain contexts can be practically guaranteed not to offend the ear.  Certain notes in certain contexts will be almost guaranteed not to work.  Most notes fit in between, with varying degrees of “working”, consonance, dissonance, and not working with the rest of the music.  To understand how to use notes, we have to understand what they are.

note is:

  • a particular pitch
  • played at a certain moment
  • for a particular duration of time
  • with a certain timbre
  • at a certain volume
  • that changes over time in a certain way.

So a single note has many aspects.  Each of these aspects has to be considered as to how it fits in the context of the music.

phrase is:

  • A related sequence of musically motivated notes and silences with an a*sociated
  • Sequence of note time-value relationships and rests that constitute the melodic rhythm.

melody is a sequence of musical phrases.

The musical context is an evolving “state” of the music that depends on three basic things:

  1. What has come before (the past)
    • Meter and rhythm
    • The groove
    • Melody
    • Harmony
    • Timbre
    • Motifs
    • Themes
      • Verse
      • Chorus
    • Phrases
    • Chord progressions
    • The melodic rhythm of note-value phrases
  2. What is going on now (the present)
    • Current harmony (underlying chord)
    • Nearby notes and silences
    • Whether on or off the beat
    • Which beat you are on
    • Where you are in the music’s chord progression, motif, melody, phrase, or theme
  3. What will come later (the future)
    • [same elements as what has come before]

Music is built with these patterns upon patterns upon patterns of notes and silences.  The musical context sets the framework for these patterns–a pattern cannot be fully realized if the whole pattern has not been exposed–played yet.  For example, the pattern of patterns that is a song or piece of music is not complete until the piece has finished.

The meter is perhaps the most fundamental pattern associated with a musical theme.  The time signature defines a repeating pattern of note-value (time duration) relationships that often remains inviolate through out a piece–the most common example is 4 beats per measure.  No matter which pitches you choose, you have to make them fit in a 4 beats per measure pattern (though often the end of one measure will extend through the beginning of the next).  The most elementary motif is normally no shorter than one measure, one bar.

The number of 4 beat note-value combinations (melodic rhythms) in one bar is not extremely high.  Considering that the sixteenth note is usually the smallest time value extensively used, basically only a half dozen different note values are available (sixteenth, eighth, quarter, half, whole, triplet).  The number of patterns available from combinations of these time values in a beat pattern like 4 beats-per-measure-quarter-note-gets-one-beat is reasonably manageable.  However, as the number of bars increases, the number of combinations increases exponentially.  Patterns of bars emerge, and patterns of bar-patterns are built on top.  These can be phrases or sub-phrase patterns, motifs, themes, verses, choruses, A-sections, B-sections, songs, or symphonies…  The development of patterns and adhering to them are fundamental motivations for playing particular notes.

Chord progressions are repeating sets of bars with a defined pattern of chords a*sociated with each bar.  For example, the blues format is a pattern of 12 bars with the I, IV, V chords played for 4, 2, 2, 1, 1, 1, 1 bars.  Within this pattern there is obviously another pattern lurking.. it is divided into 3 groups of 4 bars.  In the first group the chord does not change.  In the second group of 4 bars, the chord changes once.  In the third group of 4 bars the chord changes 3 times.  The frequency of chord changes is a “superimposed pattern” that gives the music a sense of motion.  In the 12 bar blues form, the music starts out still, starts moving faster in the middle, and moves even faster at the end.  With this faster motion comes a feeling of “something happening” that is over and above the rhythm and the melody of the music.  When the blues progression repeats, there is another cycle of relative stillness giving the feeling that what was happening is over and something new has started, followed by the increasing motion again and a new sense of something happening.  So, another pattern is built out of repeating verses, a pattern of chord change frequency (even if the chords were different each verse, as in modulation to a new key).

What are possible reasons for picking a note?  What motivations are there?  How do we know which note to play (next)?

  • It has been composed and is predefined.
  • It works with the groove
  • ONE two THREE four ONE two THREE four
  • one TWO three FOUR one TWO three FOUR
  • ONE two three four ONE two three four
  • ONE two three ONE two three
  • ONE two ONE two ONE two three ONE two ONE two ONE two three
  • It fits with the selected musical style
  • It works with or establishes some musical theme of a song, like a
    • phrase
    • verse
    • chorus
    • bass line
    • chord progression
  • It works with or establishes some melodic rhythm pattern (note-value phrase)
  • It contributes to the musical feel
  • It comes from the harmony
  • It comes from the scale and mode
  • It borrows from a related harmony, scale, or mode
    • Chord substitutions
    • Mode/scale substitutions
  • It follows from the melody
  • It leads to upcoming harmony (chords)
  • It comes from the ear, motivated by the sound
  • It comes from the mind, motivated by the intellect
  • It comes from the body, motivated by playing technique
  • It comes from the instrument, motivated by its mechanical characteristics
  • It comes from memory
  • What has sounded good before
  • What has sounded bad before (so you don’t do it again in that context)
  • What theoretical relationships have worked before (in addition to what new relationships may work now)
  • What physical actions have been practiced before
    • Lick – A set series of physical actions (consisting of blows, draws, bends, overbends, and other effects) that result in a memorable pattern of notes with an action-associated note-value phrase (melodic rhythm) over a set of holes.  One lick can be played in different physical places, or on different key or tuning harps, to produce different melodic phrases with the samemelodic rhythm.  While the original musical phrase may have had “well motivated” notes, when captured as a physical action pattern of play rather than a musical statement the notes can become less well motivated.
    • Riff – The term “riff” is not used consistently by players.  Many players consider a riff to be the same thing as a lick.. two words with different origins that mean the same thing.  Other players think of a riff as a short repeated “lick” used in some thematic way, such as a song’s “hook”.  Some people think of a “riff” as something behind the solo, and a “lick” as something used in a solo, and others think something else altogether.  It’s good to make clear from the context just what you mean when you say “riff” to avoid confusion. Another definition for “riff” is: a physical-action based ornamentation of a note, or transition between notes or phrases.  As with a lick, the motivation of the resulting notes of an ornamentation riff is primarily due to the physical action, and not to play notes of particular pitches.
  • It is an accident; a mistake of the ear, mind, or technique
  • It tries to meet expectations
  • It tries to be unexpected
  • It acts in a phrase of related notes to contribute to a musical statement
  • Patterns upon patterns upon patterns of notes and silences form an integrated tapestry that is the music.

Turning Licks Into Phrases

As discussed above, licks are playing patterns that generate a melodic rhythm and a*sociated pitches based on the physical characteristics of the instrument.  Phrases are a*sociated musically motivated notes and silences with a corresponding note-value pattern, which is the melodic rhythm of the phrase.  So, licks generate musical phrases, but they aren’t themselves musical phrases.

One way to help turn a physical playing pattern into a musically motivated phrase is to use the melodic rhythm as a recurring theme or motif in your song.  As with most things, good taste includes not overdoing it.

To really turn the results of a lick into a musical phrase, you should be able to play the same notes wherever they occur on the harp.  In other words, if you play a lick on the bottom of the harp, be able to play those notes in the middle and top of the harp too.  Be able to play them in different positions so you learn the musical relationships, not just the physical actions you use when playing the lick in one place on one harp.  This will help your ear and mind get control of the musical phrase and help you minimize the reliance on muscle memory.  It helps your music break free of your technique, by extending your techniques to enable the music you want to play.  It helps improve your musical vision, and can help enhance your internal image “mind’s eye” view of the harp.


The Harp Reference: Basic Chords on the Diatonic

To figure out the chords, you first have to know the “interval relationships” of the notes.  Lets look at the notes again.

Holes:      1 2 3 4 5 6 7 8 9 10 
Blow notes: C E G C E G C E G C 
Draw notes: D G B D F A B D F A

So, for blow holes 1, 2, and 3 you have C, E, and G, which is a C Major chord (major 3rd interval on “bottom”, i.e. C & E, and minor 3rd interval on “top”, i.e. E & G).  Notice that holes 4, 5, and 6 are also C, E, G, which is another C Major chord, as are holes 7, 8, and 9.  In 1st position the C Major chord is the tonic or root or I chord of the C scale.  In 2nd position the C Major chord is the sub-dominant or IV chord of the G scale, which is part of the I, IV, V blues progression.

For draw holes 1, 2, and 3 you get D, G, and B. This is a G Major chord, 2nd inversion (which just means the root note is in the middle–that is, a G Major chord is G, B, D, but if you play the D as the lowest note you get D, G, B–but it is still a G Major chord).  Notice that  the 4 draw is the same as the 1 draw, a D note.  Doubling a note does not change the chord, so drawing holes 1-4 also produces a G Major chord.  For 1st position the G Major chord is the dominant or V chord of the C scale.  For 2nd position the G Major chord is the root or I chord.

Drawing on holes 2, 3, 4, and 5 have notes G, B, D, F, which is a G7 chord.  The dominant 7th note adds color to the major chord and is used very often in blues, rock, and country music.  Once again you can double the D by adding the 1 draw and you still have the G7 chord.

Drawing on holes 4, 5, and 6, or 8, 9, and 10 produces the notes D, F, A, which is a D minor chord (notationally Dm).

The four note chords in draw 3-6 and 7-10 are B, D, F, A, which is a Bm7b5 chord.  Note that this chord is the same as the D minor chord with the 6th added (called Dm6), but in a different inversion–that is, instead of the 6th note (the B) being the high note in the chord it is the low note.

The diatonic harp can play only those relatively few chords.  Many times, players will play “partial chords” or double stops consisting of only 2 notes, since the full chord is not available.

For example, the Em chord, notes E G B, is not on a C harp.  But, looking at the figure above you can see that blow holes 2&3, 5&6, and 8&9 have the notes E&G, the first two notes of the Em chord.  Similarly, the F chord is F A C, and doesn’t fall on the harp–but the F&A notes are there as draw notes in holes 5&6 and 9&10.

Here’s an important point to remember.  The 3rd scale degree (the middle note in root position triads) controls whether the chord sounds Major or Minor, and sets the tonal color.  Sometimes the 3rd is left out, which results in a sort of haunting or eerie effect, since the listener does not hear the major or minor sound.  However, often times there are other instruments playing, like a guitar, bass, or keyboard, and those instruments set the overall feel of the music, so the harp can get away with not playing all the notes in a chord.

Another technique that can be used to simulate chords that aren’t on the harp is to play them broken apart.  Using the above example for Em, the player could play 5 blow & 6 blow to get the E&G, then follow that with the 7 draw to get the B note.  Many such combinations are possible.

Finally, broken chords can be played one note at a time, which are called arpeggios.


The Diatonic Harp Reference: Arpeggios

Arpeggios

An arpeggio is the notes in a chord played one at a time in sequence, instead of all together at once.  There are a very limited number of chords available on any one diatonic harmonica, but with the use of bends and overbends (or valves) any arpeggio can be played.  Knowledge of the arpeggios is very useful for improvising and keeping the improvisation consistent with the underlying chords.  More than just being able to play the chords broken into single notes, knowing where the notes in a chord are helps you understand which notes to emphasize relative to the rhythm of the music.

Here are the arpeggios for the basic I, IV, V chords in 2nd position (notes for the key of C). 
 

Chord Notes Octave Tab Octave Tab Octave Tab
I C E G Low 2 3 4 Middle 6> 7 8 High 9> 10>’ n/a
IV F A C Low 1> 2> 3> Middle 4> 5> 6> High 7> 8> 9>
V G B D Low 1 2′ 3″ Middle 4 5# 6 High 8 9>’ 10

Here are the arpeggios for the dominant I, IV, V chords in 2nd position (notes for the key of C). 
 

Chord Notes Octave Tab Octave Tab Octave Tab
I7 C E G Bb Low 2 3 4 5 Middle 6> 7 8 9 High 9> 10>’ n/a n/a
IV7 F A C Eb Low 1> 2> 3> 3′ Middle 4> 5> 6> 6># High 7> 8> 9> 10>”
V7 G B D F Low 1 2′ 3″ 4> Middle 4 5># 6 7> High 8 9>’ 10 10>

Here is a diagram showing where the arpeggios lie in your harp.  Start at a filled circle and follow the arrows. By the way, you can practice these arpeggios on any key harp–you don’t have to use an F harp–it’s just easier to think in the key of C.

One of the interesting things about these diagrams is that you can easily see how the arpeggios relate to each other and connect.  Seeing and visualizing these relationships is very important for improvising and knowing how to jam over chords.

Here are the arpeggios for the minor ii, iii, and vi chords in 2nd position (notes for the key of C). 
 

Chord Notes Octave Tab Octave Tab Octave Tab
ii D F A Low 3″ 4> 5> Middle 6 7> 8> High 10 10> n/a
iii E G B Low n/a 1 2′ Middle 3 4 5># High 7 8 9>’
vi A C E Low 2> 2 3 Middle 5> 6> 7 High 8> 9> 10>’

Here are the arpeggios for the dominant minor ii, iii, and vi chords in 2nd position (notes for the key of C). 
 

Chord Notes Octave Tab Octave Tab Octave Tab
ii7 D F A C Low 3″ 4> 5> 6> Middle 6 7> 8> 9> High 10 10> n/a n/a
iii7 E G B D Low n/a 1 2′ 3″ Middle 3 4 5># 6 High 7 8 9>’ 10
vi7 A C E G Low 2> 2 3 4 Middle 5> 6> 7 8 High 8> 9> 10>’ n/a

The major scale arpeggios can be played in 3rd position with the use of the hole 5 overblow to get the major 3rd instead of the naturally occurring minor 3rd.  It is this natural minor 3rd in hole 5 that makes 3rd position a natural choice for playing with minor chords and minor scales. 

The following diagram shows the arpeggios for the minor i, iv, v chords in 3rd position.  Here, the iv chord minor 3rd requires the hole 6 overblow. 


How to Play Blues Harmonica?

The blues is an improvisational form of music.  That is, it’s dynamic–you play what you feel and make it up as you go.  You can find sheet music and tab for blues songs, and these can be useful helps for learning a particular song.  But you have to play from your heart, not from your head.  That is, the blues needs to sound spontaneous, not preplanned–even if you’re playing well worn songs.

Listen to enough blues that you can hear the chord changes and anticipate them by feel, without thinking about it. Develop your ear enough to be able to single out and listen to the individual instruments.  Playing blues is like communicating in a language.. you need to be able to listen as well as speak, and what you say is better if it fits in the context of the conversation.

Stay in the rhythmic “groove” established mainly by the bass and the drums.  Beginning players often worry so much about notes, they forget about the rhythm–but the rhythm is the heart beat of the music, giving it life.  It is normally better to make a mistake on a note than a mistake on the rhythm.

The blues consists of numerous phrases (also called “licks” or “riffs”) that follow a question-answer, tension-release form.  The initial phrase asks the musical question and establishes some tension.  The subsequent phrase releases the tension by answering the question.  So, even though the phrases are distinct and separate, they are still related.  Listen to the questions asked by the other instruments and how they are answered.  Build your improvisational solos in the context of this conversation.  Even though you’re playing a solo, you’re first and foremost part of a team of musicians creating the music.  Listen to the music.  Add to it only to make it better.

How to Play Blues Harmonica?

[toc heading_levels=”3,4,5,6″]

The Blues Form

If you’re going to play the blues, you have to be thoroughly familiar with the blues form.

Normally the blues is played as a 12 bar chord progression in 4/4 time using the I IV V (one four five) chords of the major scale, normally played as dominant 7th chords (i.e. with the flat 7th added to the basic triad), and melody notes from the blues scale (see below).

The basic 12 bar form is:

  • 4 bars of the tonic I chord, (In the key of E that’s an E chord)
  • 2 bars of the sub-dominant IV chord, (In the key of E, that’s an A chord)
  • 2 more bars of the I chord,
  • 1 bar of the dominant V chord, (in the key of E, that’s a B chord)
  • 1 bar of the IV chord
  • 1 bar of the I chord
  • 1 bar of the V chord as a turnaround to start the next verse, or 1 more bar of the I chord to end
  • back to the beginning.

Here’s what it looks like in a sort-of lead sheet form, with the key of C shown as an example: 

Blues Harmonica Chords

The Blues Scale

The blues scale consists of the most frequent and most emphasized notes used when playing the blues.  Learn the scale and lean on those notes, especially on the beat.  “Leaning on” the blues scale notes means to use them more frequently and/or play them louder.

The blues scale consists of the following musical scale degrees: 
1, b3, 4, b5, 5, b7 8/1.

These are also sometimes called the tonic (1), flat third, sub-dominant (fourth), flat fifth, dominant (5), flat seven, and octave.

For the key of C that’s: 
C, Eb, F, Gb, G, Bb, C.

Second Position (aka “Cross Harp”)

Second position is by far and away the most common position used for playing blues, rock, and country music.  The blues scale in 2nd position starts on the hole 2 draw.  (The hole 3 blow is the same note, but the 2 draw should be used instead, almost always.)

For 2nd position in the low octave the tab is: 
2, 3′, 4>, 4′, 4, 5, 6>  (2 draw, 3 draw bend, 4 blow, 4 draw bend, 4 draw, 5 draw, 6 blow).

For the high octave in 2nd position the tab is: 
6>, 6>#, 7>, 7#, 8, 9, 9>

Here is a diagram of an F harp that shows where the notes in the 2nd position C blues scale are.  It doesn’t matter whether you use an F harp or not–it’s just easiest to think in the key of C.

The Blues Scale - How to play blues harmonica

Here is tab for all the notes in the blues scale in 2nd position: 
1>, 1′, 1, 2″, 2 and 3>, 3′, 4>, 4′, 4, 5, 6>, 6>#, 7>, 7#, 8, 9, 9>, 10″>, 10>, 10#

Play mostly notes from the blues scale (at first, while learning. Later you’ll figure out that you can use any note, it’s just a matter of how and where).  Make sure you play notes from the blues scale on the beat.  Try to lean on the notes in the current chord in the I, IV, V chord progression (in C, I=C, IV=F, V=G), especially the I, on the beat.

The first 6 holes are the most used for blues.  Holes 2, 3, and 4 are especially important.  Work on all the available bends in these holes.  Virtually always play hole 3 draw bent, at least a little.   It is one of the key “blue notes”, which are the flat 3rd, flat 5th, and flat 7th.  The blue notes in 2nd position are located at: 
1′ (flat 5), 2″ (flat 7), 3′ (flat 3), 4′ (flat 5), 5 (flat 7), 6># (flat 3), 7# (flat 5), 9 (flat 7), 10>” (flat 3), 10# (flat 5)

Third Position

Blues is also often played in 3rd position as well as 2nd.  Where 2nd position (cross harp) starts on the 2 draw, 3rd position starts on the 4 draw, or the 1 draw, where full blues scales are available using only normal draw bends.

Here is tab for the blues scale for 3rd position showing the key of C. 
1 2″ 2 3″‘ 3″ 4> 4, 4 5 6> 6’ 6 7> 8, 8 9 9> 9># 10 10>

The following diagram shows a Bb harp with the 3rd position key of C blues scale highlighted, and arrows that show the order of the notes in the scale from low to high.

Third Position - Blues Harmonica - How to play Blues Harmonica

First Position

Blues can also be played in 1st position, where the key of the harp is the same as the key of the music.  First position, or straight harp, starts on the hole 1 blow note.  The high end of the harp is expecially good for blues in 1st position because all the notes in the blues scale are available with only normal bends.  The middle octave requires 3 overblows, on the 4, 5, and 6 holes, but the low octave only requires the hole 1 overblow for the flat 3rd.

Here are the 1st position blues scales in tab format: 
1> 1># 2″ 2′ 2 3′ 4>, 4> 4># 5 5># 6> 6># 7>, 7> 8>’ 9 9>’ 9> 10>” 10>

Here is a diagram of the 1st position scale layout on a C harp:

First Position - blues harmonica lesson - How to play Blues Harmonica

Fifth Position

Another good position for blues that is used much less often is 5th position.  The 6 overblow is needed to complete the blues scale in the middle octave, but that note is the flat 5th, which is the least important note of the blues scale.  Leaving it out gives you the pentatonic scale, which is still good for playing blues too.

Here’s the 5th position blues scales tab: 
2> 2 3″ 3′ 3 4 5>, 5> 6> 6 6># 7 8 8>

Fifth Position - Blues Harmonica Lesson - How to play Blues Harmonica

The following diagram shows an Ab harp with the 5th position C blues scale highlighted. 

Use the Shuffle Rhythm

Emphasize beats 2 and 4.  Clap or tap on the second and forth beat of each measure, not the first and third.  Count it like 
1 2 3 4. 
Instead of a straight beat like “1 and 2 and 3 and 4 and…” it’s more like 
“1 hold and2 hold and3 hold and4 hold and1 …”

Put the rhythm in your body and don’t let it die.  Prefer to miss a note rather than mess up the beat.  Tap your foot.  Tap BOTH feet.  Tap your heels instead of your toes.  Rock from side to side.  Put the rhythm in your body!

Use triplets.  A triplet divides a rhythmic unit into 3 equal parts, instead of just 2 or 4 etc.  For example, “triplet eighths” have 3 notes in the space of 1 beat instead of the usual 2 eighth notes in 1 beat.

Learn your instrument.

You need to be familiar enough with your instrument that you don’t have to think to play it.  Learn the techniques you need in order to play the sounds you want. Learn the sounds, where they are and how to get them.

Emphasize tone and emotion more than speed.

Blues is about tone.  It’s about feelings and soul.  It’s not about how many notes you can play, but about which notes you decide to play… and which ones you decide not to play.  Remember, there are no unimportant notes.  Make sure each note is played clearly, cleanly, in time, with good tone, and given its proper due.

Leave some space.  The rest is a valid musical expression.  The silence sets up the sounds; frames them as if they’re a valuable painting.  Spaces, like notes, can add musical tension and interest to your phrasing and expression.  Very often in blues it is best to subscribe to the philosophy that less is more.

Get the blues in your mind and ear, find something to say, and be able to say it.. clearly and eloquently. 


The Harp Reference: Jamming Over Chords

Improvising Over Chords

Improvising Over Chords

I think of the notes of resolution, and emphasis, and relationships changing with the chord progression.  What I mean is, when soloing during a I chord, I’ll emphasize notes that are in the (e.g. blues) scale of the I chord–and more than that, I’ll lean a bit harder on the notes that are actually in the I7 chord.

When the IV chord comes around, I’ll switch and emphasize notes in the (e.g. blues) scale of the IV chord with further emphasis on the IV7 chord notes. Same for the V chord. So, to me, one of the first “theory” things to learn (or learn to hear) is the notes in the I, IV, and V chords–then adding the rest of the notes in the (e.g. blues) scales for those chords.

By way of example, consider the key of C. The I, IV, and V chords are C, F, and G–with the 7th we’re talking C7, F7, and G7, which have these notes:C7: C E G Bb
F7: F A C Eb
G7: G B D FThe chords don’t change just because you play the notes in a different order (though they are sometimes called “inversions” of the root chord). So, let me line up these chords in pairs, to show where notes overlap:(I)  C7: C E  G Bb
(IV) F7: C Eb F ASo you see a couple of things.

  • The root note, C, of the I chord, C7, is the same as the 5 (dominant) of the IV chord, F7.
  • The 7 note of the IV chord, Eb, is the same as the all-important-in-blues flat 3rd of the I chord (3rd is E, so flat 3rd is Eb).

From listening, we know that the 7 note and the flat 3rd are “notes of tension”–we want to hear them resolve. So, depending on where you are in the chord progression you resolve differently from the same note (Eb, or the 2nd position 3′ [3 draw bend])–either to IV (F7) chord (or scale) notes, or I (C7) chord (or scale) notes.  But, look here: the C note is shared between these two chords. So you can resolve Eb to C over either the I=C7 chord or the IV=F7 chord.  For 2nd position, that’s 3′ to 2 (3 draw bend to 2 draw).  Ever use that?!  Of course! It fits in so many places. This is why!  In blues, we’re mostly on the I and IV chords, with occasional ventures into the V.(I) C7: C E G Bb
(V) G7: D F G BThe I and V chords share the 5 note of the I chord (the G of the C7 chord) and the root note of the V chord (the G of the G chord). And, the flat 3rd–here the Bb–of the V chord (the G7) is the same as the 7 note of the I chord. Okay, we’ve seen this before. The flat 3rd and the 7th are both notes of tension that want to resolve, either up from the 7 to the 1 (Bb to C) or from the flat 3rd to the 3rd as a transition, or to the root of the 5–so Bb to B, or Bb to G. In second position, that’s 2” 2 (2 draw double bend to 2 draw) as 7th to root of the 1 chord, or 2” 1 (2 draw full bend to 1 draw) for flat 3rd to tonic of the V chord.(IV) F7: F A C Eb
 (V) G7: F G B DThe F7 and G7–IV and V chord–share the F note, the root of the IV and the 7 of the V.  The 7 is a note of tension, the root, a note of resolution.  This going from tension to resolution is the heart of blues.  But here, you don’t have to change notes! You can play the same note, and the chord progression will go from IV–V, resolved to tense, or from V–IV, tense to resolved. We’re talking about the 4> (four blow) here for 2nd position.(IV) F7: F A  C Eb
 (I) C7: G Bb C E
 (V) G7: G B  D FSo the C7 chord sits nicely between the F7 and G7, sharing the C note with the F7, and the Eb as the “blue note” flat 3rd; and the G note with the G7 chord, with the Bb as the G7 chord’s “blue note” flat 3rd.

Learning other chords, including bigger 4 and 5 note chords, can show you what notes can be used to transition smoothly from one chord to another, and provides many ideas for improvisation.

Root Notes Are Anchors

The root note of a chord is the key note, and it anchors any improvisation over that chord.  Musical lines either start on the root note or head to a root note, either of the current chord or the next chord in the chord progression.  Arpeggios begin on the root note, scales go from root (tonic) to root, and interval relationships are revealed based on the root note.  For example, the flat third blue note is a minor third from the root note, e.g. Eb in a C chord.

Since the I, IV, and V chords are the most often used chords in blues, and most music, it is important to be thoroughly familiar with where the root notes are for these chords.  Since 2nd position cross harp is the most used playing position, it is very important to know where all the root notes are on the harp for all these three chords in 2nd position.

The root notes for the I chord in 2nd position are: 
2, 6>, 9> (and 3>)

The root notes for the IV chord in 2nd position are: 
1>, 4>, 7>, 10>

The root notes for the V chord in 2nd position are: 
1, 4, 8

Practice playing these root notes by themselves.  First work on the root notes for the I chord.  Play 2, 6>, and 9> over and over until you can hit them cleanly every time without looking.  Pick up a harp and close your eyes.  Can you play the 2 draw, 6 blow, and 9 blow without looking or playing any other notes?  Keep working on it until you can.  Do the same for the IV and the V chord.

Having a firm grasp of these chordal root notes will help anchor your internalized image of the harp, as well as anchoring your improvisations to the underlying chords.  You will be able to know exactly where the octaves span on your harp, and where to play to stay in a certain octave or pitch range.  You will be better able to feel how to move phrases around on the harp, from low to middle to high, and in general it will help you know your way around the harp better.  On other instruments you can often see where you are.. see where the octaves are, but not so on the harp.  It has to be internalized–all our vision is inner.  Practice these root notes to help provide anchor points for your inner vision.

Play through the “Root Note Blues” tabbed out here.  Remember, the dots (.) are there to remind you hold that note a bit to swing the beat.  No, it’s not the most interesting blues you’ve ever heard–but it is clearly recognized as a standard blues because the chords are suggested by their root notes. 
 

Root Note Blues
I
Bar 1 Bar 2 Bar 3 Bar 4
1 & 2 & 3 & 4 & 1 & 2 & 3 & 4 & 1 & 2 & 3 & 4 & 1 & 2 & 3 & 4 &
2.2 6>.6> 9>.9> 6>.6> 2.2 6>.6> 2.2 6>.6> 2.2 6>.6> 9>.9> 6>.6> 2.2 9>.9> 6>.6> 2.2
IV I
Bar 5 Bar 6 Bar 7 Bar 8
1 & 2 & 3 & 4 & 1 & 2 & 3 & 4 & 1 & 2 & 3 & 4 & 1 & 2 & 3 & 4 &
1>.1> 4>.4> 7>.7> 10>.10> 1>.1> 4.>4> 7>.7> 4>.4> 2.2 6>.6> 9>.9> 6>.6> 2.2 6>.6> 2.2 6>.6>
V IV I V
Bar 9 Bar 10 Bar 11 Bar 12
1 & 2 & 3 & 4 & 1 & 2 & 3 & 4 & 1 & 2 & 3 & 4 & 1 & 2 & 3 & 4 &
1.1 4.4 8.8 4.4 1>.1> 4>.4> 7>.7> 4>.4> 2.2 6>.6> 2.2 9>.9> 8.8 4.4 1 _

It is easy to make simple changes to the Root Note Blues to produce something a little more interesting.  Notice the key role played by the root notes on beats 1 and 3, and the way that beats 2 and 4 lead to and from the root notes.  Also notice the rhythmic interest added by the triplet eighths (3 notes per beat) on the second and forth beat.  The triplets add to the feeling of “going somewhere” and the root notes add to the feeling of “getting where you’re going”.

More Root Note Blues
I
Bar 1 Bar 2 Bar 3 Bar 4
1 & 2 & 3 & 4 & 1 & 2 & 3 & 4 & 1 & 2 & 3 & 4 & 1 & 2 & 3 & 4 &
2.2 3 4 5> 6>.6> 7 8 9 9>.9> 9 8 7 6>.6> 5> 4
3
2.2 3 4 5> 6>.6> 7 8 9 9>.9> 9 8 7 6>.6> 5> 4
3
IV I
Bar 5 Bar 6 Bar 7 Bar 8
1 & 2 & 3 & 4 & 1 & 2 & 3 & 4 & 1 & 2 & 3 & 4 & 1 & 2 & 3 & 4 &
1>.1> 1 2>
3
>
4>.4> 4 5>
6
>
7>.7> 8> 9>
9
10>.10> 9> 8>
7
>
2.2 3 4 5> 6>.6> 7 8 9 9>.9> 9 8 7 6>.6> 5> 4
3
V IV I V
Bar 9 Bar 10 Bar 11 Bar 12
1 & 2 & 3 & 4 & 1 & 2 & 3 & 4 & 1 & 2 & 3 & 4 & 1 & 2 & 3 & 4 &
1.1 2 3 4> 4.4 4> 3
2
1>.1> 1 2>
3
>
4>.4> 3> 2>
1
2.2 3 4 5> 6>.6> 5> 4
3
1. 1 2> 2
2
>
1 _


Notation Convention for Tablature

Tab is short for tablature and is the term you’ll usually see. Tab is a shortcut notation that indicates how to play which hole on the harmonica.  This is different from standard musical notation, which indicates what note to play, including its relative duration.  The difference is between how to play a hole and whatnote to play.  How to play a note on the harmonica is specified by several things:

  • which hole to play,
  • whether you are inhaling (i.e. drawing) or exhaling (i.e. blowing), and
  • what alteration to apply,
    • be it a bend,
    • overblow,
    • other harp specific effect.

Of course, how to play a note on a harp is equivalent to what note pitch gets played, so tab is a kind of shortcut or aid to standard musical notation.  What tab doesn’t show well is timing and rhythm, which is why standard notation is better for really communicating just how something is supposed to sound.  Ways to show timing for tab include providing the lyrics, when possible, or indicating the measures (bars) and the beats.  Tab can also be used in conjunction with standard musical notation to augument the standard notation with harmonica-specific techniques and effects.

I have considered several important factors for good tab notation conventions, including:

  • Using standard ASCII characters (instead of arrows or other special graphic characters, as is seen so often) so the tab can be easily typed on a standard keyboard and e-mailed or posted on web pages, etc.
  • Keeping all the characters for a note or chord on the same line, for ease of reading
  • Not using letters like B, D, b, etc., which can be confused with note names
  • Selecting characters that maximize “white space”, which makes the tab easier to scan
  • Minimizing the number of characters needed to specify the way a hole is played
  • Making it as obvious as possible.

Here is the notation I use for describing how to play a hole: 

Notation Convention Example Meaning
A number name by itself means a draw note 3 3 draw
A number followed by a greater than sign “>” means a blow note 3> 3 blow
each apostrophe ‘ means a 1/2 step bend 3′ 
3” 
8>’
3 draw half step bend 
3 draw whole step bend 
8 blow bend
a sharp sign “#” after a number means overbend 6># 
7#
6 overblow 
7 overdraw
a tilde “~” before a number means a dip bend ~4 smooth bend from 4′ to 4
an ampersand “&” between numbers means play them at the same time 1&4 
1>&2>&3>
octave on 1 and 4 draw 
chord on 1, 2, and 3 blow
a slash / between numbers means a slur 2/3 2 draw with a little 3 draw
a percent % before a number means “tongue slap” the note %4 slap the 4 draw
2 percents %% between two numbers means “flutter tongue”  2%%5 draw 2, 5; flutter on 3, 4
an equal sign = between two numbers means a two hole shake 4=5 shake between 4 and 5 draw
a vertical bar “|” separates measures 2 3 | 3 2 1st bar: 2 3, 2nd bar: 3 2
a lower case “v” after a number means add vibrato to the note 3>v 3 blow with vibrato

Here is an example of some tab.

  • Blue Midnight as by Charlie McCoy in his “Tribute to Little Walter”

“Misty” 
Lyrics by Johnny Burke, Music by Erroll Garner

Listen to my version in Real Audio.

verse: 
Look at me, 
 ~4    3   2’… 
I’m as helpless as a  kitten  up a tree, 
1   2> 2″    5>.. 5> 6> 5> 4.. 3  2 2>… 
And I feel like I’m clinging to a cloud; 
1>   1 2>  2     3      4  4    4   4′ 4.. 
I can’t un-der-stand, I get misty just holding your hand. (repeat for 2nd) 
4> 3   4>  4      2      3″ 3  4> 2> 2>  2′   2      3″     2 
Bridge: 
You can say that you’re leading me on 
2       3″   3     4      5>     5     5     5   5… 
But it’s just what I want you to do. 
5>   5   ~6    6>  4  5>   5>  6> 5> 
Don’t you notice how hopelessly  I’m lost, 
6>       6    7  8      8>    9>’ 9>’ 9>’ 8> 9>’… 
That’s why I’m foll-ow-ing you. (DS for 3rd verse) 
9>’       9>’ 8> 10>” 9>’ 8> 8 (fill for turnaround)

I just wanted to add a couple comments about Jerry Portnoy’s rendition of Misty. I heard him do it at SPAH 97, and–despite not being that fond of the song before hand–I was blown away by how great a job that Jerry did. He was so attentive to the details.. rhythmic, pitch–especially on the embarrassingly exposed intermediate bends (3 draw whole step (3″) and 2 draw half step (2′) bend), and tone (see note with pitch). It’s a piece where “the slow” is definitely in evidence, less is more. His tone on the bends was just killer.. very horn like I thought. It’s great practice for those intermediate bends because 1)the melody is so well known, you’re familiar with what the note must sound like, and 2)the bends are right out there on important sustained notes.. you’ve got to get them clean and strong and pure. There is also some good work on the top end. The 9 blow bend (9>’) is the key note of the melody on the bridge.. you have it hit it without ever getting the unbent 9 blow.. same with the 10 blow whole step bend (10>”).. but you go from 9>’ to and from 8>, so you’ve got to keep hitting the 9>’ plain, without bending into or out of it.

How to Make Your Own Harp Tab

Here’s a great way to easily make your own harp tab. 

  1. Get the shareware program, Melody Assistant, from http://www.myriad-online.com 
    Available in several languages for Mac or PC.
    (1a. If you like it and use it, send them the $20 registration fee. Unbelievably reasonable price.)
  2. Search the web for any MIDI song you like, and download it. 
    There are thousands of MIDI files out there for just about any music style you could want, including blues, jazz, classical, pop, rock, country, hymns, etc.
  3. Open the MIDI file in Melody Assistant, select the part with the melody, and give the “Edit Tab” command.

Melody Assistant offers 3 different harp tab styles (as well as guitar tab), and will optionally optimize for breath direction and show overblows. You can specify the key of the harp, so you can get the tab for any position you want.  Plus, it supports all the standard commercial special tunings, or you can define your own tuning!

Presto! That’s it! Now you’ve got tab for any song you can find in MIDI, in any position, for any tuning of harp!

You can even play the MIDI and follow the tab along with the melody as the song plays. This is a  great way to learn new songs.  There are even options that allow you to color the notes, say making blow notes, draw notes, and bends a different color, making the music easier to read.

AND, you can learn to a*sociate standard notation with the harp tab!  This is a super way to learn how to read standard notation, since the harp tab’s right there with the music notation.  It’s also nice because you can get the timing and rhythm information from the standard notation, and use the tab to get the right pitch.

If you don’t find the MIDI song you want, you can always go buy a book of sheet music, quickly enter in the melody, then use Melody Assistant to generate the harp tab.

Links to Harp Tab

Here are a couple of links to collections of harp tab. Note that the notation is different from that shown above.


The Diatonic Harp Reference: Improvising Using Rhythm

Improvising Using Rhythm

Here’s a way to add a sense of structure and cohesiveness and “composition” to your improvised playing. The focus is on the rhythmic pattern of a phrase (or riff or lick or whatever structural component of a solo or song you want).

The idea is to repeat that rhythmic pattern over different notes in different places in the improvisation.  The result is a sense of “variation on a theme” familiarity (where the theme is the rhythmic statement rather than (necessarily) a melodic one).

Rhythmic patterns can come from:

  • The first (or any arbitrary) phrase (lick, riff, etc.) you play
    •  In other words, play a phrase the way you normally would–but pay attention to and remember the rhythmic pattern of the phrase.
  • Some familiar rhythmic pattern you already know
    • For example, try using the rhythmic pattern from “Mary Had A Little Lamb”, only don’t play “Mary Had A Little Lamb”, play other notes.
  • The meter of any sequence of words
    • As you read a series of words, the syllables form a rhythmic meter (e.g. iambic pentameter).  You can reflect these spoken patterns as musical rhythms.
  • Rhythmic patterns of the song in which you’re playing
    • These add a sense of “fitting-in” with the song
  • Rhythmic patterns of phrases from other soloists
    • These add a sense of cohesiveness among the musicians and to the different solos in the song.
  • The basic bass or rhythm “groove” of the song
    • Once again, this maintains a sense of cohesiveness between the improvisation and the song.

When a rhythmic pattern has been established, it can later be improvised off of, again, rhythmically, over and over.  For example, take a quarter note and turn it into a triplet shake, or swing eighths, or a tongue switch warble… endless variety, yet the rhythmic theme is still recognizable.  And you certainly aren’t restricted to a single rhythmic theme.  Play one, play another, repeat the first, repeat the second, play a variation of the second, play a variation of the first, play the second, play the first.  An endless supply of structural combinations exists.

The goal is to get a sense of completeness, cohesiveness (it all fits together), and integration with the whole.

This attention to rhythmic patterns is also useful as a “rut-busting” exercise.  If you find yourself getting bored with the same ol’ thing, try making up new rhythmic patterns and playing a familiar lick using the new pattern.

One variant of the “theme and variations” tip is…trick ’em.  Set something up by repeating a phrase or rhythmic pattern until the listener comes to expect something–a concluding note or phrase, a particular beat or groove, a certain effect, like vibrato (absent or present), etc.–then take it away and give them something else.  This adds interest, and builds a sense of excitement at the unexpected–“what’s coming next that I don’t expect?”  Of course this, like most things, can be over done.  You have to create a balance between playing the expected and the unexpected so the music is neither too predictable nor too “off the wall”.

Too often musicians, especially less experienced ones, pay too much attention to the notes, and not enough to the rhythm.  The notes you choose to play should always fit with the rhythmic content of the music.


Diatonic Harmonica Techniques

Tab is short for tablature and is the term you’ll usually see. Tab is a shortcut notation that indicates how to play which hole on the harmonica.  This is different from standard musical notation, which indicates what note to play, including its relative duration.  The difference is between how to play a hole and what note to play.  How to play a note on the harmonica is specified by several things:

  • which hole to play,
  • whether you are inhaling (i.e. drawing) or exhaling (i.e. blowing), and
  • what alteration to apply,
    • be it a bend,
    • overblow,
    • other harp specific effect.

Of course, how to play a note on a harp is equivalent to what note pitch gets played, so tab is a kind of shortcut or aid to standard musical notation.  What tab doesn’t show well is timing and rhythm, which is why standard notation is better for really communicating just how something is supposed to sound. 
Ways to show timing for tab include providing the lyrics, when possible, or indicating the measures (bars) and the beats.  Tab can also be used in conjunction with standard musical notation to augument the standard notation with harmonica-specific techniques and effects.

I have considered several important factors for good tab notation conventions, including:

  • Using standard ASCII characters (instead of arrows or other special graphic characters, as is seen so often) so the tab can be easily typed on a standard keyboard and e-mailed or posted on web pages, etc.
  • Keeping all the characters for a note or chord on the same line, for ease of reading
  • Not using letters like B, D, b, etc., which can be confused with note names
  • Selecting characters that maximize “white space”, which makes the tab easier to scan
  • Minimizing the number of characters needed to specify the way a hole is played
  • Making it as obvious as possible.

Here is the notation I use for describing how to play a hole: 

Notation Convention Example Meaning
A number name by itself means a draw note 3 3 draw
A number followed by a greater than sign “>” means a blow note 3> 3 blow
each apostrophe ‘ means a 1/2 step bend 3′ 
3” 
8>’
3 draw half step bend 
3 draw whole step bend 
8 blow bend
a sharp sign “#” after a number means overbend 6># 
7#
6 overblow 
7 overdraw
a tilde “~” before a number means a dip bend ~4 smooth bend from 4′ to 4
an ampersand “&” between numbers means play them at the same time 1&4 
1>&2>&3>
octave on 1 and 4 draw 
chord on 1, 2, and 3 blow
a slash / between numbers means a slur 2/3 2 draw with a little 3 draw
a percent % before a number means “tongue slap” the note %4 slap the 4 draw
2 percents %% between two numbers means “flutter tongue”  2%%5 draw 2, 5; flutter on 3, 4
an equal sign = between two numbers means a two hole shake 4=5 shake between 4 and 5 draw
a vertical bar “|” separates measures 2 3 | 3 2 1st bar: 2 3, 2nd bar: 3 2
a lower case “v” after a number means add vibrato to the note 3>v 3 blow with vibrato

Here is an example of some tab.

  • Blue Midnight as by Charlie McCoy in his “Tribute to Little Walter”

“Misty” 
Lyrics by Johnny Burke, Music by Erroll Garner

Listen to my version in Real Audio.

verse: 
Look at me, 
 ~4    3   2’… 
I’m as helpless as a  kitten  up a tree, 
1   2> 2″    5>.. 5> 6> 5> 4.. 3  2 2>… 
And I feel like I’m clinging to a cloud; 
1>   1 2>  2     3      4  4    4   4′ 4.. 
I can’t un-der-stand, I get misty just holding your hand. (repeat for 2nd) 
4> 3   4>  4      2      3″ 3  4> 2> 2>  2′   2      3″     2 
Bridge: 
You can say that you’re leading me on 
2       3″   3     4      5>     5     5     5   5… 
But it’s just what I want you to do. 
5>   5   ~6    6>  4  5>   5>  6> 5> 
Don’t you notice how hopelessly  I’m lost, 
6>       6    7  8      8>    9>’ 9>’ 9>’ 8> 9>’… 
That’s why I’m foll-ow-ing you. (DS for 3rd verse) 
9>’       9>’ 8> 10>” 9>’ 8> 8 (fill for turnaround)

I just wanted to add a couple comments about Jerry Portnoy’s rendition of Misty. I heard him do it at SPAH 97, and–despite not being that fond of the song before hand–I was blown away by how great a job that Jerry did. He was so attentive to the details.. rhythmic, pitch–especially on the embarrassingly exposed intermediate bends (3 draw whole step (3″) and 2 draw half step (2′) bend), and tone (see note with pitch). It’s a piece where “the slow” is definitely in evidence, less is more.
His tone on the bends was just killer.. very horn like I thought. It’s great practice for those intermediate bends because:
1)the melody is so well known, you’re familiar with what the note must sound like, and 2)the bends are right out there on important sustained notes.. you’ve got to get them clean and strong and pure. There is also some good work on the top end. The 9 blow bend (9>’) is the key note of the melody on the bridge.. you have it hit it without ever getting the unbent 9 blow.. same with the 10 blow whole step bend (10>”).. but you go from 9>’ to and from 8>, so you’ve got to keep hitting the 9>’ plain, without bending into or out of it.

How to Make Your Own Harp Tab

Here’s a great way to easily make your own harp tab. 

  1. Get the shareware program, Melody Assistant, from http://www.myriad-online.com
    Available in several languages for Mac or PC.
    (1a. If you like it and use it, send them the $20 registration fee. Unbelievably reasonable price.)
  2. Search the web for any MIDI song you like, and download it. 
    There are thousands of MIDI files out there for just about any music style you could want, including blues, jazz, classical, pop, rock, country, hymns, etc.
  3. Open the MIDI file in Melody Assistant, select the part with the melody, and give the “Edit Tab” command.

Melody Assistant offers 3 different harp tab styles (as well as guitar tab), and will optionally optimize for breath direction and show overblows. You can specify the key of the harp, so you can get the tab for any position you want.  Plus, it supports all the standard commercial special tunings, or you can define your own tuning!

Presto! That’s it! Now you’ve got tab for any song you can find in MIDI, in any position, for any tuning of harp!

You can even play the MIDI and follow the tab along with the melody as the song plays. This is a  great way to learn new songs.  There are even options that allow you to color the notes, say making blow notes, draw notes, and bends a different color, making the music easier to read.

AND, you can learn to a*sociate standard notation with the harp tab!  This is a super way to learn how to read standard notation, since the harp tab’s right there with the music notation.  It’s also nice because you can get the timing and rhythm information from the standard notation, and use the tab to get the right pitch.

If you don’t find the MIDI song you want, you can always go buy a book of sheet music, quickly enter in the melody, then use Melody Assistant to generate the harp tab.

Diatonic Harmonica Techniques

This table lists a large variety of techniques that can be used for playing the diatonic harmonica.  These are in some order of difficulty, however even simple techniques can require much practice and expertise to master. The harmonica is sometimes called the easiest instrument to play, but the most difficult to master.  While that is certainly arguable, don’t think that becoming an expert on the harmonica is easy or will happen over night, despite what some book titles might lead you to believe…

This table should give you an idea about “where you are” in your ability, and what techniques you still need to master.

I’ve included sample Real Audio clips to demonstrate most of these techniques, where it makes sense.  Some areas, such as embouchure, should not effect the resulting sound to an appreciable degree.  The samples are most all played on a key of A harp.


Diatonic Harmonica Techniques

Technique Remarks Sample
Wow, you can make noise *sucking*
too!
Playing should be done by breathing
through the harmonica
, not by thinking about blowing or
sucking.  We talk about blows and draws, but it’s about inhaling
and exhaling.  The breathing should come from
the diaphragm
.  Breath control is as important in
harmonica
playing as in singing. The air should be slowly inhaled and exhaled.
Practice
playing a note and holding it for as long as you can, being careful not
to get dizzy.  Also practice breathing in as much air as you can..
hold it.. now breathe in a little more, and a little more. 
Practice
breathing in and out as fast as you can–think of a panting dog.
Play
Simple 1st position play (i.e.
“straight
harp”)
Many traditional “camp fire”
songs are easy
for the beginner, like “Oh Susanna”, “Red River Valley”, “Clementine”,
etc.  These are normally played by ear and use 1st position where
the key of the song is the same as the key of the harp.  The
middle
octave is most often used, where a full diatonic scale is available
without
requiring any bends.
Play
Chords and
Chugging Rhythms
The harmonica lets you play
chords as well
as single notes, and the chords are easier to get than single
notes. 
The chords can be used as backing rhythms to compliment melodic
play. 
The tongue block embouchure
is normally used so that chords can be played and then blocked to
produce
single notes.  Chord chugging can make use of rhythmic
breathing patterns
.
Play
Play
Single notes Because of the close proximity of
the holes
on diatonic harmonicas, some technique and practice is required in
order
to get clean single notes.  The way of putting the mouth on the
harp
is called embouchure, and several
different embouchures can be used to get single notes. The main
embouchures
are the pucker or lip
block
, the tongue block,
and the U-block or slotted tongue.
Play
The 2 draw The hole-2 draw is often
problematic for
beginners, and sometimes the 1 draw as well.  Many beginners think
there’s something wrong with the harp, because this note won’t
play. 
The usual reason is a “pre-bend” condition where the mouth/vocal tract
shape causes a flatted note or keeps the note from sounding.  The
beginner should concentrate on a mouth shape for making an “eeeee”
sound,
and might want to let a little air in through the nose at first
to help play the note.  If you can draw holes 1-2-3 and hear the 2
draw note, you know the harp is okay.
Play
Hand techniques Cupping
the
harp with the hands
, and opening/closing the hands and fingers is a
common and traditional way to achieve very characteristic harmonica
specific
sounds.  The key is getting a very air-tight cup with the hands,
which
mutes the sound.  Opening and closing this cup creates the
characteristic
“wah-wah” sound of the harmonica.
Play
Multiple key harmonicas Diatonic harmonicas come in all
different
keys (i.e. C, D, E, … Ab, Bb, F#, etc.). The normal range of harps
from
low to high (such as when harps are offered in a set) is G at the low
end
to F# on the high end, but doubled keys add high G and low harps from D
(or even low C). The sample has chords for A, C, and D harps, 3 of the
most common keys.
Play
Note
articulations 
The tongue can be used to start
or attack
notes differently, which changes the color of the notes and adds
variety
to the sound of the harp.  These articulations can be
associated
with various spoken syllables, like saying “ta” or “ka” or “da” or “ha”
or “ga”, etc.  Articulation can also be done by slightly lifting
the
upper lip off the harp and replacing it in a sort of “biting” or
“kissing”
the harp fashion.  Articulations are easiest using the pucker/lip
block embouchure, but can also be done using tongue blocking.
Play
Shakes A shake is a rapid
alternation between
adjacent holes. Shakes are similar to trills, but the notes are more
than
1/2 step apart. Sometimes shakes are called “warbles”.  Shakes are commonly done by shaking the head from
side to side, but can also be done
by moving the harp from side to side, twisting the harp, or some
combination
thereof.  More advanced shakes can incorporate note bending to add
variety.  The samples are from Stormy Sea II.
Play
Play
Play
2nd position
(i.e. “cross harp”)
2nd position is the most commonly
used approach
to playing blues, rock, and country music.  The scale
for 2nd position
is a 5th higher than the natural key of the harp,
for example, for a key of C harp playing it in 2nd position means
playing
in the key of G.  2nd position starts on the 2 draw and uses
mostly
draw notes, especially on the low end of the harp, rather than mostly
blow
notes as in 1st position (the key of the harp).  The draw notes
provide
more possibilities for bends and expressive vibrato than the blow notes.
Play
Draw
Bends

as ornaments 
When beginners first achieve draw
bends,
which are available on holes 1-6, they are primarily quick changes from
the natural note, like a quick flattening of a note continuously
bending
a little down and then back up to the primary note.  In other
words,
the bent notes are not used as notes in their own right.  The note
bends, but the player has little control over the depth and duration or
the note. The sample has a thin weak sounding draw bend, and is an
example
of what NOT to do.
Play
Blow Bends as ornaments Blow bends are available on holes
7-10. 
The sample has a thin weak sounding blow bend, and is an example of
what
NOT to do.
Play
Dip bend A dip bend is a quick smooth bend into the note to be
played. 
This technique is frequently used to ornament notes, especially on the
draw notes.  It is done by initially attacking the hole as a bent
note, then gradually releasing the bend to slide into the final
note. 
Or, the hole can be started unbent, and a smooth gradual
bend can be used to slide into the final bent note.  The sample
clip
is from Stormy Sea II.
Play
Glissando A glissando is a sequence of notes played in rapid succession
that
ends on the primary note to be played.  Play a single note and
then
slide the harp around in your mouth.. that is essentially a
glissando. 
The notes in a glissando are not individually articulated, but are
played
as a single continuous physical movement.  A “ripped” glissando is
essentially an articulation of the final note.  The sample clip is
from Stormy Sea II.
Play
Diaphragm
Tremolo
Diaphragm tremolo is distinct
from throat
vibrato
, and as its name implies it emphasizes the diaphragm
instead
of the throat, though each is used to a certain degree. It is
characterized
by a volume oscillation tremolo as opposed to a pitch oscillation
vibrato. 
However, when using vibrato on a held bend, the diaphram is used to
gently
add the tremolo, and the pitch will vary due to the pressure changes.
Diaphragm
tremolo is basically achieved by repeating “ha ha ha ha” as when making
a laughing sound.  The sample tremolo is somewhat exaggerated so
you
can easily hear it.  Often the term vibrato is used instead of
tremolo
to mean either vibrato or tremolo.
Play
Draw
Bends

for note production:
– Full bends 
– Intermediate Bends
Draw note alterations are
so-called
bends that alter the natural pitch of a note to a different usable
on-pitch
note. The word “bend” implies a continuous pitch change, but bends on
the
harmonica do not have to be changes from other notes–in other words, a
bend as an altered note can be played separately from other notes, and
the natural note need not be played at all.  Draw bends in holes 2
and 3 have bend ranges more than a single half step (semi-tone), while
draw bends in holes 1, 4, and 6 have a half step range.  Bends
tend
to alter most easily to the extreme range, called a full bend,
and
notes between the natural note and the most altered note are called intermediate
bends,
and are more difficult to achieve, control, and maintain on
pitch than normal bends.  The sample has a number of draw bend
notes
mixed in with normal notes.
Play
Blow Bends for note
production 
Holes 8 and 9 have a half step
blow bend,
while hole 10 has a whole-step bending range.
Play
Rhythm and melody together (i.e. vamping) Using a tongue
blocking
technique, rhythm chords and melody can be played at the
same
time.  Normally a chord containing the melody note is played, and
then notes of the chord are blocked from being played by using the
tongue. 
Similar effects can be achieved with a lip block by opening and closing
the embouchure or rolling the harp up at the back to go from a chord to
a single note.  This technique is often used on the bottom 3 holes
where lip blocking is more difficult.
Play
Playing from a Rack A rack is a device that holds the harp so you can
play hands-free. 
Usually the rack goes around your neck.  Often a “wing nut” is
used
to hold the rack tight at a pivot point, and often the rack will slip
and
push away from your mouth.  Using two conical washers or a lock
washer
can help keep the rack tighter.
n/a
Amplified
play
Traditional blues style harp is
played amplified
through a microphone

The mic and the amp work together to produce the sound, and what you
should
get depends on what you like to hear.  Traditional mic’s are
bullet
shaped vintage or vintage reissued models like the Shure
Green Bullet, Astatic JT30
, Hohner Blues Blaster, etc., though
many
players use ordinary vocal mics such as the Shure SM-57 and
SM-58. 
The Shaker brand mics are smaller, lighter and easier to cup than
traditional
bullet style mics  Tie clip electret mics can also be used, and
these
are easier to cup tightly and produce acoustic-style hand effects. Preferred amplifiers
are normally tube amps
, and vintage
Fender
amps are highly valued as harp amps.  Popular amps include the
Fender
Bassman, the Bassman ReIssue (RI), the Fender Champ, Fender Princeton,
etc.  Many players prefer amps with reverb, or use separate reverb
“tanks”.  Digital or analog delay pedals are a common effect in
amplified
play.
Play
Slurs and
double stops
A slur is where a bit of
an adjacent
note is played along with the primary note.  A double stop
is where two notes are played at the same time with essentially equal
strength. 
Double stops can be played using bent notes and combinations of bent
and
un-bent natural notes, especially on holes 1-4.  It is even
possible
to play an overblow so that both reeds sound and two notes are
generated. 
A slur has a primary note and a softer secondary note. Slurs can add a
“bite” to a note, especially when amplified.  When playing 2 notes
together think about 1)Blending the sound or 2)giving each note its own
voice.  The sample has first a slur, then a double stop for the
same
notes. Notice how much smoother the slur sounds.
Play
Split Intervals 
– 4-hole octaves 
– 5-hole octaves
Split intervals are notes
that are
played that have intervening notes blocked out, normally by the tongue.
The most common split interval is an octave, for example holes 1 and 4
blow or draw at the same time, with the tongue blocking out holes 2 and
3.  Hole 4 and 8 draw also form an octave, with holes 5, 6, and 7
blocked out.  The sample plays single notes an octave apart, then
together, for both blow and draw octaves.
Play
Octave Shakes An octave split interval is played and rapidly alternated
with an adjacent
octave, as in a 2-hole shake with single notes, by shaking the head
and/or
harp.  This effect is heard relatively infrequently on the
diatonic,
but was used by classic blues harpers like Little Walter on songs like
“Blues With A Feeling” and “Got My Mojo Working”.  This is a
commonly
used effect on blues chromatic, and the sample is played on a Hohner
Super
64X.
Play
Resonance 
Vocal tract
– Hands/cup
Resonance is a
reinforcing
of sound waves that amplifies a note.
  Achieving good tone
on a harmonica requires resonance, and tuning the vocal tract to the
note
being played.  This requires opening the vocal tract and playing
“from the diaphragm”
. Hand resonance can add to the player’s vocal
tract resonance and further amplify a note.  Very minute changes
to
the hand cup can produce or eliminate this resonance. The samples were
played with the same force of breath.  The differences in volume
are
due to the added resonance.  Notice how the tone goes from thin
and
weak to full and strong.
Play
Play
Vibrato Throat vibrato is a slight
wavering of a
note’s pitch similar to the effect singers use. Throat vibrato, as
distinct
from diaphragm tremolo, is mainly
felt
in the throat as a pinching of the air stream.  In reality both
throat
vibrato and diaphragm tremolo use elements of both the throat and the
diaphragm,
but the emphasis is different as the names imply.  Throat
vibrato is a very important technique that should be learned by
everyone.
 
It is very frequently used and adds much to the tone
and note shaping capabilities of the harp.  There are other types
of vibrato that can be achieved by moving the mouth or the lips. 
A slight chewing motion, or chin vibration produces a kind of vibrato,
as does a motion similar to whistling a vibrato.  Similar vibratos
can be achieved by articulating “oy oy oy” or “yo yo yo”.  These
non-throat-vibrato techniques are especially useful on bends and
overbends, as well as notes that don’t respond as well to throat
vibrato.
Play
Tongue Slap A tongue slap is a
technique where
a chord is played for a brief time, then all but one or two notes are
suddenly
blocked out with the tongue.  The air that had been flowing
through
normally 4 holes is suddenly diverted to 1 or 2 holes, and the sudden
blocking
of 2 or 3 holes causes a kind of slapping sound.  The sample is
exaggerated
to highlight the effect. The tongue slap is one of the characteristic
techniques
often used with the tongue block embouchure, and serves to thicken up
the
sound of the harp and punctuate single notes.
Play
Flutter
tongue/tongue
lift effects (i.e. rapid vamping)
A flutter tongue or rapid
vamping
technique
is where (normally) a split interval is played and the tongue is
rapidly
and repeatedly removed and replaced off and back onto the blocked
notes. 
It causes a rapid switching between a chord and an interval like an
octave,
or even a single note.  The sample first plays an octave slap,
then
the rapid alteration between a chord and the octave, for both blow and
draw.
Play
Tongue Rolls  A tongue roll is where a note is
played and
the tongue is vibrated or rolled as in a Spanish-style rolled-R. 
This is a seldom used effect more than a normal playing technique.
Play
Whoops A “whoop” is using your voice to
whoop or
holler while playing the harp. This is normally a seldom used effect
rather
than a standard playing technique. You can also do barks, clicks, and
other
mouth or voice effects in conjunction with playing the harp. 
Sonny
Terry and Peter “Madcat” Ruth make frequent use of this kind of effect.
Play
Growl A growl is an effect used in
conjunction
with deep draw bends. The soft palette at the back of the mouth is
relaxed
and allowed to vibrate; it’s kind of like snoring while playing. 
This vibration along with the bent note causes the growl sound.
Play
Back-Pressure Chords By using a very air tight hand cup it is possible to play the
harmonica
backwards, by having air enter through the back of the harp in addition
to through the front.  In essence, your cup is so tight that when
you play a note the air pressure builds up in your hand cup and flows
back
into the harp.  Similarly, a draw note causes enough of a vaccuum
to suck air into the harp through other non-played holes.  You
block
the holes you don’t want to sound with your thumb or finger and use the
back-pressure activated notes along with the played note to create new
chords.
Play
3rd position
(i.e. “draw harp”)
As 2nd position is playing in a
key a 5th
above the natural key of the harp, 3rd position is playing in a key
another
5th higher than the natural key of the harp, e.g. for a key of C harp,
2nd position is the key of G, and 3rd position is D. 3rd position play
starts on the hole 1 or 4 draw. The natural mode of 3rd position is a
minor
key so 3rd position is often used to play with minor key songs.  A
complete 3rd position blues
scale

is available on the first two octaves, so this is a common position for
blues next to only 2nd position in frequency of use.  The sample
is
the blues scale in 3rd position.
Play
Knowing where you are Beginners usually don’t know
right where they are on the harp at all times, while expert players
usually do.  As you gain more techniques like bends and overbends,
it becomes important from a technique standpoint (separate from a
musical standpoint) to know where you are because each hole plays
differently; some bend well, some don’t, some bend more or less than
others, some are draw bends and others are blow bends, some holes are
good for overbends and others not so much.  Musically, you need to
know what note you’re on, and where the other notes are.  You need
to become extremely familiar with the harp note layout, both within a
hole and across the harp.
Able to go where you want Once you know where you are, you
need to be able to visualize where you want to go, and you need to be
able to get there accurately.  This is more difficult when you are
going to holes not adjacent to the current one.  Corner switching
from a tongue block embouchure can make octave jumps and other
intervals easier to hit accurately than pucker/lip-blocking since the
mouth doesn’t have to move far because the tongue is moving too.
Playing both ends of the harp There are usually 2 different
octaves (sometimes 3) where you can start playing your song, lick,
riff, or phrase…the bottom end and the top end.  You should be
able to play the same thing starting in different octaves, as long as
you don’t run out of harp.
Special Tunings  Special tunings are modifications
to the
standard diatonic layout of notes, which is the Richter
tuning. 
Common special tunings include the natural minor, which provides a
minor
key for normal 1st and 2nd position playing, the Lee Oskar Melody
Maker,
which raises the b7ths (i.e. hole 5 draw) to Maj7th and raises hole 3
blow
a whole step, Steve Baker Specials which adds a duplicate of the low 3
holes as the 1st 3 holes an octave lower, country tuning, etc. etc.
These
special tunings make playing certain styles easier than using normal
Richter
tunings. The sample has chords from a Melody Maker tuning, a Natural
Minor
tuning, and a rare tuning called Tempting.
Play
Train
Songs
Train songs use train-like
rhythms on chords
on the low 3 holes, and work best on lower key harps (like G and
lower).
A train whistle is simulated by drawing holes 3 and 4 at the same
time. 
One articulation that mimics a train is “Tah hooka tooka hooka” where
only
the “hooka” is played exhaling, and many variations on that theme, like
“Tooka hooka tah hooka”.  Other fast tongue articulations can be
used
to augment the breathing pattern,
such as “diddly hooka diddly hooka tah hooka diddly hooka”.
Play
Multiple Embouchures The 3 primary embouchures
are the puker/lip block, the tongue block, and the (relatively seldom
used)
U-block. The lip block and tongue block can be used for different
effects,
so it is good to learn and use both and be able to switch back and
forth
easily depending of the effect you want.  Many players believe the
best blues tone can only be achieved by using the tongue block. 
Many
effects and techniques require use of the tongue block embouchure.
Subtle effect on player’s tone
Playing out of both corners (of
the mouth);
TB left and right
Tongue blocking is typically done
with the
tongue blocking holes on the left with the single note being played by
the right corner of the mouth.  It is also useful to be able to
block
on the right and play out of the left corner, for fast accurate note
jumps
(corner switching) and playing holes 1-3.
It’s how, not what you hear
Bends from all embouchures and
corners
Many players bend from one
embouchure, like
a pucker/lip block, and not from another, like the tongue block. 
It is best to be able to bend from all the different embouchures and
both
sides of the mouth.
It’s how, not what you hear
Split interval bends It is possible to bend both
notes of a split interval, e.g. an octave, at the same time.  You
can also bend one note of an interval to form an octave, for example
the 3 draw whole step bend (3″) and the 6 draw.
Tongue
Switch Shimmer 
The tongue switch shimmer is an
effect where
the tongue is rapidly switched from side to side to allow opposite
corner
holes to sound.  This can be done extremely rapidly.
Play
Draw Bend Vibrato Getting a smooth vibrato
on draw bends requires a delicate control and balance between the
throat
and the diaphragm. Without this delicate control the vibrato becomes
very
chunky.  The sample is a hole 2 half step “intermediate” bend.
Play
Blow Bend Vibrato Blow bend vibrato also requires a
more delicate
control than vibrato on straight “unbent” notes.
 Play
Speed Speed playing requires note and
rhythmic
accuracy and control of rapid changes to breath direction.  It is
easy to overuse speed, which can detract from musical expression. 
The sample is a clip from Stormy Sea II.
Play
12th Position 12th position (sometimes called
“1st flat”) is the key with one more flat than the key of the harp, or
equivalently a 4th above the key of the harp.  For example, on an
F harp 12th position is the key of Bb.  12th position is useful
for melodic play in a major key. To play 12th on the bottom of the harp
you need to be very good at the 2 draw whole step bend and the 3 draw
whole step bend.
Positions
4-12
Learning positions 4-12 requires
additional
familiarity with the diatonic note layout.  The natural scales
associated
with position play correspond to various modes.  Best use of these
positions requires the ability to play chromatically by using either valves
or overblows.  5th and 12th
positions
are particularly useful.
n/a
No speed needed Sometimes speed can be used as a
crutch to
hide defects in playing. Attention to details and nuance of note
formation, tone,
timing, and phrasing can require more expertise than merely playing
fast. 
Details and mistakes are more exposed during slow play than during fast
passages.  Speed is best when the precision and nuances required
for
beautiful slow play are incorporated in the fast passages as
well. 
The sample is a clip from Misty.
Play
Valved
Bends
Valved bends use only a single
reed for the
bend, rather than both reeds as in a  normal diatonic bend. 
Valved bends have a greater potential range than normal bends, but
require
a different attack and bending approach.
Play
Overbends
(i.e.
overblows and overdraws)
Overblows and overdraws activate
the opposite-than-normal
reed as an opening reed as opposed to the normal closing
reed activation.  Overblows activate the outer “draw” reeds to a
note
about 1/2 step above the natural draw note, while overdraws activate
the
inner “blow” reeds to a note about 1/2 step above the natural blow
note.
Overblows require relatively narrow or tight reed
gaps
.  Achieving overbends requires much more focus and
finesse
than ordinary bends, with much stricter requirements on mouth/throat
shape
and pressure.
Play
Bending overbends and overbend
vibrato
It is possible to bend the pitch
of overblows
and overdraws, and add effects such as vibrato
to the overbends.  Overbends themselves require much greater
facility
with the harp than normal bends, and further bends and effects require
still greater control and expertise.  The first sample for bending
an overblow (hole 6) is a clip from Stormy Sea II on a C “Golden
Melody”. 
The second sample is a hole 7 overdraw with vibrato followed by a 7
blow
with vibrato.
Play
Play
Chromatic play By using overbends and/or valved
(isolated
reed) bends in addition to normal bends and the natural notes it is
possible
to play every note on a diatonic harp, that is, to play a diatonic
chromatically. 
This adds enormous capability to the diatonic and especially position
play. 
However, it is extremely difficult to get tonal or timbral consistency
between unbent, bent, and overbent notes.
See “Jazz” sample
Jazz The ability to play the diatonic
chromatically
brings jazz into the realm of the diatonic.  Jazz is a difficult
genre
on any instrument, and especially so on an instrument such as the
diatonic
that requires advanced techniques to make available all the chromatic
notes. 
The sample is the song Blue Monk using a normal and a low Eb, 2nd
position.
Play
Counterpoint Counterpoint is more than one
melody at the
same time. By sophisticated use of single notes, double-stops, playing
out of both sides of the mouth, and split intervals, simultaneous
melodies
can be played on the diatonic harp.  Diatonics have one advantage
over chromatics in this area because wider splits are possible due to
the
smaller hole size of diatonics as compared to chromatics.  Special
tuned harps are often used for counterpoint play.
Listen to Richard Hunter
<!-- Play -->
Chromatic play in all keys Since a single diatonic harmonica
has all
chromatic notes available (though some have a different timbre than natural notes), it is possible to play every key diatonic in
every key.  This of course requires a great deal of practice and
study.. very few can do it.
Listen to Howard Levy


How to Hold your Harmonica?

How to hold harmonica? That is problem which many people ask HarmonicaTabs. As many people know: holding a harmonica properly is the first step toward playing it successfully. If you’re a lefty, follow these instructions but reverse the left and right hands. 
Make sure the harmonica is right-side up: The holes of the harmonica should be facing you, with those that produce the lowest notes on the left and those that produce the highest notes on the right.
Most harmonicas have the numbers 1–10 embossed on the top cover plate over each hole. The leftmost hole should be numbered “1,” and the rightmost hole should be numbered “10.”

Diatonic

Hold the body of the harmonica in the left hand between the thumb and index finger. The three remaining fingers will then be curved slightly, to form a small resonating space. Place the flat of your right hand over the harmonica (not the mouthpiece side!), and enclose it, forming a tight cup. Optimally, the cup should form a large resonating space.

Tremolo

 With the left hand, hold the harmonica somewhere around the left of the center. If one has the strength, hold the harmonica with the thumb and index finger, and let the three remaining fingers curl together to form a resonating space. With the right hand, hold the harmonica somewhere around the right of the center.
If one has the strength, hold the harmonica with the thumb and index finger, and let the three remaining fingers curl together to form a resonating space. The fingertips of both hands should touch each other, while the palms face each other. Some players also recommended crossing the fingers to ensure a good resonation is formed, but this may hinder the movement of the harmonica.

Chromatic

There are quite a few variants for holding a chromatic. One is a deviation of the diatonic hold, using the right thumb to work the slide button. This is particularly used by Blues player, which often play Chromatic in 3rd position only.
The other popular variant is very similar: With the left hand, hold the harmonica somewhere around the left of the center with the thumb, index and middle fingers. Then twist your right hand along the wrist, so that the fingers point to a two o’clock position and palm facing up.
Place the right palm at the bottom of the harmonica (usually sit right below the left thumb) and wrap all the fingers except the index fingers around the harmonica. If done properly, the right wrist will form a right angle. Your index finger will be touching the slide button, and will always be touching there, regardless if you use the button or not.

If it’s a 16-hole variant, hold it in similar manner, except your cup will be located closer to the center. Alternatively, break up the cup.

How to hold harmonica with 10 steps

[toc heading_levels=”3,4,5″]

Step 01. Place the harmonica between your left index finger and thumb

Step 01. Holding Your Harmonica

. Hold your thumb and index finger parallel as if you were about to pinch something. Place the harmonica between the two fingers, pushing the left end inside your purlicue (the skin between the pointer finger and thumb).

Step 2. Position the instrument so its lowest note is on the left.

How to hold Harmonica - Holding Your Harmonica step 2

To properly play a harmonica, make sure its lowest note is on your left side. If the notes are not engraved on the instrument’s cover plate, blow on both ends to find which side is lower.

Step 3. Leave the lip of the harmonica exposed.

How to hold Harmonica - Holding Your Harmonica step 4

To leave room for your mouth, make sure about half the harmonica is exposed. When blowing, keep your thumb and index finger back so you do not have trouble connecting with the instrument.

Step 4. Cup your right hand around the harmonica to create an air seal.

How to hold Harmonica - Holding Your Harmonica step 3

While holding your harmonica, place your hands next to each other so they are straightened out with knuckles down. Move your right hand up so the tip of your left ring finger lines up with the tip of your right pinky. From this position, roll your hands together to create a sealed air pocket between your harmonica and palms.[

  • Make sure to close large and noticeable gaps, especially at the back of your hands and around the harmonica itself.
  • There is no way to make a complete seal using your hands, so don’t worry about tiny gaps.

Step 5. Place your right thumb in front of the harmonica for control or comfort.

How to hold Harmonica - Holding Your Harmonica step 5

If your thumb is uncomfortable or you’re having trouble controlling the harmonica, try placing your right thumb in front of the instrument’s high notes. Just make sure to move it 

Step 6. Hold your right elbow in

How to hold Harmonica - Holding Your Harmonica step

When playing, make sure to hold your right elbow flush against your side. This will help prevent arm, shoulder, and neck strain, as well as give you greater control over your hand techniques.

Step 7. Slide your harmonica to change notes

How to hold Harmonica - Holding Your Harmonica step 7

To change from one note to another, slide the harmonica right or left in your mouth. Most harmonicas will have between 10 and 16 notes to create sound, though specialty harps may have more. Most consumer harmonicas are locked to one key with note variations made by changing how you blow.

Step 8. Keep your hands closed to create low tones

How to hold Harmonica - Holding Your Harmonica step 8

Play the harmonica with your hands fully closed to create low, bass-heavy notes. The tighter your hands are, the bassier the note will sound. This technique is used heavily in blues music

Step 9. Open your hands to create high tones

How to hold Harmonica - Holding Your Harmonica step 9

To play higher, brighter-sounding notes, open your hands to let more air escape. Instead of sad, muted tones, this will give you the bright, bouncy ones used throughout folk music.

Step 10. Open and close a section of your hand to create wah wahs

How to hold Harmonica - Holding Your Harmonica step 10

To create the classic warbling sound harmonicas are known for, move your right hand to create a small passage where air can escape. When you rapidly open and close this passage, you will create wah wah sounds. Some areas to open your hand include:

  • Behind the harmonica, done by slightly twisting your right hand.
  • On top of the harmonica, done by extending the fingers on your right hand.
  • Below the harmonica, done by bottoming out your right wrist.

Source: Internet.